1. The Quick Specs: Mt. Guiting-Guiting (G2) Profile
The hike to Mt. Guiting-Guiting (G2) is rated as a Difficulty 9/9 Major Climb, the highest classification in the Philippines. Standing at 2,058 MASL on Sibuyan Island, it features a Class 5 trail defined by the technical “Knife Edge” ridge traverse. The standard expedition requires 3 to 4 days. It is strictly for experienced mountaineers.
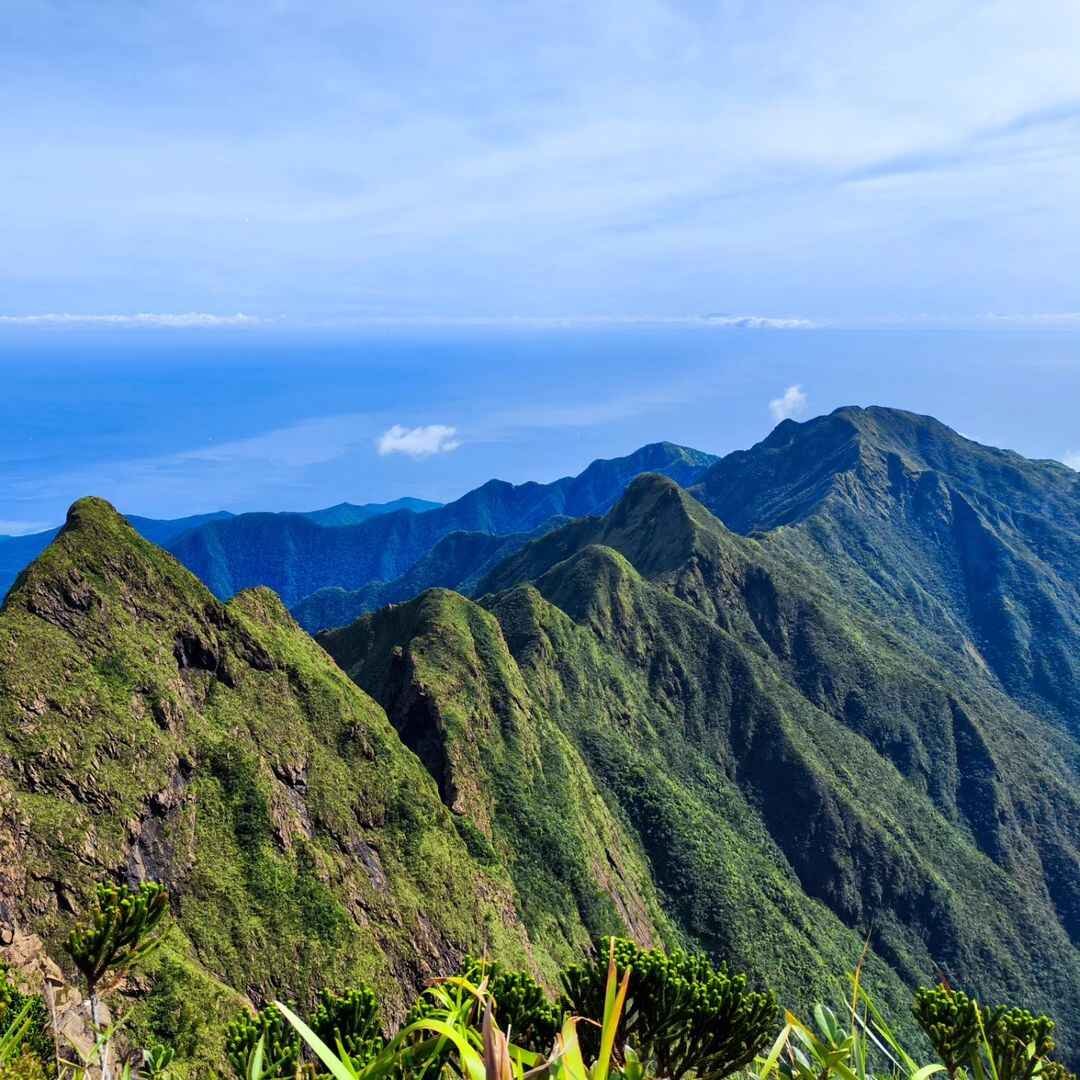
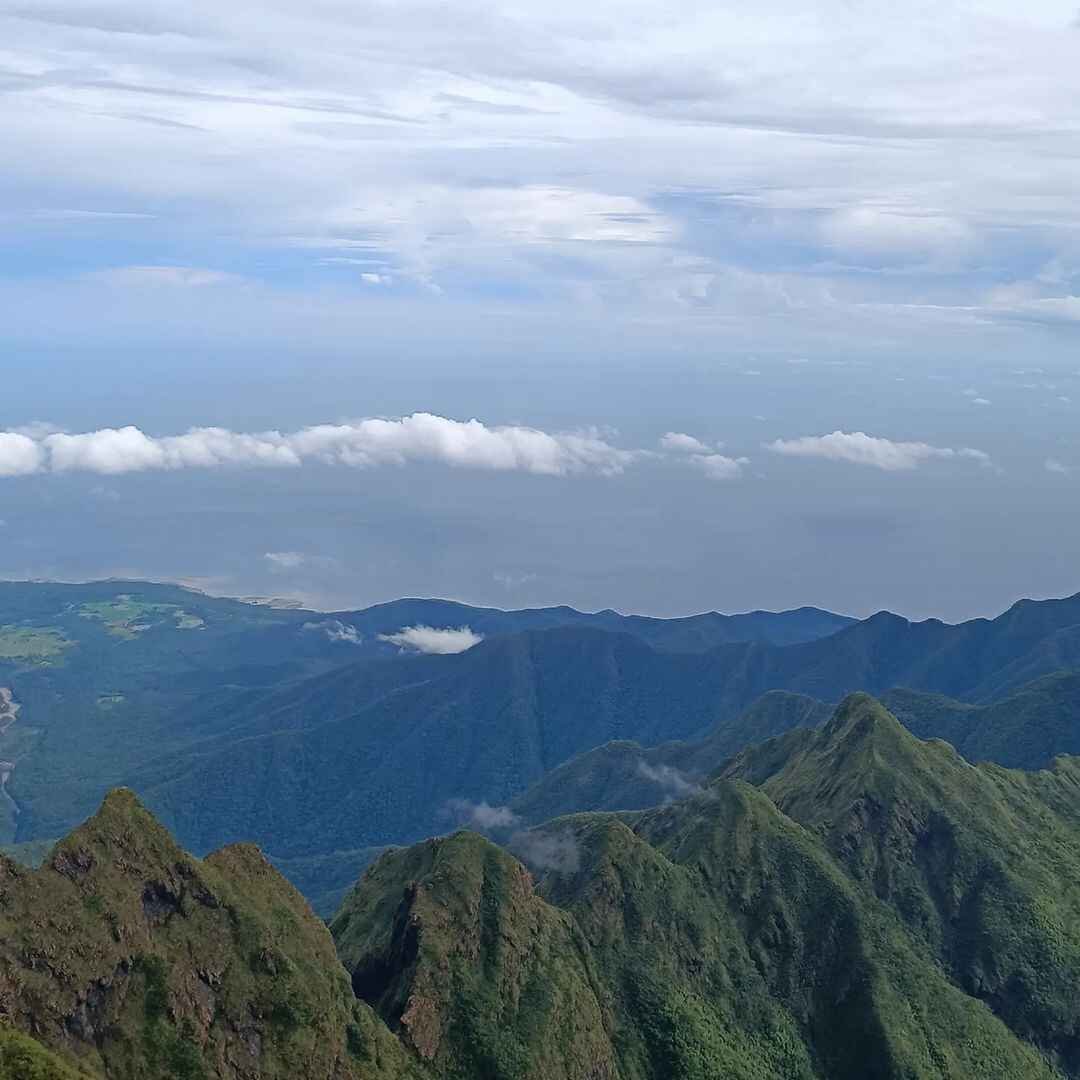
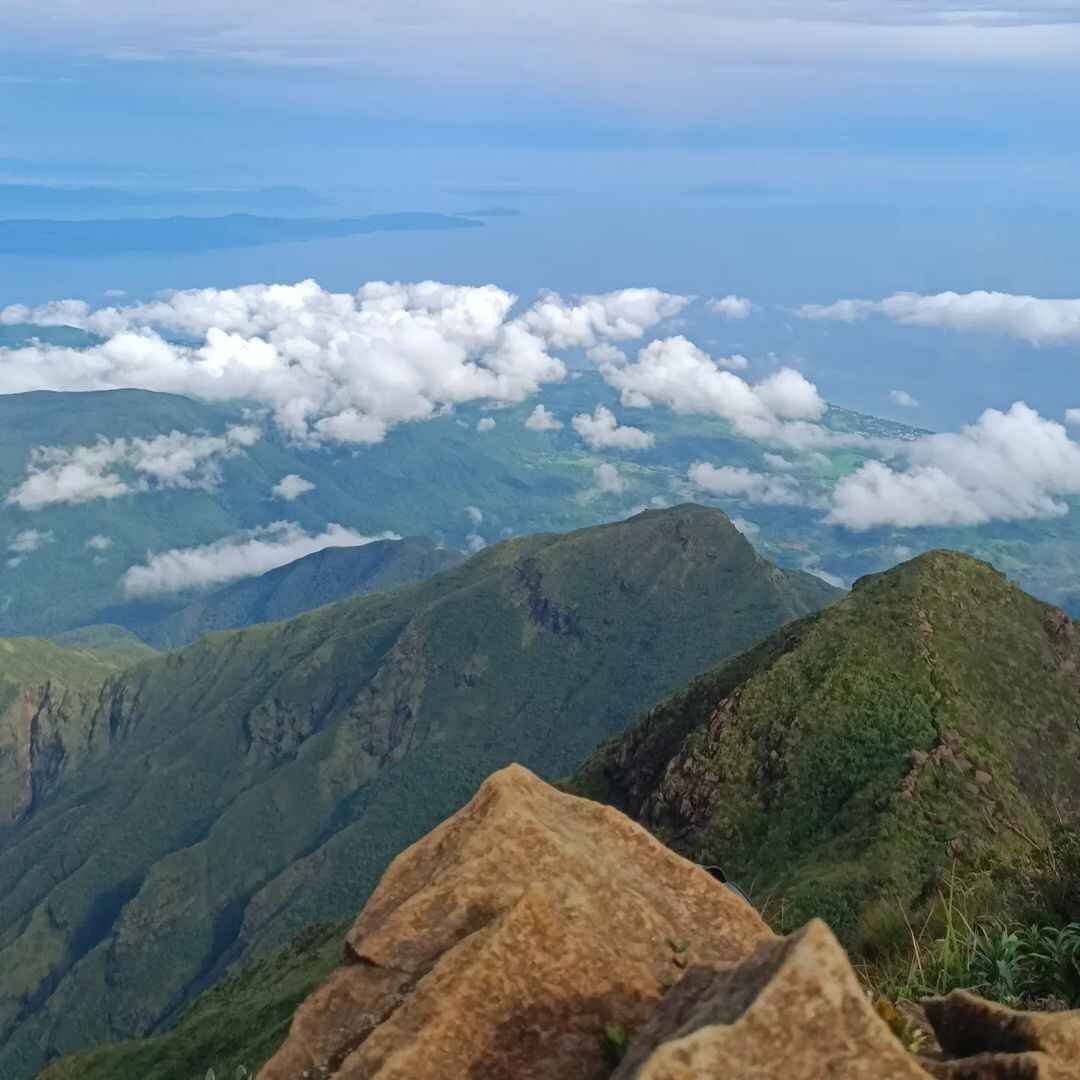
If you are scouting your next major expedition, understand that the Mt. Guiting-Guiting difficulty rating is not an exaggeration. This mountain does not just test your cardio; it tests your technical ability to move over complex terrain. Known as the “Galapagos of Asia” due to its isolation in the Sibuyan Sea, G2 is a lifted mountain composed of ultramafic rock, meaning the trail is jagged, sharp, and unforgiving on gear. Along with Mt. Halcon in Mindoro and Mt. Mantalingajan in Palawan, it completes the fearsome “Knife Edge Trilogy.”
Here is the essential profile for your Mt. Guiting-Guiting hike guide:
| Specification | Details |
| Elevation | 2,058 Meters Above Sea Level (MASL) |
| Location | Magdiwang (Entry) / San Fernando (Exit), Sibuyan Island, Romblon |
| Difficulty Rating | 9/9 (Pinoy Mountaineer Scale) |
| Trail Class | Class 5 (Requires scrambling, rock climbing, and use of hands) |
| Standard Duration | 3 Days (Backtrail) or 4 Days (Traverse) |
| Limatik Presence | High (Especially in the lower dipterocarp forest sectors) |
| LGU / Park | Mt. Guiting-Guiting Natural Park (MGGNP) |
The “9/9” Reality Check
Unlike volcanic peaks like Mt. Kanlaon or Mt. Mayon, where the challenge is often the gradient or sulfur, G2’s difficulty comes from the “Knife Edge.” This serrated ridge exposes you to the Amihan winds and sheer drops on both sides. The path often narrows to a few feet, and trekking poles become useless hazards here—you need your hands free to grip the rock.
Insider Tip: When we say the rocks are “ultramafic” and “jagged,” we mean they are abrasive. I highly recommend wearing gloves (garden or industrial gloves work better than expensive trekking gloves here). I have seen branded hiking boots get shredded by the sharp rocks on the descent to Mayo’s Peak. Do not underestimate the wear and tear on your gear.
The Knife Edge of Sibuyan
Mt. Guiting-Guiting (G2) in Romblon is a Difficulty 9/9 Major Climb, rising to 2,058 MASL. Famous for its hazardous “Knife Edge” ridge and “Galapagos of Asia” biodiversity, this technical hike requires 3-4 days to traverse. It is part of the “Knife Edge Trilogy” and strictly requires a DENR permit and licensed guide.
Rising to 2,058 Meters Above Sea Level (MASL), G2 is the highest peak in Romblon and the centerpiece of the Mt. Guiting-Guiting Natural Park (MGGNP). In the mountaineering community, it holds a revered spot in the “Knife Edge Trilogy,” standing shoulder-to-shoulder with Mt. Halcon in Mindoro and Mt. Mantalingajan in Palawan as the country’s most formidable peaks. The trail is rated Class 5, demanding full focus, three-point contact scrambling over sharp ultramafic rocks, and the mental fortitude to push through the “Walk in the Park” (an ironically named section of jagged boulders).
I have crossed this ridge during both the sweltering Dry Season (March-May) and the blustery Amihan season, and the mountain demands respect every single time. The “bonsai” forests of the summit may look serene from afar, but up close, the exposure is terrifyingly real. Whether you are planning a traverse from Magdiwang to San Fernando or the traditional backtrail, preparation is your only safety net. Let’s get your logistics sorted.
Table of Contents
Pre-Climb Requirements & Permits for Mt. Guiting-Guiting(NEW RULES)
Permits are mandatory and hiking G2 now requires extensive proof of experience. You must possess a Basic Mountaineering Course (BMC) certificate and have completed two major climbs within the past six months. Medical certificates must be secured locally in Sibuyan, and a local Police Clearance is required.
Because Mt. Guiting-Guiting is a protected sanctuary, the DENR Park Superintendent and local LGU have recently implemented some of the strictest mountaineering requirements in the country to ensure climber safety. You cannot simply show up at the Barangay Tampayan jump-off anymore.
To ensure your G2 Sibuyan itinerary proceeds, prepare these documents. Remember, you must submit your itinerary one day in advance.
Proof of Training: All mountaineers must possess a Basic Mountaineering Course (BMC) certificate or a valid first aid training certificate.
Climb History: You must present proof that you have completed two major climbs within the past six months.
Sibuyan Medical Certificate: You can no longer bring a medical certificate from Manila. You must secure medical certificates in Sibuyan, preferably a day prior to the climb.
Police Clearance: You must obtain a police clearance by registering at the police station in your corresponding entry town (e.g., Magdiwang or San Fernando).
Quota System: Climbing slots are allocated on a daily basis; if the maximum number of climbers is reached, no additional permits will be issued.
Insider Tip: Do not plan your arrival on the same day as your hike. The new rules explicitly state that “No same-day climbs are allowed”. You need that buffer day to visit the local Magdiwang clinic and police station to secure your local paperwork.
How to Get There: Crossing the Romblon Gap
The most direct way to get to Mt. Guiting-Guiting from Manila is to take a bus (JAM Liner/DLTB) to Batangas Port, then board the Starlite Ferries RoRo vessel bound for Magdiwang Port, Sibuyan. The ferry typically departs daily at 4:00 PM. Alternatively, you can fly to Roxas City (Capiz) and take a 1:00 PM ferry crossing to Magdiwang.
Reaching Sibuyan Island is the first crux of the expedition. Unlike accessible Luzon peaks, G2 is separated by the “Romblon Gap,” meaning your Mt. Guiting-Guiting hike guide logistics rely heavily on maritime schedules. You must time your departure from Manila perfectly to catch the single daily trip from Batangas, or risk being stranded for 24 hours.
Option A: The Direct Route (Batangas to Magdiwang)
This is the standard approach for most hikers. It minimizes transfers but requires a long sea voyage.
Step 1: Bus to Batangas Pier. Take a bus from Buendia (Gil Puyat), Cubao, or PITX. Operators like JAM Liner, DLTB, and ALPS run 24/7.
Travel Time: 3 to 4 hours via SLEX/STAR Tollway.
Fare: Approximately ₱265 – ₱340.
Tip: Leave Manila by 11:00 AM. You need a buffer for traffic in Sto. Tomas and the often chaotic security check at the terminal.
Step 2: The Starlite Ferry. Starlite Ferries is the dominant carrier servicing the Batangas to Magdiwang route.
Departure: Typically 4:00 PM (Daily).
Arrival: 6:00 AM – 10:00 AM the next day (stopover in Romblon, Romblon).
Fares (2026 Est.): ₱1,500 – ₱1,800 (Economy/Reclining) to ₱2,000+ (Tourist).
LakbayPInas Tip: Do not trust the “Daily” schedule blindly during Amihan season (November-February). Gale warnings frequently cancel trips. Also, if you are hiking during Holy Week, book your tickets online at least 30 days in advance. I have seen dozens of chance passengers sleeping on the concrete floor of Batangas Port because the vessel was fully booked.
Option B: The “Plan B” (Via Roxas City)
If the Batangas route is fully booked or you prefer less travel time, the southern backdoor is a viable G2 Sibuyan itinerary alternative.
Fly: Take a flight from NAIA to Roxas City Airport (RXS).
Transfer: Take a tricycle to Culasi Port in Roxas City.
Ferry: Board the Starlite Ferry from Roxas to Magdiwang.
Schedule: Usually departs at 1:00 PM (Check daily rotation).
Travel Time: Only 5-6 hours, significantly shorter than the Batangas leg.
Local Logistics: Magdiwang to Jump-off
Once you dock at Magdiwang Port (Ambulong), you are still a few kilometers from the trailhead. Public transport is scarce.
Tricycle Transfer: Hire a tricycle to the DENR Office in Barangay Tampayan.
Cost: ₱150.00 per trip (Special trip, good for 3-4 pax + packs).
Short Haul: From Manong Lee’s House to the port is about ₱50.00.
Coordinators: Successful teams often pre-arrange rides with local legends like Manong Lee or Kuya Remy Rebiso. They can have a tricycle waiting for you as you disembark, saving you from haggling with drivers at the pier.
Trail Analysis & Camp Features
The primary campsites on Mt. Guiting-Guiting are Camp 1, Camp 2, Camp 3 (1,270 MASL), and Mayo’s Peak (1,550 MASL). Most hikers use Mayo’s Peak as the assault camp. The last reliable water source is Bulod’s Spring, located 15 minutes from Mayo’s Peak. There is NO reliable water source on the Knife Edge or Summit.
Understanding the anatomy of the Mt. Guiting-Guiting trail is critical for your survival. The hike is a tale of two mountains: the wet, suffocating jungle below and the dry, exposed rock above. You must switch your mindset—and your gear—as you ascend past Camp 3.
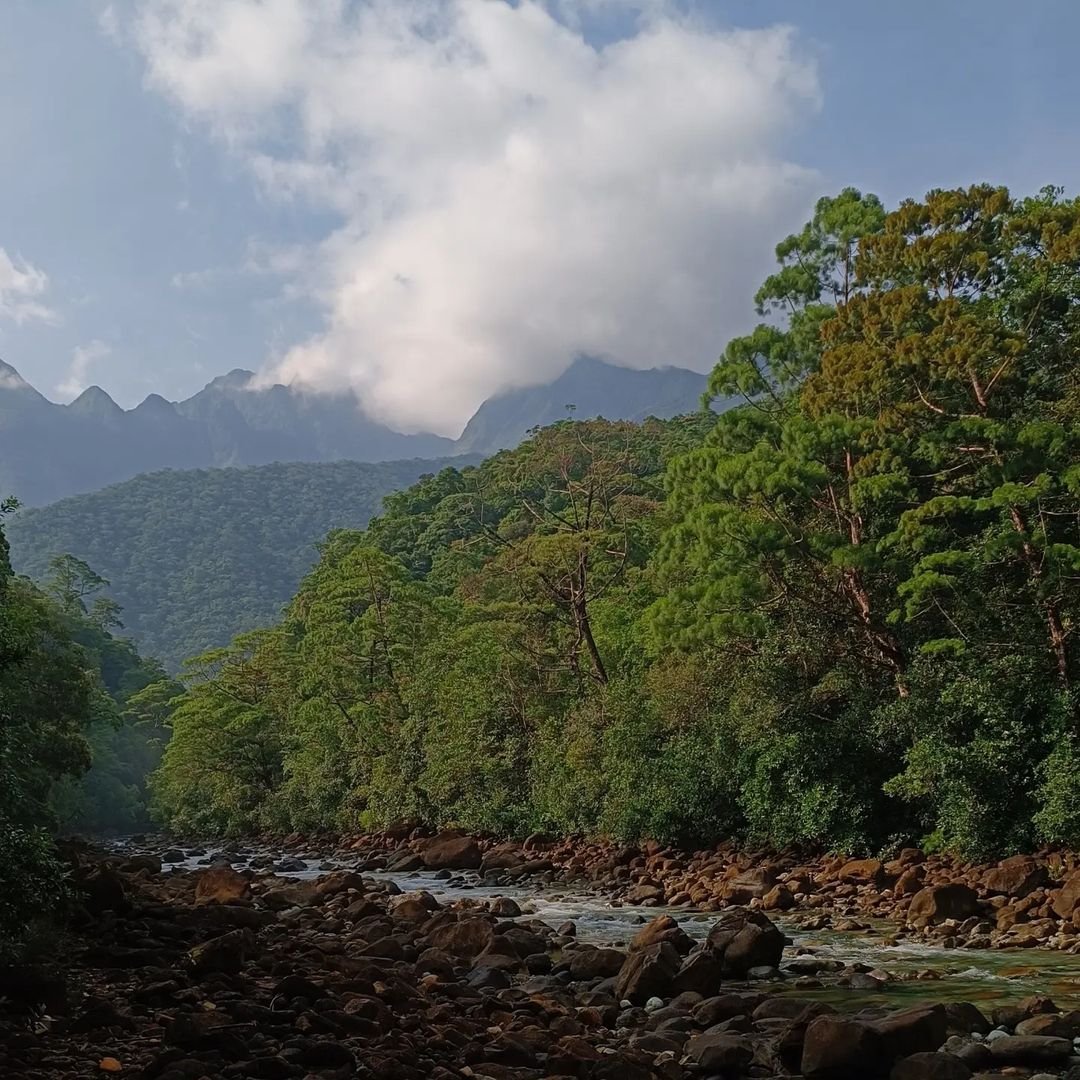
Segment 1: The “Limatik” Kingdom (Jump-off to Camp 3)
The hike from Barangay Tampayan (approx. 30 MASL) begins deceptively. You cross the Olango River and enter a dense dipterocarp forest. This section is humid, muddy, and enclosed.
The Hazard: This is the undisputed territory of the Haemadipsa (Blood Leeches) or “Limatik.” They are heat-seeking and aggressive.
Camp 1 & 2: Often used as rest stops or lunch areas. Camp 2 sits at roughly 710 MASL.
Camp 3: Located at 1,270 MASL, this marks the transition zone. The tall trees begin to give way to mossy, stunted vegetation.
Insider Tip: I strongly advise against stopping for long breaks between Camp 1 and Camp 3. The moment you stop moving, the Limatiks swarm. Keep checking your eyes; I’ve had to pull a leech off a team member’s eyelid in this section. Wear leggings and tuck your pants into your socks.
Segment 2: Mayo’s Peak (The Gateway)
At 1,550 MASL, you reach Mayo’s Peak. This is the de facto “Base Camp” for the summit assault. The terrain shifts dramatically here—the soft soil disappears, replaced by the mountain’s signature jagged rock.
Water Source: Bulod’s Spring is the lifeline of this expedition. It is located about 15-20 minutes down a steep side trail from the campsite.
Protocol: “Camel up” here. Drink as much as you can hold and fill every vessel you have (3-4 Liters capacity). Do not count on Mabel’s Spring further up; in my experience, it is almost always dry or too slow to be useful.
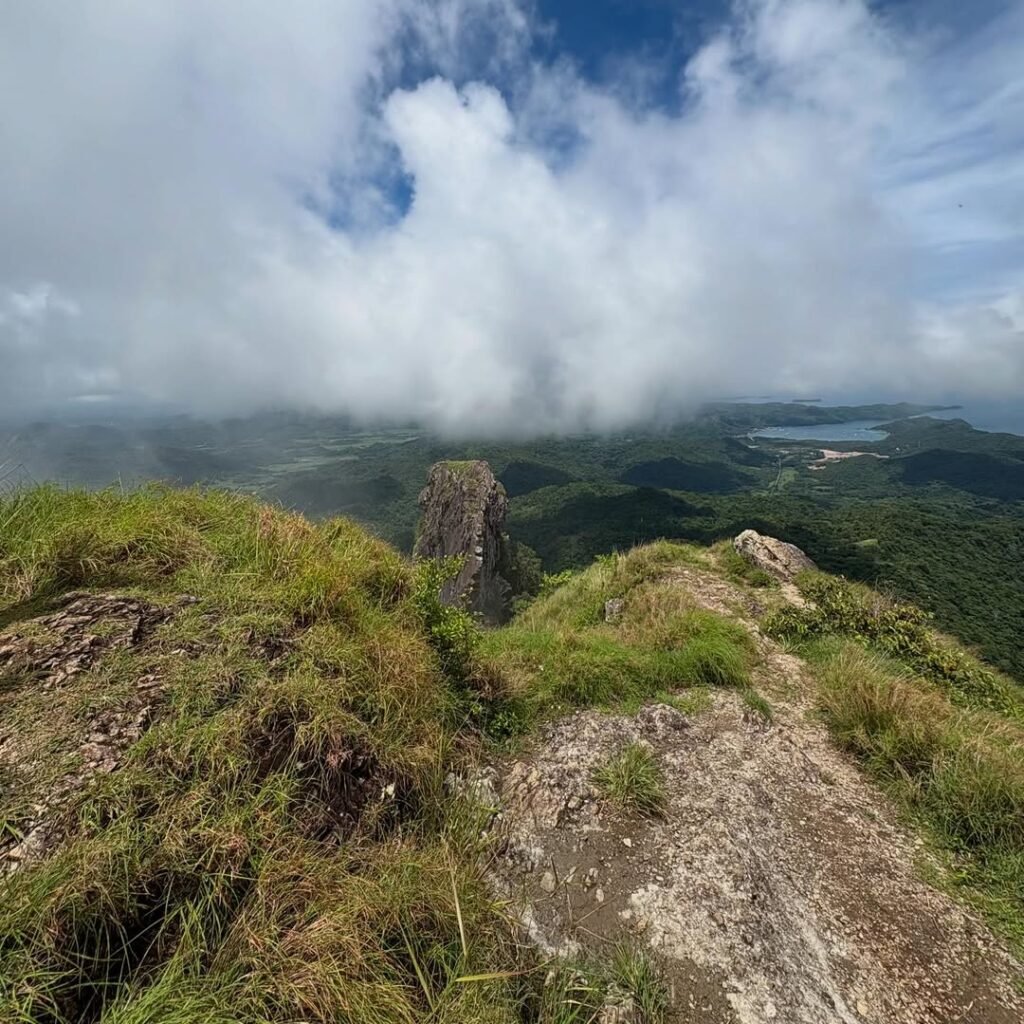
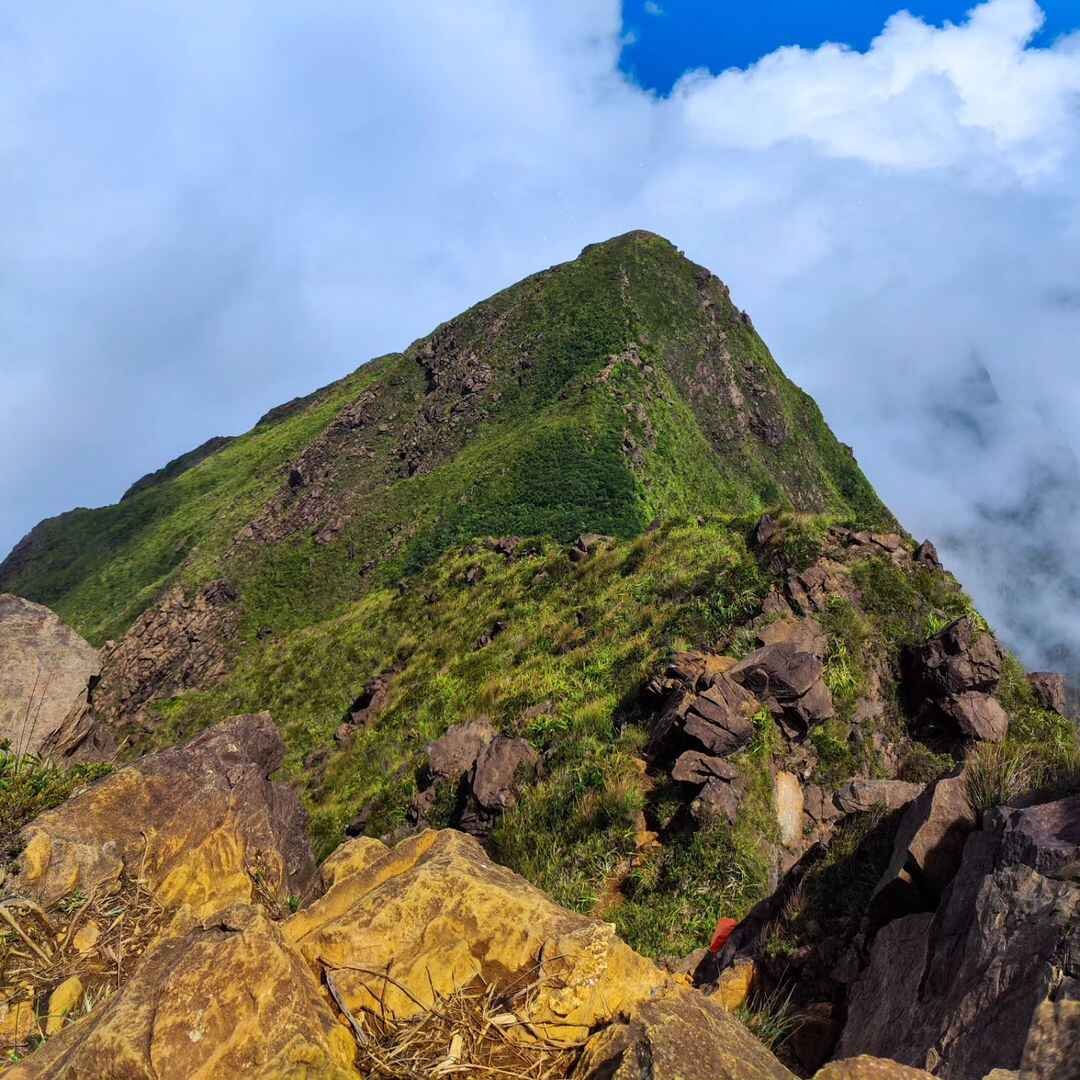
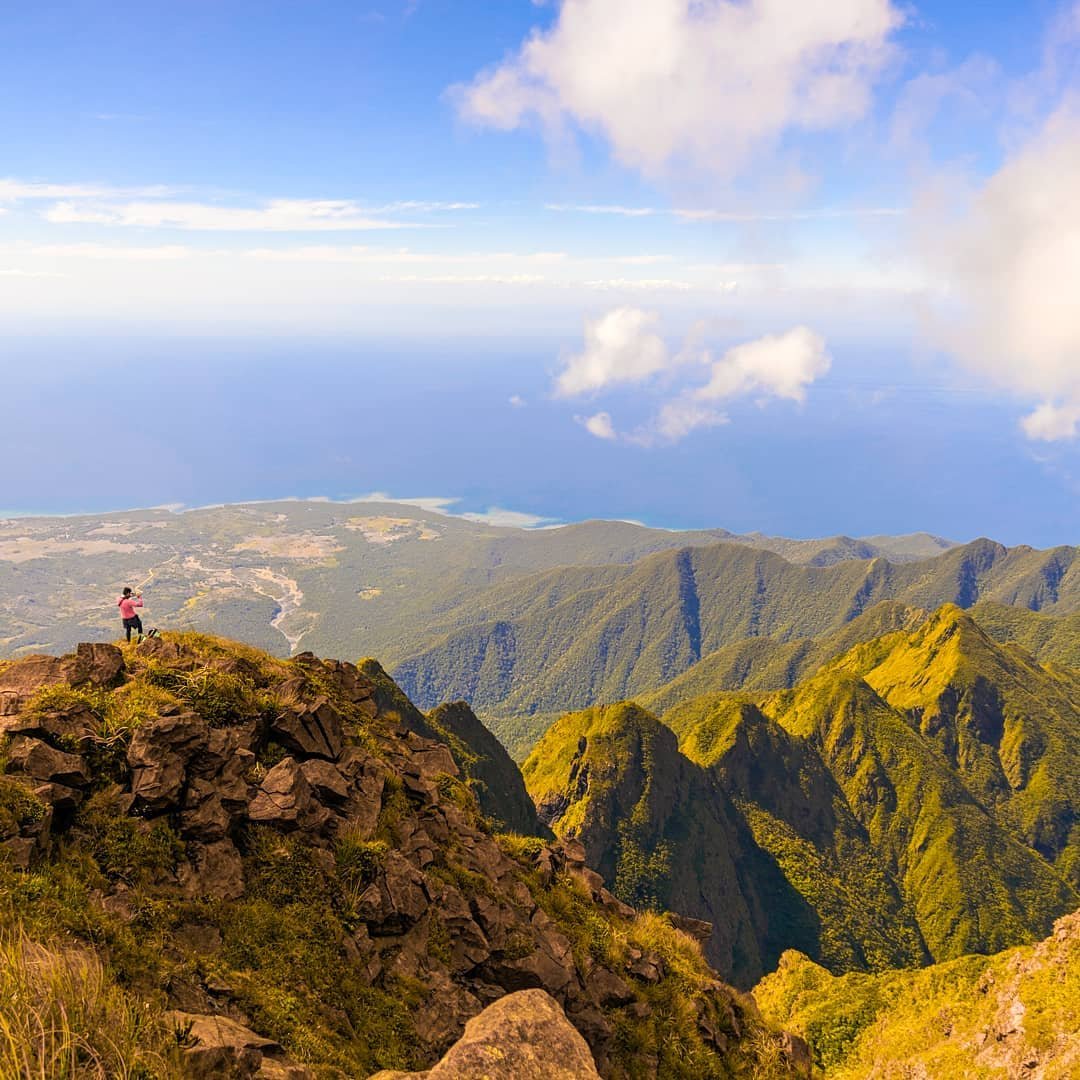
Segment 3: The Knife Edge (The Crux)
Leaving Mayo’s Peak, you descend slightly before facing the Knife Edge, the serrated spine of ultramafic rock. This is a Class 5 scramble.
Landmarks: You will navigate famous features like “Kiss the Wall” (where the ledge is so narrow you must hug the rock) and the “Camel Back.”
The “Peak of Deception”: At 1,640 MASL, this false summit breaks hearts. You think you’re there, but the true 2,058 MASL summit is still a grueling assault away.
Safety Rule: Stow your trekking poles. They are dangerous here. They can get stuck in the rock fissures and throw you off balance. You need your hands free for three-point contact.
Connectivity Check
Do not expect to livestream your climb.
Jump-off / Magdiwang: Strong signal (Smart/Globe).
Mayo’s Peak: Intermittent. You can sometimes send an SMS if the wind is right.
Summit: Mostly dead spots or blocked by cloud cover. Treat this as an off-grid expedition.
Itinerary Options (2026)
The standard safe itinerary for Mt. Guiting-Guiting is 3 Days and 2 Nights. While elite trail runners attempt single-day assaults, the traditional schedule allows for acclimatization at Mayo’s Peak (1,550 MASL). If attempting the “Traverse” to San Fernando, a 4-day itinerary is recommended to manage the punishing descent and logistics.
Choosing the right G2 Sibuyan itinerary depends entirely on your team’s fitness and your logistical exit plan. You have two primary options: the “Backtrail” (Entry/Exit via Magdiwang) or the “Traverse” (Entry via Magdiwang, Exit via San Fernando).
Option A: The Standard Backtrail (3 Days / 2 Nights)
This is the most common route. It simplifies logistics because you start and end at the same point, Barangay Tampayan, close to the port.
| Day | Time | Activity |
| Day 0 | 16:00 | Depart Batangas Port via Starlite Ferries. |
| Day 1 | 08:00 | Arrival at Magdiwang Port. Breakfast at Romblon Deli. |
| 09:00 | Tricycle to DENR Office (Tampayan) for briefing/permits. | |
| 10:30 | Start Trek. Cross Olango River. | |
| 16:00 | Arrival at Mayo’s Peak (1,550 MASL). Set Camp. | |
| Day 2 | 03:00 | Wake up call. Light breakfast. |
| 04:00 | Start Assault to Summit via Knife Edge. | |
| 09:00 | ETA G2 Summit (2,058 MASL). Photos at the marker. | |
| 10:00 | Start descent back to Mayo’s Peak. | |
| 15:00 | Back at Mayo’s Peak. Rest or descend to Camp 3 if weather turns. | |
| Day 3 | 07:00 | Break Camp. Descent to Jump-off. |
| 13:00 | Arrival at DENR Tampayan. Log out. | |
| 14:00 | Tricycle to Sanctuary Garden Resort for wash-up. |
Insider Tip: On Day 2, the window for a clear view at the summit is usually between 7:00 AM and 9:00 AM. After that, the thermal clouds from the Sibuyan Sea rise and engulf the peak. Start early.
Option B: The Grand Traverse (3 Days / 2 Nights – Advanced)
This route enters via the North (Magdiwang) and exits via the South (Sitio Olango, San Fernando). It covers the entire mountain spine.
| Day | Time | Activity |
| Day 1 | — | Same itinerary as Option A (Camp at Mayo’s Peak). |
| Day 2 | 04:00 | Start Assault. |
| 09:00 | Summit. Do not linger. | |
| 10:00 | Start descent to San Fernando side. | |
| 12:00 | Pass the “Peak of Deception” and “Crash Site”. | |
| 17:00 | Arrival at Camp 3 (San Fernando side). Set Camp. | |
| Day 3 | 06:00 | Resume descent. |
| 14:00 | Arrival at Sitio Olango, San Fernando. | |
| 15:00 | Board pre-arranged Tricycle to Magdiwang or boat to Cresta de Gallo. |
The Friction Point: The descent to San Fernando is legendary for being “endless.” It takes 8-10 hours of steep, knee-bashing downhill through leech-infested jungle.
Logistics Warning: You enter in Magdiwang but exit on the other side of the island. You must pre-arrange a “Traverse Pickup.” A tricycle from San Fernando back to Magdiwang Port costs roughly ₱300.00 per head and takes over an hour. Do not assume you can flag one down in the remote village of Sitio Olango.
Budget Breakdown: Updated MGGNP Fees
A safe budget for a DIY hike to Mt. Guiting-Guiting in 2026 is roughly PHP 8,500 to PHP 10,500 per person. Fees have been standardized: the guide fee is 4,000 pesos, and the porter fee is 4,000 pesos. The mandated ratio is 3 mountaineers to 1 guide and 1 porter.
Mountaineering inflation is real, and hiking expenses 2026 for major climbs like G2 have adjusted significantly. The biggest chunk of your budget will go to the Starlite Ferry and the newly standardized professional fees for your support team.
Detailed Expenses (Estimated Per Head for a Group of 3):
| Expense Category | Cost (PHP) | Notes |
| Bus (Manila-Batangas) | ₱600 – ₱700 | Roundtrip (JAM/DLTB). |
| Ferry (Starlite) | ₱3,000 – ₱4,000 | Roundtrip (Economy vs. Tourist). |
| Registration Fee | ₱500 (Local) / ₱1,000 (Foreign) | Paid at DENR Magdiwang. |
| Guide Fee | ₱4,000 | Standard fixed fee. Split among max 3 pax. |
| Porter Fee | ₱4,000 | Standard fixed fee. Split among max 3 pax. |
| Local Clearances | ₱200 – ₱300 | Police clearance & Sibuyan Medical Cert fees. |
| Food & Transport | ₱2,000+ | Tricycles, trail food, guide/porter meals. |
Insider Tip: The official Guide-to-porter ratio is strictly 3:1:1. You must also remember to include your guide and porter in your meal planning. Add an extra cup of rice and a serving of ulam (viand) per meal for them, or you will end up giving them your own rations.
What to Bring: The G2 Gear List
For footwear on Mt. Guiting-Guiting, leave the heavy mountaineering boots at home. You need trail running shoes with aggressive lugs (e.g., Salomon Speedcross, Hoka Speedgoat, or La Sportiva Bushido) for maximum grip and flexibility on the sharp ultramafic rocks. Pack industrial-grade garden gloves, 3-4 liters of water capacity, and a windbreaker to combat hypothermia on the ridge.
Packing for your Mt. Guiting-Guiting hike guide checklist requires a specific strategy: you are dressing for two different wars. The lower forest is a hot, humid leech bath, while the Knife Edge is a jagged, exposed wind tunnel. Standard camping gear often fails here.
The “Knife Edge” Loadout
Footwear (Critical): The ultramafic rocks of G2 are notoriously abrasive. I have seen hikers wearing stiff trekking boots struggle to find purchase on the “Kiss the Wall” segment because their soles were too rigid. You need the flexibility of a trail runner to smear and grip the rock. Expect your shoes to take a beating; the sharp edges will chew up the midsoles.
Gloves: Do not bring expensive USD 50 tactical gloves; the rocks will shred them in hours.
Insider Tip: Go to a local hardware store or Decathlon and buy the cheap, rubber-dipped gardening gloves (approx. ₱50 – ₱100). They offer superior grip on the sharp limestone and you won’t feel bad throwing them away after the climb.
Water Capacity: You need to carry 3 to 4 Liters of water from Bulod’s Spring. Since there is no reliable water source at the summit or along the ridge (Mabel’s Spring is unreliable), your hydration system must be robust. I use a 2L bladder for drinking on the move and two 1L Nalgene bottles as backup.
The “Limatik” Defense Kit
The hike from Tampayan to Camp 3 is prime leech territory.
Alcohol Spray: The only effective weapon. Spray it on your boots and socks every 30 minutes.
Ear Plugs / Cotton Balls: It sounds paranoid until it happens to you. Limatiks can crawl into ear canals. Plugging your ears during the lower forest trek is a common safety habit among G2 veterans.
Light-Colored Leggings: Wearing white or light grey compression pants makes it easier to spot the dark leeches crawling up your legs before they bite.
Summit & Emergency Gear
Windbreaker / Rain Jacket: The temperature drop at the Peak of Deception is sudden. When the Amihan wind hits your sweat-soaked shirt, hypothermia is a genuine risk.
Utility Cord: Bring 10-15 meters of 7mm utility rope. While the guides have ropes, having a backup line for hauling packs up the steep Class 5 sections can speed up the team’s movement significantly.
Post-Climb: Food & Side Trips
The best places to eat in Magdiwang after a G2 climb are Sanctuary Garden Resort for their famous Halo-Halo and comfort food, and Restaurant Fuji for Japanese/Korean dishes like Chicken Katsu. For a post-hike celebration, most teams head to the pristine sandbar of Cresta de Gallo in San Fernando.
After days of surviving on trail mix and canned tuna, your first meal back in Magdiwang is almost a spiritual experience. The culinary options on Sibuyan Island are surprisingly diverse, offering the perfect calorie reload before your Starlite Ferry ride back to Batangas.
The Reward Meal: Where to Eat
Sanctuary Garden Resort: Located just a short tricycle ride from the DENR Office, this is the unofficial headquarters for G2 survivors. Their Halo-Halo is legendary among hikers for cooling down after the humidity of the trail. I also highly recommend their “Sizzling Sisig” and fried chicken.
Restaurant Fuji: A hidden gem in Magdiwang town proper. You wouldn’t expect legit Japanese food here, but their Chicken Katsu and Gyoza are excellent. The salty miso soup is perfect for replenishing electrolytes lost on the Knife Edge.
Romblon Deli: If you have an early morning departure, this spot near the port serves a solid bacon-and-egg breakfast and brewed coffee to wake you up before the ferry leaves.
The Essential Side Trip: Cresta de Gallo
No G2 Sibuyan itinerary is complete without “decompression” at Cresta de Gallo. This stunning white sandbar is the complete opposite of the dark, jagged mountain you just conquered.
Logistics: The island is located off the coast of San Fernando (the exit point of the traverse). You need to hire a pump boat from the local port.
Boat Rental (2026 Est.): ₱2,500 (Small / 1-4 pax) to ₱3,500 (Large / 5-8 pax).
Entrance Fee: Approximately ₱70 – ₱100 per head.
Travel Time: About 45 minutes to 1 hour from the mainland.
Insider Tip: There are absolutely no stores on the islet—no sari-sari stores, no vending machines. You must buy all your water, ice, charcoal, and food at the San Fernando public market before you board the boat. I made the mistake of assuming I could buy cold beer there; don’t be like me. Bring a cooler.
Frequently Asked Questions (FAQ)
Mt. Guiting-Guiting is rated Difficulty 9/9 and is NOT safe for beginners. Cell signal (Smart/Globe) is unreliable, functioning mostly at the jump-off and intermittently at Mayo’s Peak. Drones require a specific PAMB permit. Emergency extraction is manual (porter-assist), expensive, and slow. The best season to climb is March to May.
Is Mt. Guiting-Guiting safe for beginners?
Absolutely not. This is a Difficulty 9/9 Major Climb. The trail requires technical skills, including Class 5 rock scrambling and high-altitude endurance. If your experience is limited to minor hikes like Mt. Batulao or Mt. Daraitan, G2 is dangerous.
Recommendation: You should have completed several major multi-day hikes (e.g., Mt. Pulag Akiki Trail, Mt. Tapulao, or Mt. Arayat Quad Peak) before attempting this G2 Sibuyan itinerary.
Is there a mobile signal on the mountain?
Do not rely on it.
Magdiwang/Jump-off: Strong signal for both Smart and Globe.
Mayo’s Peak (1,550 MASL): Intermittent. You might catch enough signal to send an SMS if you stand on the exposed rock facing the town, but data for uploading stories is virtually non-existent.
Camps 1, 2, & 3: These are dead spots deep in the valley.
Summit: Occasional signal, but often blocked by the thick cloud layer rising from the Sibuyan Sea.
Can I fly a drone on G2?
Strictly speaking, no, unless you have a permit. Because Mt. Guiting-Guiting Natural Park is a protected area, the PAMB (Protected Area Management Board) restricts drone usage to prevent disturbing the wildlife (like the Sibuyan Fruit Bat).
Protocol: You must declare your drone at the DENR Office in Tampayan and pay the corresponding permit fee. Unauthorized flying can lead to confiscation of your gear.
What happens if I can’t finish the climb?
This is the harsh reality of the Mt. Guiting-Guiting hike guide: there is no helicopter rescue here.
The “Human Hammock”: If you get injured or cannot walk, you will be carried down manually by a team of porters using a makeshift hammock tied to a bamboo pole.
The Cost: You will shoulder the daily wages of every porter involved in the rescue (usually 4-6 personnel), plus meals. It is physically grueling for them and financially painful for you.
When is the best time to climb?
The prime window is the Dry Season (March to May).
Pros: The rocks are dry, offering better grip on the Knife Edge, and the views are clearer.
Cons: The heat is brutal, and water sources like Bulod’s Spring may have reduced flow.
Avoid: The Habagat Season (June to October). The trails turn into mud slides, river crossings become impassable, and the Limatik population explodes.
Insider Tip: Even in summer, the weather on the ridge is unpredictable. I’ve climbed in April and still faced zero visibility and freezing rain at the summit. Always pack for the worst-case scenario.
Respecting the Saw-Toothed King
Mt. Guiting-Guiting demands total respect. Strictly adhere to Leave No Trace (LNT) principles—taking flora or rocks is a crime under the NIPAS Act. The mountain generates its own microclimate, so prepared gear is non-negotiable. Finalize your logistics by booking Starlite Ferries in advance.
The “Saw-Toothed” profile of Mt. Guiting-Guiting is more than just a logo for your finisher shirt; it is a warning. This mountain creates its own weather system. I have stood at Mayo’s Peak in blistering heat, only to be hammered by freezing rain and zero visibility on the Knife Edge an hour later. No amount of beta from this Mt. Guiting-Guiting hike guide can replace situational awareness on the trail. Listen to your guide—if they say turn back, you turn back.
The Golden Rule: LNT
The biodiversity here is the reason Sibuyan Island is called the “Galapagos of Asia.”
Do Not Poach: Taking a pitcher plant (Nepenthes sibuyanensis) or a piece of ultramafic rock is not a souvenir; it is theft. The DENR and local porters are vigilant.
Pack It Out: If you brought a candy wrapper up to Camp 3, it comes down with you to Magdiwang. There are no trash cans in the MGGNP.
Ready to Face the Knife Edge?
The logistical friction is part of the adventure. Secure your Starlite Ferries tickets early, train hard for the Difficulty 9/9 ascent, and prepare for the climb of a lifetime.
Bookmark this Mt. Guiting-Guiting hike guide and safe climbing, mga ka-Lakbay!