
Quick Guide Table
| Field | Details |
|---|---|
| Mountain name | Mt. Kimat |
| Alternate names | Mt. Kimat Patil-ao / Mt. Kimat Patil-aw |
| Location | Barangay Malaya, Cervantes, Ilocos Sur |
| Protected area context | Associated with Bessang Pass Natural Monument |
| Mt. Kimat MASL / Height | Around 1,500 to 1,554 MASL |
| Difficulty level | Commonly cited at 6/9 |
| Trail type | Traverse |
| Estimated distance | Around 15 to 16 km |
| Estimated hiking time | Around 8 to 12 hours total |
| Jump-off | Bessang Pass side / local registration area |
| Exit point | Zigzag road / Zigzag Pines Elementary School area |
| Best time to hike Mt. Kimat | November to April |
| Day hike or overnight | Usually day hike; camping is possible but less standard |
| Guide requirement | Expected or strongly advised |
| Water source | Limited, seasonal, and unreliable |
| Cell signal | Spotty to unreliable |
| Beginner-friendliness | Not ideal for casual beginners |
| Current status notes | Fees, guide setup, and water reliability may vary |
Mt. Kimat at a Glance for First-Time Hikers
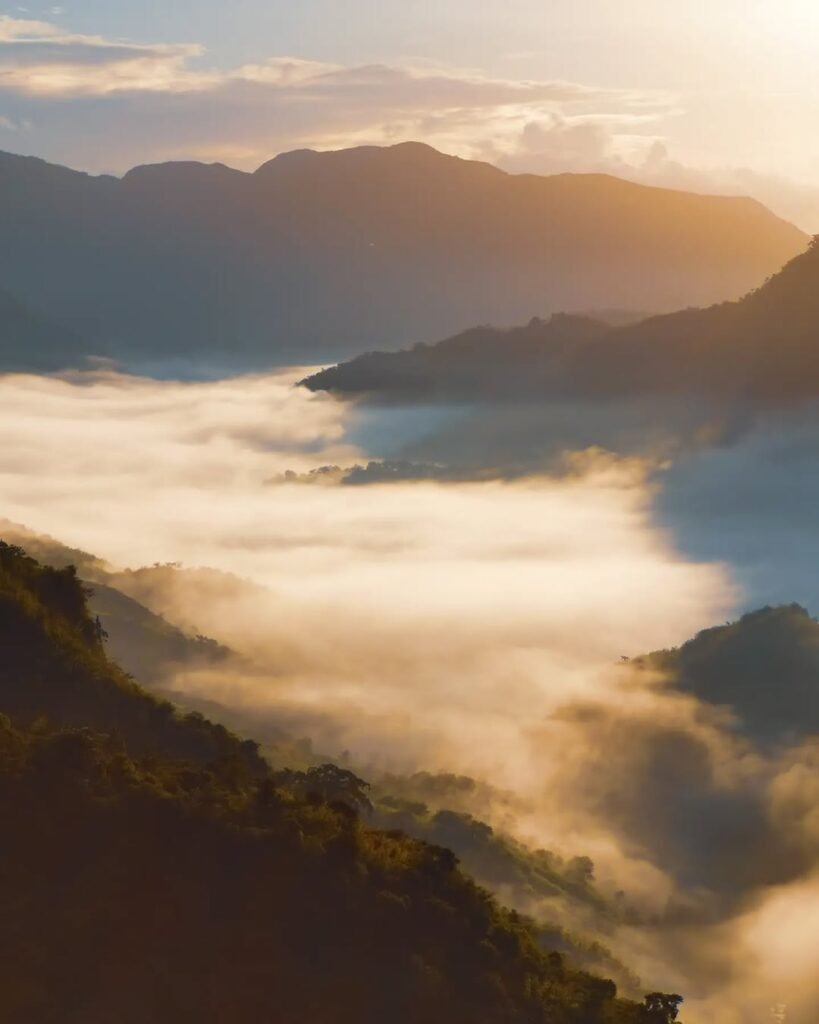
Mt. Kimat is in Cervantes, Ilocos Sur, and it is best treated as a serious day-hike traverse, not a casual beginner climb. The mountain is known for its exposed ridges, narrow trail sections, long walking day, and wide-open views that make the effort feel rewarding but never effortless. If you are used to shorter minor climbs, this one can feel much bigger on the ground because of the heat, trail exposure, and the mental pressure of moving through open ridgelines.
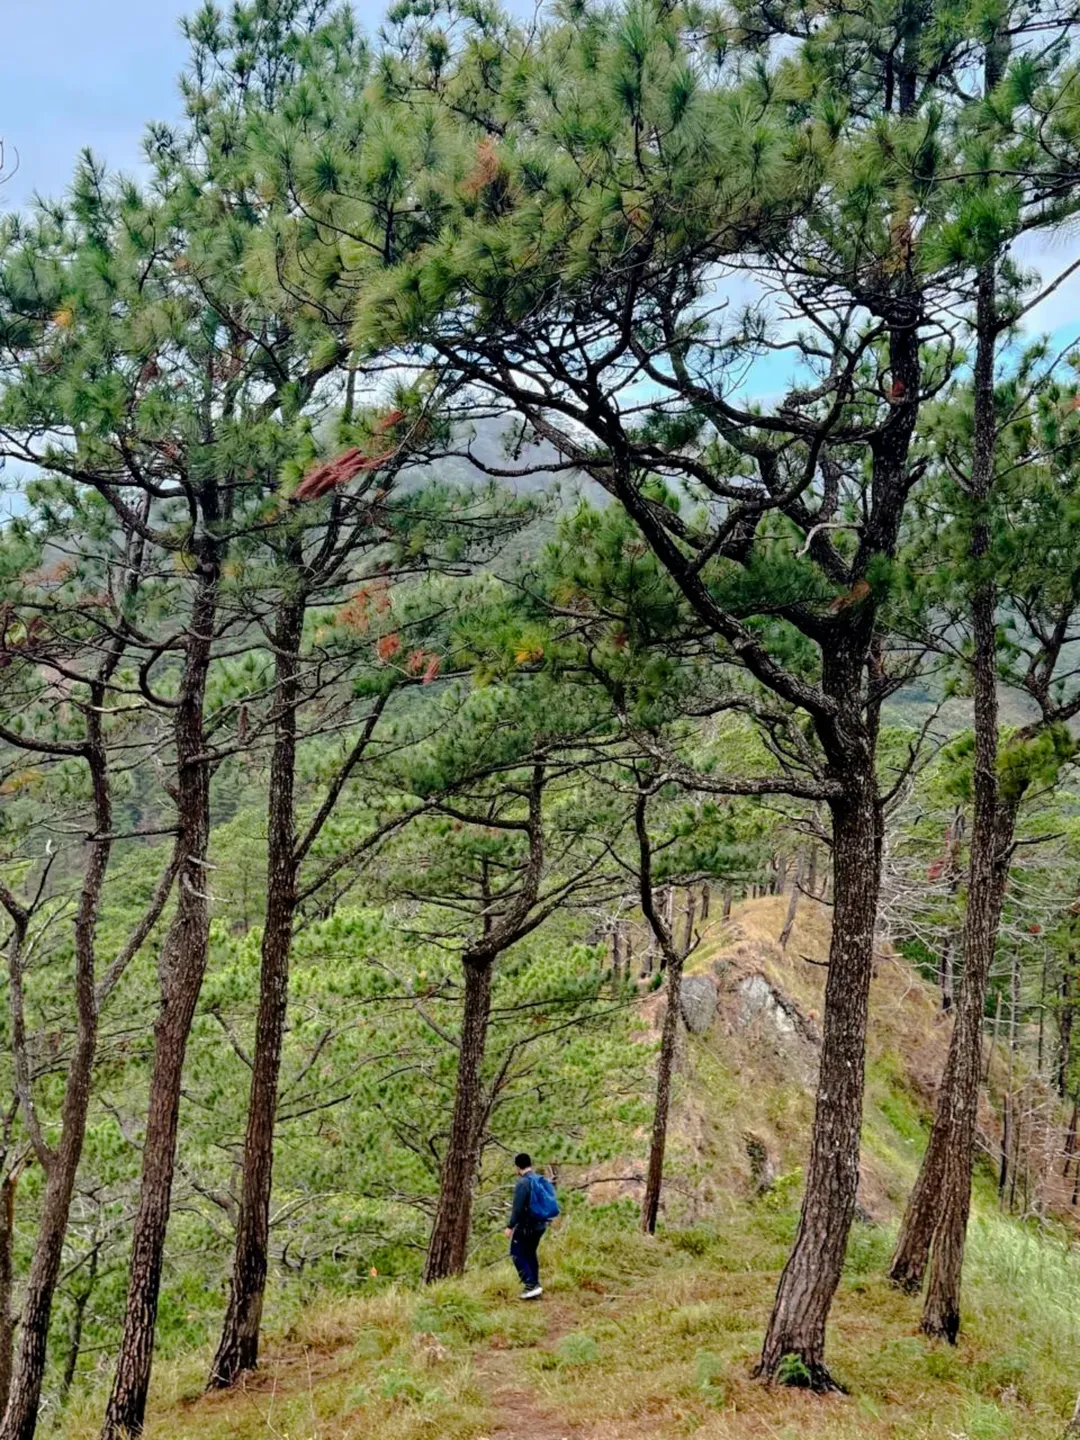
What makes Mt. Kimat appealing is the mix of ridge walking, pine-fringed sections, and a trail character that feels raw and less manicured than easier weekend mountains. It is the kind of hike that rewards early preparation, steady pacing, and respect for the terrain.
Best for:
- Hikers comfortable with long day hikes
- Small DIY groups that can manage logistics well
- Joiners who want a harder Ilocos Sur ridge hike
- Readers looking for a more serious traverse than a beginner-friendly walk
Not ideal for:
- Casual first-timers with no recent hiking base
- Hikers who struggle with exposure or narrow trail sections
- People expecting a short summit push with easy exit logistics
On paper, the stats look manageable, but the full picture includes a 15 to 16 km traverse, a commonly cited 6/9 difficulty, variable local costs, and transport planning that matters as much as the hike itself.
Table of Contents


Where Is Mt. Kimat? Location, Map, and Mountain Overview
Mt. Kimat Location is in Barangay Malaya, Cervantes, Ilocos Sur. In route discussions, you will often see Bessang Pass mentioned because the hike is commonly linked with the Bessang Pass side as the jump-off area and with a traverse flow that exits on the Zigzag side. That protected-area context matters because access, registration flow, and guide arrangements may depend on local policy and on-ground coordination.
You may also see the mountain referred to as Mt. Kimat Patil-ao or Mt. Kimat Patil-aw. Those variants are useful to remember when checking old hike posts, organizer releases, and route notes. The word “Kimat” is commonly explained as “lightning” in Ilocano, which fits the mountain’s exposed character and sharp ridgeline image.
For map logic, the most practical way to think about the route is this:
- Town proper: Cervantes, Ilocos Sur
- Approach side: Bessang Pass or nearby local registration side
- Main trail logic: traverse, not a simple out-and-back
- Exit side: Zigzag road / Zigzag Pines Elementary School area
You may also come across the term Pautan Trail in some references. Treat that as a route label or local-area trail reference, not necessarily a standardized official trail name. For planning, what matters more is understanding the jump-off side, the exit side, and how your pickup will work at the end of the traverse.
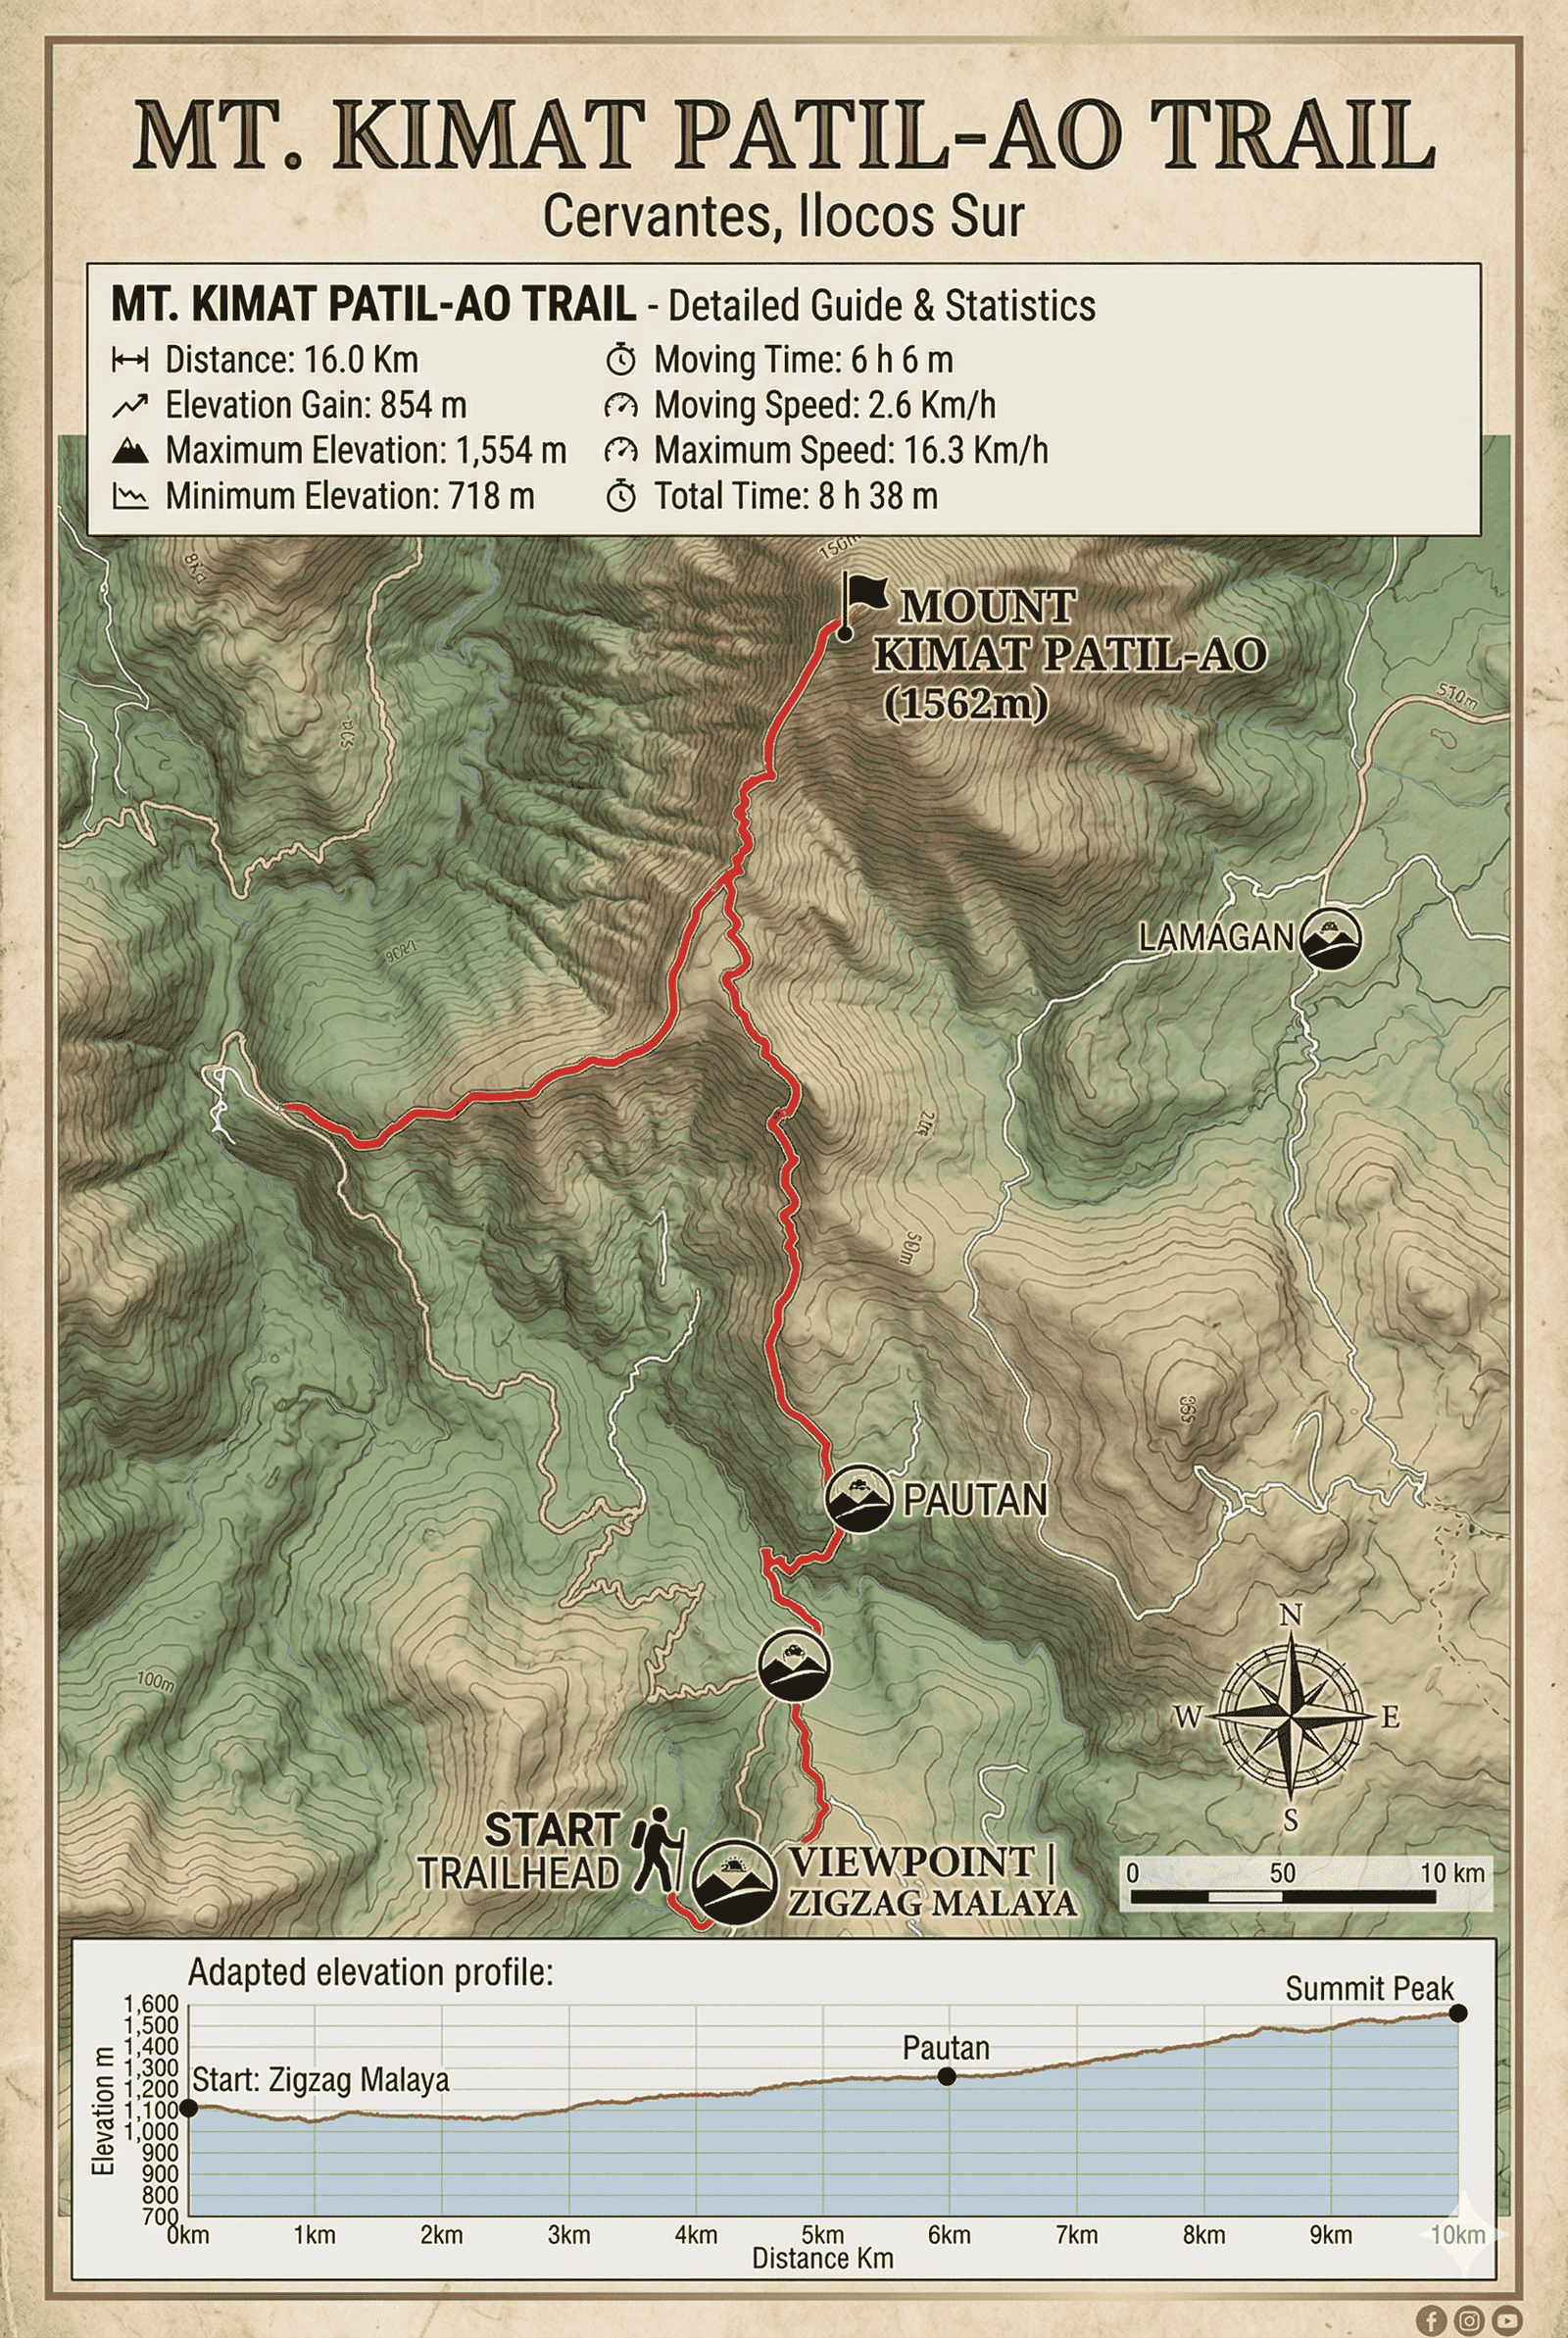
Mt. Kimat Difficulty, MASL, Distance, and Hiking Time
Mt. Kimat Difficulty-Level is commonly cited at 6/9, with a height of around 1,500 to 1,554 MASL, a trail distance of roughly 15 to 16 km, and an elevation gain in the 850-meter range. Those numbers already tell you this is not a soft beginner hike. It is a long traverse with a real endurance component, and even strong day hikers should treat it as a full-day effort rather than a quick summit outing.
If you are looking for the short answer: Mt. Kimat is moderately hard to hard for most casual hikers. A fit group can log moving time near six hours, but real elapsed time usually stretches to 8 to 12 hours once you include registration, setup, rest stops, water checks, route pacing, and exit logistics.
The raw stats only tell part of the story. On the ground, the hike can feel harder than the numbers suggest because the trail is exposed, route rhythm can be interrupted by narrow ridge sections, and the traverse format removes the comfort of a simple turnaround option. Even without technical climbing, the consequence of a mistake feels higher when you are moving through open ridges with loose soil underfoot.
Why it feels harder than the stats:
- Exposure: less shade and more direct sun on open sections
- Loose footing: certain parts can feel unstable, especially when dry or after rain
- Fear factor: narrow ridge sections demand focus
- Long day format: this is a real traverse, not a short summit hop
- Limited water: you cannot rely on refills
If you are comparing Mt. Kimat KM and elevation with other Luzon day hikes, the better comparison is not just the number. It is the combination of distance, exposure, and the mental load of a long ridge day.

What to Expect on the Mt. Kimat Trail
The Mt. Kimat Trail is best described as a long, exposed ridge traverse with changing rhythm rather than one continuous grind. You are not just chasing a summit. You are managing a full mountain day where footing, weather, and pacing matter from start to finish. The trail can feel quiet and raw, with sections that open wide to the sky, then tighten again into narrower lines where attention matters more than speed.
Early Trail and Traverse Rhythm
The opening part of the Mt. Kimat Hike usually sets the tone quickly. Expect climbing early, and expect your legs to know right away that this is not a warm-up mountain. A steady pace works better than trying to win the morning. Stronger hikers can burn themselves out too early here, especially if they underestimate the total length of the traverse.
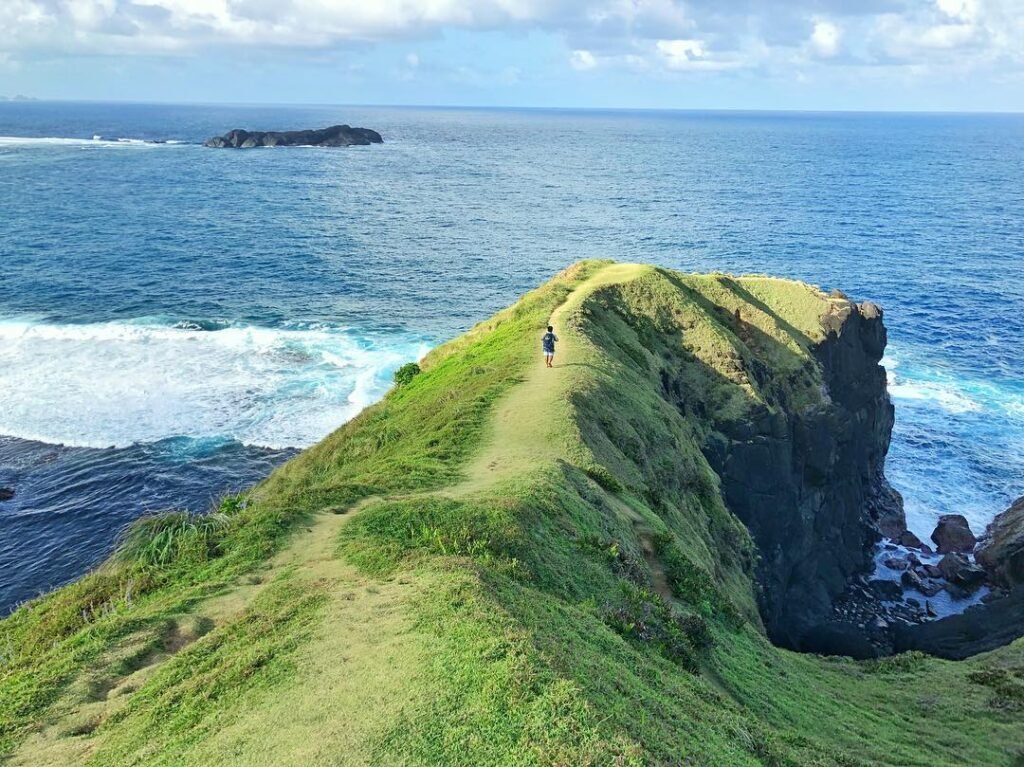
Exposed Ridges and Knife-Edge Sections
The most defining parts of the route are the exposed ridge sections and the commonly mentioned knife-edge stretches. That does not automatically mean technical climbing, but it does mean you need attention, balance, and comfort with airy terrain. Wind on the ridgeline can make these sections feel bigger than they look in photos, and loose soil can add just enough uncertainty to keep you focused.
Heat, Wind, and Seasonal Water
Shade is limited in many parts of the route, so sun exposure becomes a real factor by mid-morning. In cooler months, wind can make the ridges feel more manageable. In hotter months, the same open trail can drain you fast. Water is the biggest practical caution. Refill points may appear in some seasons, but you should treat them as a bonus, not a guarantee. Mangga Campsite is one of the most commonly referenced points on the route, and it often works as a useful pacing marker rather than just a campsite name.
Trail realities to keep in mind:
- Open terrain can feel much hotter than forested climbs
- Narrow sections reward calm, controlled movement
- Overgrown patches and loose soil can slow the group
- Water reliability may vary by season
Itinerary Table
| Time | DIY dayhike sample | Notes |
|---|---|---|
| 04:30–05:00 | Arrive at registration area | Early arrival is important |
| 05:00 | Registration / briefing | In-person setup is the norm |
| 05:30 | Trek starts | Start early for cooler trail temperatures |
| 08:00 | Mangga Campsite area | Useful pacing marker |
| 09:00 | First possible water source | Treat as seasonal and unreliable |
| 09:30 | Open trail / exposed section | Heat and wind become more noticeable |
| 11:30 | Summit target | Pace varies by group |
| 12:30 | Start descent / continue traverse exit flow | Avoid lingering in bad weather |
| 14:30 | Another possible water source | Seasonal |
| 16:30 | Exit point / Zigzag side | Arrange pickup in advance |
| Evening | Return to Cervantes / onward transit | Add buffer time |


Route Flow, Jump-Off, Exit Point, and Pautan Trail Note
Mt. Kimat is commonly treated as a traverse, and that matters because your starting point and endpoint are not the same. Most route descriptions place the jump-off on the Bessang Pass side and the exit near Zigzag Pines Elementary School or the Zigzag road side. That means transport planning is part of the hike, not an afterthought.
For most hikers, the cleanest way to understand the route is this:
- Start: Bessang Pass side / local registration area
- Finish: Zigzag-side exit
- Route type: traverse, not standard out-and-back
- Pickup planning: arrange it before the hike, especially for DIY groups
- Pautan Trail: mention it carefully, as it may refer to a route label or local trail reference rather than a single universally used official trail name
If you build your itinerary as if this were a simple summit-and-return hike, you can easily create a transport problem for yourself at the end of the day.
Fees, Permits, Registration, and Guide Requirement
For Mt. Kimat DIY planning, assume that registration is handled in person, not through a centralized online permit platform. Based on the research outline, guide support is treated as standard practice, and that is the safest assumption to use unless local policy changes. This is also the more practical setup for a traverse with a separate exit point.
Working budget anchors from the research place the registration fee at around ₱100 per person and the guide fee at around ₱500 to ₱1,000 per group, 1- 5 Ratio, but both are subject to change. Do not treat those numbers as permanent official rates. Guide ratio, environmental fees, porter rates, parking, wash-up fees, and campsite charges may vary by season, organizer, or current local policy.
What matters most for planning is not just the amount. It is knowing what must be sorted before hike day:
- Confirm the current registration point
- Confirm whether the guide is arranged locally or in advance
- Confirm your group size and possible guide ratio
- Confirm whether the exit-side pickup needs separate coordination
If you are using Mt. Kimat Location details to plan independently, it is smart to confirm access with current local tourism or municipal channels before the trip. A small policy change can affect timing, cost, and where you begin.
Quick checklist before you go:
- Confirm access
- Confirm registration point
- Confirm guide setup
- Confirm fees
How to Go to Mt. Kimat from Manila
If you are researching How to go to Mt. Kimat from Manila, the main commuter logic is simple: Manila to Cervantes, then local transfer to the jump-off. The hardest part is not reaching Ilocos Sur. It is making the last-mile connection work smoothly enough that you still start early on the mountain. There is no train option for this trip, and there is no standard public bus that drops hikers straight at the trailhead.
Via Tagudin
For many DIY hikers, the Tagudin route is one of the most practical commuter options.
- Ride a northbound bus from Manila toward the Ilocos or La Union corridor
- Get off at Tagudin or the access point commonly used for transfer flow
- Continue toward Cervantes by local transport
- Arrange or secure a final transfer to the jump-off side
Older baseline figures in the research put Tagudin to Cervantes at around ₱120, while the Manila leg can vary significantly depending on bus line and current fare updates. Treat older fare references as planning anchors, not final published truth.
Via San Fernando, La Union
This route can work well if you find a better schedule or prefer a La Union transfer pattern.
- Take a bus from Manila to San Fernando, La Union
- Transfer to transport going to Cervantes
- Continue with local arrangement to the jump-off
Research-based older baselines place San Fernando to Cervantes at around ₱160 to ₱200, subject to change. This route can be useful, but it may involve more transfer friction than a smoother direct corridor option.
Via Baguio
The Baguio option is workable, especially for hikers already coming from North Luzon or for groups linking the trip with a Baguio stop.
- Travel from Manila to Baguio
- Transfer to transport heading to Cervantes
- Arrange the last-mile ride to the jump-off
Older baseline figures place Baguio to Cervantes at around ₱180 to ₱200, but confirm before your hike.
Final Transfer to the Jump-Off
This is the part many hikers underestimate. Even if reaching Cervantes is straightforward, your Mt. Kimat DIY plan still depends on how you move from town proper to the registration or jump-off side, and later from the exit point back to your base or onward route. For DIY groups, this usually means prior coordination. For joiners, this is one of the biggest problems the organizer solves for you.
If you want the least stressful setup, aim for an arrival that lets you overnight in Cervantes and start early the next day.

DIY vs Joiner Setup: Which Mt. Kimat Trip Style Fits Best?
A Mt. Kimat Itinerary works best when it matches your tolerance for logistics. DIY gives you more control, but it also asks more from you before the hike even begins. Joiner trips are less flexible, but they usually remove the hardest parts of transport coordination.
Choose DIY if you:
- Already know how to manage multi-leg public transport
- Have a small group to split guide and transfer costs
- Want more control over pace, timing, and side arrangements
- Are comfortable confirming details locally before the trip
Choose joiner if you:
- Are traveling solo
- Want van transport handled for you
- Prefer shared guide and logistics costs
- Do not want to solve jump-off and exit pickup separately
Public joiner-post signals in the research place some Mt. Kimat packages around ₱2,300 to ₱2,800 per head, but inclusions vary, and that is not an official mountain fee. In practice, DIY can be cheaper if your group is organized and transport splits well. Joiner can be better value if convenience matters more than control.
Budget Breakdown for a Mt. Kimat Hike
Your Mt. Kimat DIY budget depends on three things more than anything else: long-distance transport, last-mile transfers, and how many people are sharing guide and vehicle costs. Local hiking fees are usually the smaller part of the total. The research outline uses around ₱100 per person for registration and around ₱500 to ₱1,000 per group for guide fees as working anchors, but both remain subject to change.
The biggest variable is transport. Even if the mountain-side fees stay reasonable, your total cost can shift a lot depending on whether you come in via Tagudin, San Fernando, or Baguio, and whether you need a private arranged ride to the jump-off and pickup from the exit. Lodging also matters if you overnight in Cervantes.
Budget Breakdown Table
| Budget item | Working amount | Status note |
|---|---|---|
| Manila to Tagudin bus | ₱680+ | Current fare signal; re-check before publishing |
| Manila to La Union bus | ₱740+ | Current fare signal; re-check before publishing |
| Manila to Baguio bus | Varies | Depends on carrier and class |
| Tagudin / Bitalag to Cervantes | ₱120 | Older baseline reference |
| San Fernando to Cervantes | ₱160–₱200 | Older baseline reference |
| Baguio to Cervantes | ₱180–₱200 | Older baseline reference |
| Cervantes to jump-off transfer | Varies | Often arranged |
| Registration fee | ~₱100 per head | Subject to change |
| Guide fee | ~₱500–₱1,000 per group | Subject to change |
| Porter fee | ~₱200–₱500 per pack | Not standardized |
| Parking fee | ~₱20–₱50 | May vary |
| Camping fee | No confirmed official rate | Verify locally |
| Lodging in Cervantes | ~₱200 per head to ~₱1,200 per room | Depends on property and room type |
| Food budget | ₱250–₱500 per day | Estimate |
| Water and snacks | ₱150–₱300 | Estimate |
| Joiner fee signal | ~₱2,300–₱2,800 per head | Inclusions vary |
Splitting guide and transfer expenses can change the total more than most first-time planners expect. A solo DIY trip may stop making sense quickly, while a four- to six-person group can bring the per-head cost down enough to compete with joiner pricing.

Where to Stay in Cervantes Before the Hike
If you want a smoother start, staying overnight in town is often the better call. Cervantes is not a major tourist hub, but it has usable lodging for hikers who need rest before an early trail start. Based on the planning outline, names commonly referenced for local stays include Greenfields Lodge, Villa Maria Inn, Marlinsam’s Lodge, and Kabakiran Lodge.
This matters most for hikers coming from Manila by public transport. If your arrival is too late to move efficiently to the jump-off, forcing a same-day mountain start can leave you tired before the real work even begins.
A practical expectation is simple:
- Cervantes lodging is basic but useful
- Price range can run from budget shared rates to modest private rooms
- Weekend or holiday demand can tighten availability
If you are building your trip around How to go to Mt. Kimat from Manila, booking a place in town the night before usually gives you more control, more sleep, and a better chance of starting early.
Best Time to Hike Mt. Kimat
The best time to hike Mt. Kimat is generally November to April, when the trail is usually drier and ridge movement is more manageable. That does not mean every day in that window is automatically safe or comfortable, but it is the most reliable planning season for a long exposed traverse.
From December to February, conditions are often cooler, which helps on open sections, though fog can still affect views and ridge atmosphere. From March to April, the trail can feel much hotter, especially once the sun fully hits the exposed parts of the route. This is where early starts matter most.
The rainy season raises the risk level quickly. Loose soil gets worse, narrow sections feel more consequential, and weather exposure becomes a bigger issue. A mountain with open ridges is not where you want to gamble on unstable conditions or lightning-prone afternoons.
A simple planning rule works well here:
- Dry months are better
- Cooler months are more forgiving
- Wet weather makes the traverse harder and less predictable
For safety and comfort, start early and avoid treating weather as a minor detail on this mountain.
What to Wear, What to Bring, and Water Strategy
For the Mt. Kimat Hike, pack for exposure, distance, and a long day on foot. This is not the kind of route where you can assume convenient water, deep shade, or a forgiving exit if you underpack. The best gear strategy is simple: stay light, but do not get careless.
Bring:
- Trail shoes or hiking boots with decent grip
- Sun protection: cap, sunglasses, sleeves, sunscreen
- Light insulating layer for cooler morning wind
- Rain jacket or light shell
- Headlamp for early starts or delays
- Trekking poles for pacing and stability
- High-energy snacks and enough food for a full mountain day
- Basic first-aid kit
- Power bank and charged phone
- Small trash bag or dry bag for essentials
For water, the safest strategy is to carry enough from the start. On an exposed route like this, 3 to 4 liters is a realistic planning range for many hikers, depending on weather, pace, and personal intake. Refill points may appear, but they may vary by season. Do not plan your day around uncertain water.
If you are deciding what matters most, prioritize three things: grip, sun protection, and hydration. Those will affect your day more than any optional extra.
Safety Reminders, Signal, Emergency Contacts, and Road Warnings
Mt. Kimat Ilocos Sur planning should include more than just summit goals. Signal can be unreliable, weather can change the feel of exposed sections fast, and the road approach to Cervantes may be winding enough to tire out travelers before the hike even begins. A good plan here is less about drama and more about reducing avoidable friction.
Treat mobile coverage as inconsistent. Download maps before the trip, keep key contacts saved offline, and do not assume you can fix transport issues on the fly once you are already deep into the route.
Keep these safety points in mind:
- Avoid late starts on bad-weather days
- Do not treat the ridge sections casually, especially when tired
- Reconfirm your exit pickup before you begin
- Expect winding mountain roads on the way in and out
- Save local emergency channels before the trip
For emergency references, the outline points to the usual municipal blocks you should have on hand:
- Mayor’s Office
- BFP
- Police Assistance
- MDRRMC
- Municipal email
Rather than relying on old screenshots, pull the current local contact details from official municipal or tourism pages before your hike.
Mt. Kimat FAQs
Where is Mt. Kimat located?
Mt. Kimat Location is in Barangay Malaya, Cervantes, Ilocos Sur. Most route descriptions connect it with the Bessang Pass side for the jump-off and the Zigzag side for the exit.
How hard is Mt. Kimat?
It is commonly treated as a 6/9 hike. That makes it better suited to hikers with decent endurance and comfort on exposed terrain than to casual first-timers.
How many kilometers is Mt. Kimat?
Mt. Kimat KM is generally placed around 15 to 16 km. The full day feels longer than the number suggests because it is a traverse with logistics on both ends.
How high is Mt. Kimat?
Mt. Kimat MASL is commonly cited at around 1,500 to 1,554 meters above sea level. The height matters, but trail character and exposure matter just as much.
Is Mt. Kimat beginner friendly?
Not for casual beginners. A fit first-timer with good preparation may finish it, but this is not the kind of hike I would frame as an easy starter mountain.
Do I need a guide for Mt. Kimat?
Guide support is commonly treated as standard practice in current planning references. Confirm the current setup locally before your hike.
What is the jump-off for Mt. Kimat?
Most planning notes place the jump-off on the Bessang Pass side. The exit is usually handled separately on the Zigzag side.
What is the best time to hike Mt. Kimat?
The best time to hike Mt. Kimat is usually from November to April. Dry conditions and early starts make the route more manageable.
Can I do Mt. Kimat DIY from Manila?
Yes, but it takes planning. The biggest challenge is not reaching Ilocos Sur, but arranging the final transfer to the jump-off and the pickup from the exit.
Is there water on the trail?
Possible water points may exist, but they can be seasonal and unreliable. Carry enough water and treat refills as a bonus, not part of your main plan.
Final Planning Tips Before You Hike Mt. Kimat
- Confirm access and the current registration point before your trip
- Confirm guide setup and any local policy changes
- Arrange exit-side pickup before the hike starts
- Recheck weather and road conditions, especially in wet months
- Carry enough water for a hot, exposed trail day
- Start early to reduce heat exposure and pacing pressure
- Do not underestimate the hike just because the elevation number looks manageable
- Build buffer time into your transport plan, especially if you are going DIY
Read more hiking and travel guides
If you are planning this climb, it also helps to read a few related guides before finalizing your trip. These articles can help you compare difficulty, build a bigger Ilocos Sur itinerary, or understand where this route fits among other mountains in the Philippines.
Aw-Asen Falls in Sigay, Ilocos Sur DIY Travel Guide – A good side trip if you want to explore more of inland Ilocos Sur after your hike.
19 Must-Visit Ilocos Sur Tourist Spot 2025 Guide – A broader Ilocos Sur guide if you want to turn your climb into a longer provincial trip.
Beginner-Friendly Hikes in the Philippines – Helpful if you want to compare this route against easier mountains before deciding if it fits your current level.
Major Climb Mountain Philippines Difficulty 5–8 – A useful reference if you want to understand where this mountain sits in the major-climb range.
Mountains in the Philippines Travel Guide – A broader roundup for hikers building a longer mountain bucket list across the country.