Mt. Kupapey and Mt. Fato quick facts
| Field | Planning Value to Use |
|---|---|
| Mountain name | Mt. Kupapey / Mt. Fato |
| Location | Barangay Maligcong, Bontoc, Mountain Province |
| Province / municipality / barangay | Mountain Province / Bontoc / Maligcong |
| Elevation / MASL | Mt. Kupapey: 1,647 MASL; Mt. Fato: 1,438 MASL |
| Difficulty level | Commonly treated as a minor hike, around 3/9 |
| Trail type | Usually done as a twin-hike side trip from Maligcong; Mt. Kupapey often includes a traverse-style descent into the terraces |
| Estimated hiking time | Mt. Kupapey: around 1.5 to 2.5 hours up; Mt. Fato: around 1 to 2 hours up |
| Estimated distance | Variable depending on route flow and side walks around the terraces |
| Jump-off / registration point | Maligcong village / homestay-coordinated guide setup |
| Best time to hike | Mt. Kupapey for sunrise; Mt. Fato for sunset; green months around May to July; golden terraces around August to early September depending on harvest |
| Day hike or overnight | Best as a 2D1N trip from Manila; possible as a day activity only once already in Maligcong |
| Guide requirement | Best treated as required or strongly expected for summit hikes |
| Water source | Do not rely on trail water; bring your own |
| Cell signal | Patchy; Globe and Smart can vary by spot |
| Beginner-friendliness | Yes for fit beginners, but the logistics are harder than the trails |
Is Mt. Kupapey worth it for a DIY trip?
Yes, Mt. Kupapey is absolutely worth it for a DIY trip, especially if I want a Cordillera hike that feels scenic, quiet, and rewarding without being overly technical. The real highlight here is the sunrise hike to Mt. Kupapey, with Mt. Fato working perfectly as a sunset side climb the day before. What makes the trip stand out is not just the summit itself, but the whole Maligcong experience: the village setting, the pine-lined trails, and the way the Maligcong Rice Terraces slowly reveal themselves once the first light hits the valley. The bigger challenge is usually getting my timing right from Bontoc to Maligcong, not the actual hike.
I’d recommend this trip to hikers who enjoy more than just checking off a summit. This works well for fit beginners, weekend DIY travelers, and anyone who wants a mountain trip with more atmosphere and less crowd pressure than the usual Cordillera stops. If I only have time for one, I’d still prioritize Mt. Kupapey. But if my schedule allows it, doing Mt. kupapey and Mt. Fato together gives the trip much better rhythm. In the end, this is more about the overall experience than raw hiking difficulty.
Where is Mt. Kupapey located and what makes Maligcong special?
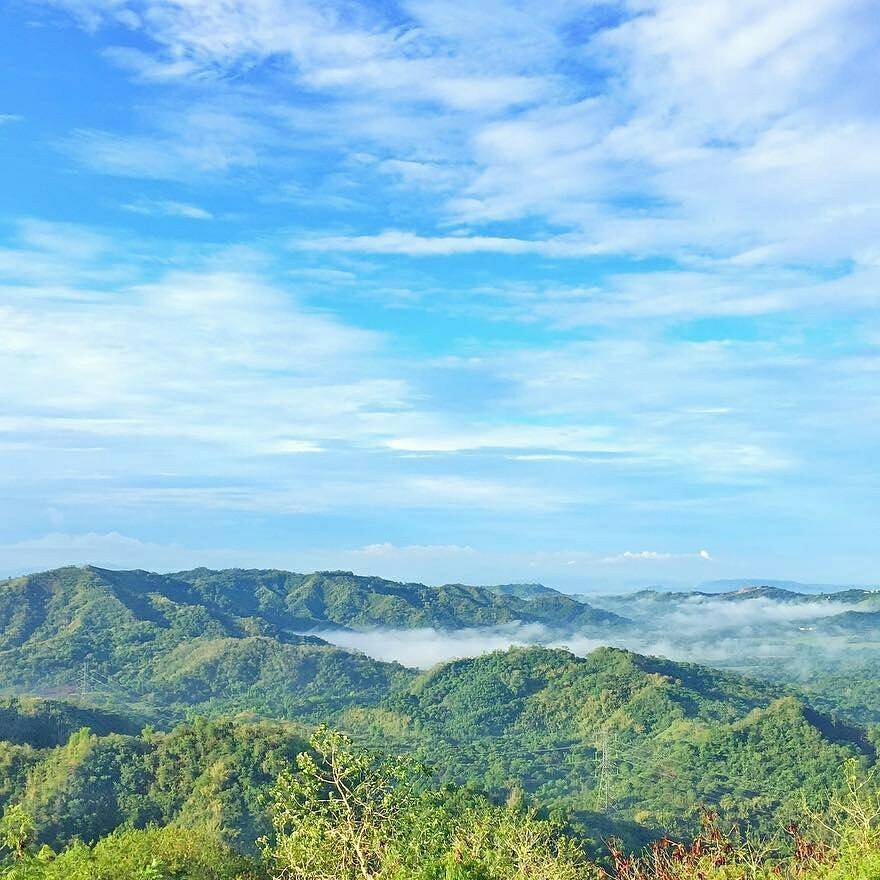
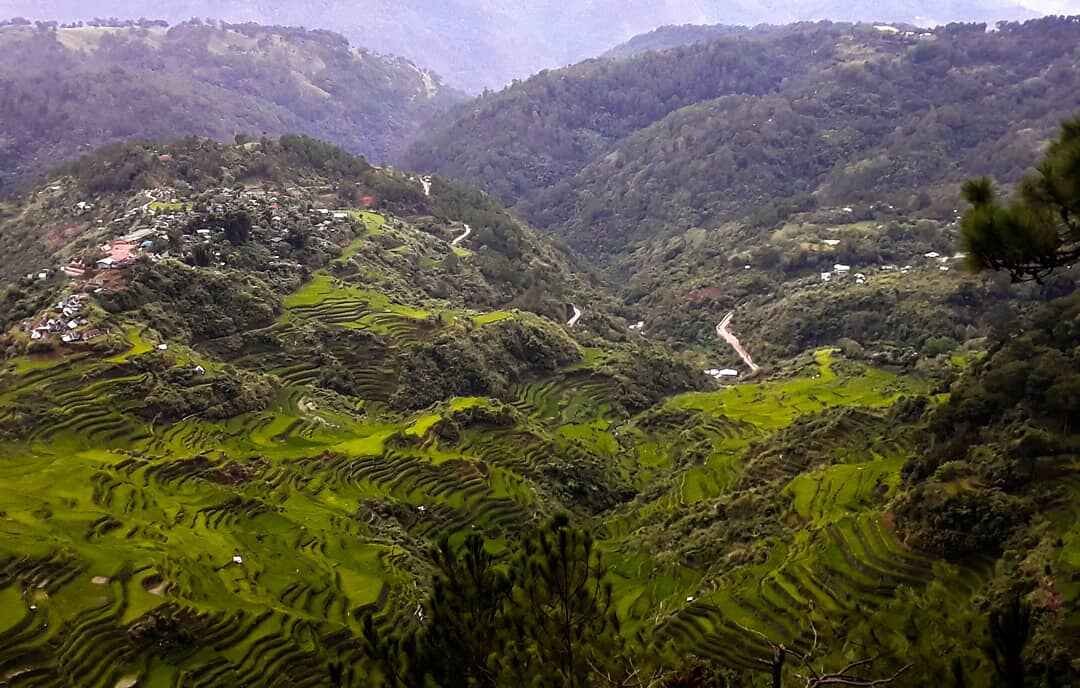
Mt. Kupapey is located in Barangay Maligcong, Bontoc, Mountain Province, not in Sagada. The same goes for Mt. Fato, which sits in the same upland village landscape. So if someone is searching where is Mt. Kupapey located, the simple answer is this: it’s in Maligcong, an elevated barangay of Bontoc that is also home to the beautiful Maligcong Rice Terraces. Yes, I can visit Maligcong mainly for the terraces, but the destination makes more sense when I experience the village, the hikes, and the landscape together.
What makes Maligcong special for me is that it does not feel like a typical summit-only trip. I’m not arriving at a crowded highway jump-off packed with stalls, noise, and rushed registration. I’m arriving in a quiet mountain village where homestays sit close to the terraces, pine trees frame the slopes, and the peaks feel like part of everyday local life instead of a separate tourist product. That is what gives this trip its character.
I can hike Mt. Kupapey for sunrise, do Mt. Fato for sunset, and still spend time walking along the rice terraces in between. The whole place feels slower, more grounded, and more intimate than the usual high-traffic Cordillera stops, and that is exactly why it stays memorable.
Table of Contents

Mt. Kupapey difficulty, Mt. Fato difficulty, MASL, and hiking time
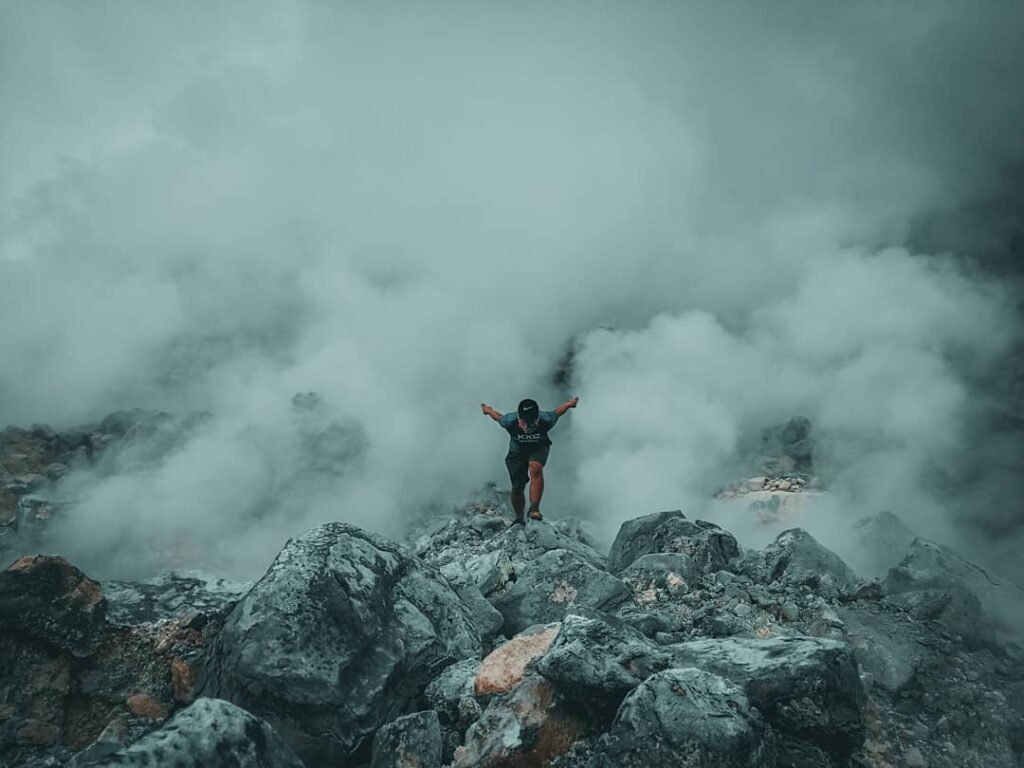
Both Mt. Kupapey and Mt. Fato are manageable minor climbs, not brutal major hikes. Mt. Kupapey is the higher of the two at 1,647 MASL, while Mt. Fato sits at 1,438 MASL, and both are commonly treated around 3/9 difficulty. That said, first-timers can still get surprised by the steep opening sections, slippery footing, and the fact that Kupapey usually starts long before sunrise. So no, these are not “hard” in the classic mountaineering sense, but they still demand decent stamina, stable footing, and realistic expectations.
Mt. Kupapey difficulty and trail effort
Mt. Kupapey is the more rewarding hike for me, but it also feels more serious because of the timing and the extra elevation.
- Elevation: around 1,647 MASL
- Difficulty: commonly rated around 3/9
- Hiking time: usually around 1.5 to 2.5 hours to the summit
- Trail feel: starts near the terraces, enters a muddy forest trail, then opens into grassland before the final push
- Best timing: usually done as a pre-dawn ascent for sunrise and possible sea of clouds
What makes Kupapey feel tougher is not just the climb itself. It is colder, darker, and quieter because I am usually starting while the village is still asleep. The forest section can feel steeper than expected, especially when the ground is wet, and that early-morning chill adds another layer to the effort.
Mt. Fato difficulty and trail effort
Mt. Fato is shorter and feels more relaxed, which is why I like it as the sunset hike.
- Elevation: around 1,438 MASL
- Difficulty: also commonly rated around 3/9
- Hiking time: usually around 1 to 2 hours to the summit
- Trail feel: begins with a steep staircase, then moves into a pine forest before reaching the rocky summit
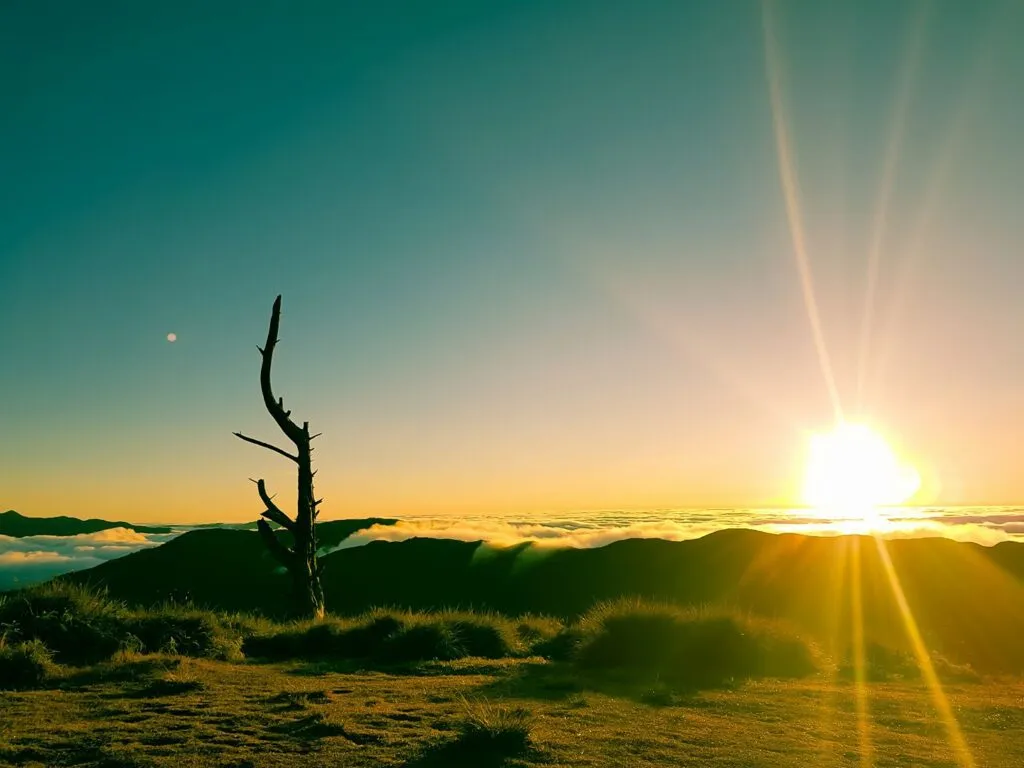
- Best timing: better as a sunset climb
If I compare the two directly, Mt. Fato Difficulty feels slightly easier overall because it is shorter and usually done in warmer late-afternoon light. The trail still has effort, especially on the opening climb, but it does not carry the same cold, sleepy, pre-sunrise pressure that Mt. Kupapey does.
What the Mt. Kupapey and Mt. Fato trails are actually like
Expect a minor hike with real footing issues, not a paved viewpoint walk.
This is one of those trips where the trail texture matters more than the difficulty rating makes it sound. Mt. kupapey and Mt. Fato are both beginner-friendly on paper, but once I am actually on the path, what stands out is the contrast between wet forest soil, pine-covered sections, exposed grass, and uneven rocky summit areas. It is scenic, but I still need to watch every step.
Mt. Kupapey trail character
- The trail starts close to the terraces and quickly enters a shaded forest
- The first big impression is the muddy section under the trees
- The ground can feel soft, wet, and slippery, especially after rain or morning moisture
- Once I break out of the forest, the trail opens into a grassland ridge that feels wider, brighter, and less enclosed
- The final summit push is shorter, but it still needs steady footing
- On descent, the route can continue through a terrace traverse, which is one of the best parts of the whole trip
Mt. Fato trail character
- The climb starts with steep concrete steps right out of the village
- After that, the trail shifts into a pine forest with a more natural dirt-and-rock feel
- The footing is less muddy than Kupapey in many conditions, but it can still be uneven
- The summit area is defined by rock formations and a rocky summit viewpoint
Biggest surprises first-timers should expect
- Trail signage is limited, so local guidance really matters
- There is no reliable water resupply once I leave the village
- The descent can feel trickier than the ascent if the trail is wet
- The terraces can suddenly appear on the way down from Kupapey, and that shift from dark forest to open rice-field views is easily one of the most memorable parts of the route
Best month to hike Mt. Kupapey and when to see the Maligcong Rice Terraces at their best
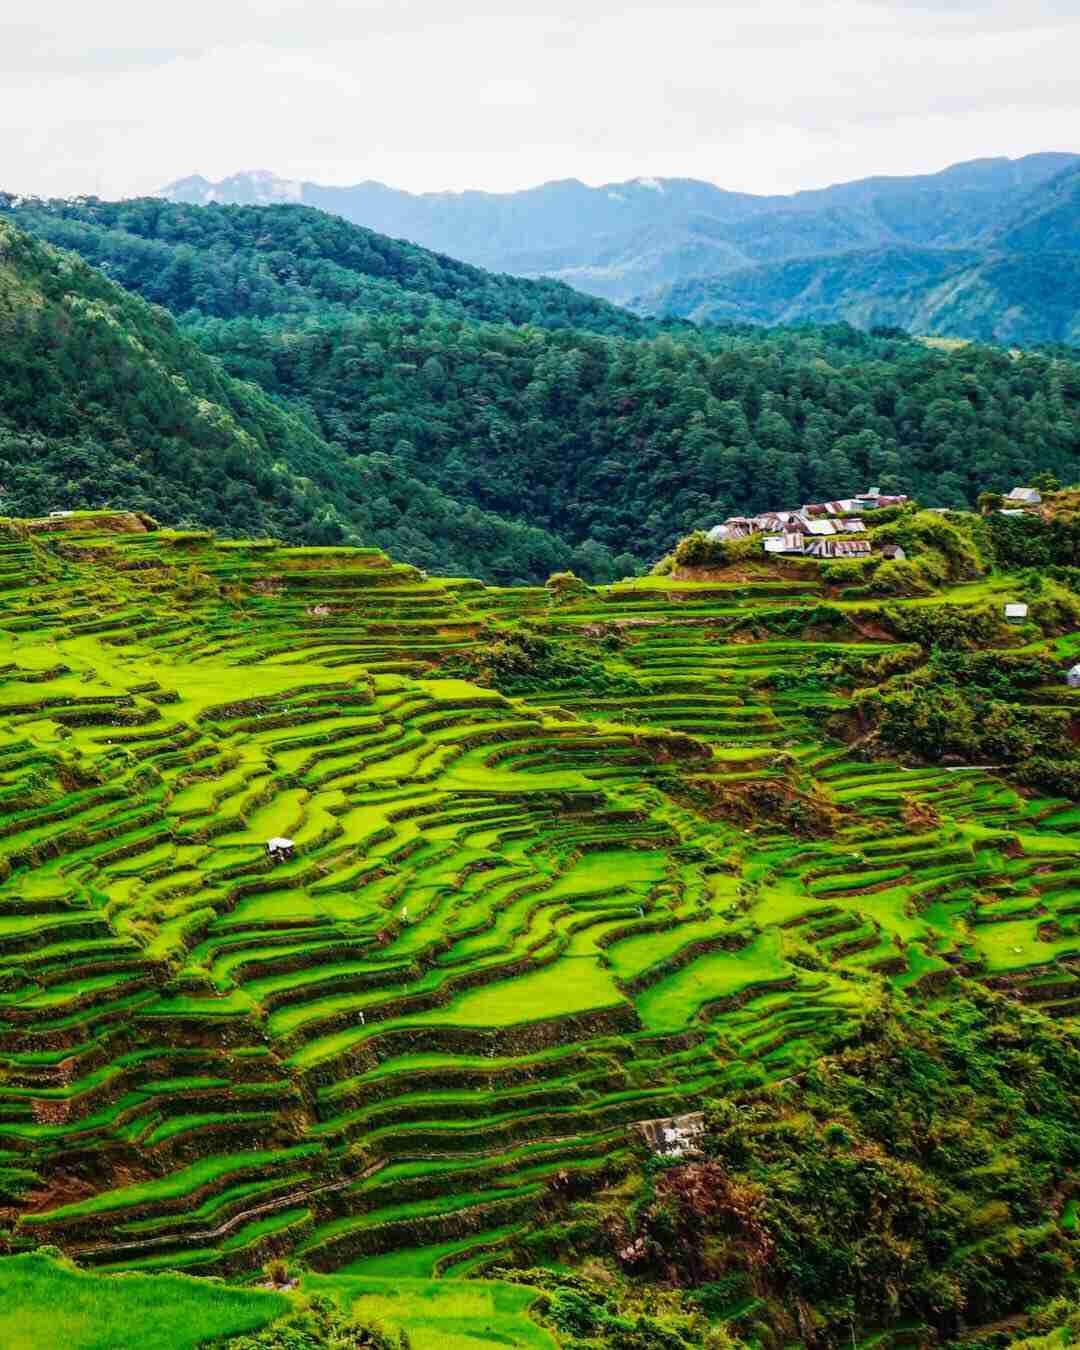
The best all-around timing, I would aim for May to July. That is usually the sweet spot when the Maligcong Rice Terraces look lush and green, the landscape feels alive, and the descent from Mt. Kupapey becomes especially photogenic. But the best month to hike Mt. Kupapey really depends on what kind of scenery I want. If I want mirror-like reflections, the early-year months are more interesting. If I want the classic green Cordillera look, late spring into early rainy season works best. If I want golden fields, I need to time it much closer to harvest. Sunrise views also depend heavily on weather, so even the “best” month does not guarantee a perfect sea of clouds morning.
- Mirror phase: January to early March
- This is when the paddies hold water and reflect the sky
- The terraces can look silver, moody, and highly photogenic at dawn
- This works well if I want more unusual Mt. Kupapey photos
- Green phase: May to July
- This is the best all-around season for most travelers
- The terraces look lush, full, and intensely green
- If I want the classic Maligcong look, this is usually the safest target window
- Golden phase: around August to early September
- This is when the fields turn heavy gold before harvest
- It is one of the most beautiful times to visit, but it is also the most timing-sensitive
- Harvest and weather can shift the visual window fast
My one caution here is simple: the golden season is never something I would treat as fixed. Harvest timing can move, and rain can affect both visibility and trail conditions.


How to go to Mt. Kupapey from Manila
The simplest DIY route is Manila to Bontoc, then jeepney to Maligcong. Yes, you can do this trip purely by commute, and for most readers planning how to go to Mt. Kupapey from Manila, this is still the cleanest public transport setup. On paper, the route looks straightforward. In real life, it becomes fragile once I reach Bontoc and start timing the last jeepney to Maligcong, because that final leg is the real bottleneck of the trip.
Manila to Bontoc
For the easiest DIY setup, I would go straight to Bontoc first.
- Ride a CODA Lines bus from the HM Transport Terminal in Cubao
- The guide’s working schedule places the usual night departures around 8:00 PM, 9:00 PM, 10:00 PM, and 10:30 PM
- Travel time is usually around 10 to 11 hours
- The guide’s fare range runs from about ₱725 to ₱1,123, depending on bus class and how the ticket is booked
- Since departure times and seat classes can shift, I would still check live availability before leaving
This is the route I would prioritize because it is the most direct, and it gives me the best chance of reaching Bontoc with enough buffer for the next transfer. For a practical Mt. Kupapey itinerary, I would already budget the first major transport cost here: roughly ₱725 to ₱1,123 one way, or about ₱1,450 to ₱2,246 round trip just for the Manila-Bontoc bus segment.
Bontoc to Maligcong
This is the part of the Mt. Kupapey DIY guide that I would take most seriously.
- Final Maligcong access is by jeepney from Bontoc
- The jeepney terminal is along Capitol Road near the public market, although locals may point me to a nearby side street depending on the day
- Travel time is roughly 30 minutes
- The guide’s working fare baseline is around ₱20 to ₱25 per person
- The same guide uses rough ascent windows at 8:00 AM, 12:00 PM, 2:00 PM, 4:00 PM, and 5:00 PM
This second leg is cheap, but it is also the most delicate part of the entire Mountain Province commute. I might only spend around ₱20 to ₱25 to get up to Maligcong, but if I arrive in Bontoc too late and miss the last trip, the whole budget changes. That is why I never treat the Bontoc-to-Maligcong segment like an easy on-demand transfer.
What to do if you miss the last jeepney
If I miss the last jeepney, I usually have two choices:
- stay overnight in Bontoc and continue the next day
- arrange a special trip, which the guide places at around ₱700
That one mistake can wipe out the savings from doing the trip DIY, which is why this route feels easy at first but becomes very risky once I am chasing the last Maligcong ride.
Timing mistakes I would avoid
- arriving in Bontoc too close to the 5:00 PM cutoff
- assuming the Bontoc Circle / market area loading point will be identical every day
- not keeping at least extra cash for a possible ₱700 special trip
- treating the Bontoc-to-Maligcong leg as the easy part when it is actually the most fragile segment
- spending too long lingering in town when I should already be securing my seat to Maligcong
DIY vs joiner: which setup makes more sense for Mt. Kupapey and Mt. Fato?
For Mt. Kupapey and Mt. Fato, DIY is cheaper, while joiner is easier. That is really the clearest way I would frame it.
DIY is better for…
- hikers who are comfortable with transport coordination
- travelers who want to control their schedule in Bontoc and Maligcong
- small groups that can split the shared guide fee
- readers trying to keep the trip around the low-to-mid ₱2,000+ range
- people who do not mind handling the overnight bus, jeepney transfer, and homestay setup themselves
Joiner is better for…
- first-timers who do not want to deal with the Bontoc-to-Maligcong bottleneck
- solo travelers who prefer a fixed joiner package
- hikers who want bundled transport, guide coordination, and accommodation
- travelers willing to pay more to reduce planning risk
- anyone who sees convenience as more important than squeezing the budget
Using your research as the base, a tightly optimized DIY trip can land at around ₱2,052 for a lean 2D1N setup, then climb closer to ₱3,500 depending on meals and personal spending. Joiner-style packages in the same guide begin around ₱3,899 to ₱4,049, and even then, the knowledge base still suggests bringing around ₱1,500 extra for meals and personal expenses outside the package. For first-timers, I would recommend joiner if timing stress is a deal-breaker. For experienced DIY travelers, the savings and flexibility make public transport worth it.
Fees, guide setup, homestays, and on-ground logistics in Maligcong
Maligcong may look affordable at first glance, but I still need cash and coordination to make the trip work smoothly. This is not the kind of destination where I can arrive empty-handed and figure things out as I go. Once I get to the village, most of the costs are reasonable, but they are very real, and the setup works best when I already know what I need to pay and arrange.
Common fees I would plan around
- Environmental fee: around ₱30 to ₱50 per person
- Guide fee: around ₱500 to ₱600 per group
- Guide ratio: usually for 1 to 5 hikers
- Additional guide-related charge: around ₱100 to ₱150 per extra person if the group goes beyond the usual threshold
- Homestay rate: around ₱300 to ₱400 per person per night
- Kitchen or communal cooking use: around ₱50
- Post-hike banlaw: usually included in the homestay or charged only nominally
So if I am doing a basic shared DIY setup, I would already expect my on-ground core costs to include:
- ₱30 to ₱50 environmental fee
- about ₱100 to ₱120 each for guide share if we are five hikers splitting ₱500 to ₱600
- around ₱300 to ₱400 for homestay
- small cash for jeepney, food, and other village expenses
What I would settle in cash
- environmental fee
- local guide payment
- homestay payment
- jeepney fare and any tricycle help in Bontoc
- meals, snacks, and emergency allowance
What I would arrange the night before
- my sunrise call time
- my guide setup for Mt. Kupapey
- my return jeepney plan to Bontoc
- breakfast timing or packed food
- my trail clothes, headlamp, and cash for the next morning
For lodging, names like Suzette’s Homestay and Vilma’s Homestay come up naturally in the knowledge base because they are practical, established choices for hikers. Suzette’s is placed around ₱350 to ₱400 per person, while Vilma’s is useful because of its proximity to the jump-off. By evening, the whole place settles down early, and that quiet village rhythm becomes very obvious. Maligcong has a real cash only and early-lights-out culture, and that calm feeling of a mountain village shutting down before a 3:00 or 4:00 AM summit push is honestly part of the experience.

Sample Mt. Kupapey itinerary for a 2D1N DIY trip
Yes, you can do Mt. Kupapey and Mt. Fato in one weekend, and for most DIY hikers, a 2D1N itinerary is the most practical setup. The rhythm that makes the trip work is simple: Mt. Fato for sunset, Mt. Kupapey for sunrise, then descend through the terraces the next morning. It is a tight schedule, but it feels rewarding because I get both peak experiences without stretching the trip too long. I just have to accept that same-day adjustments can happen if public transport slips, especially on the Bontoc-to-Maligcong leg.
| Time | DIY 2D1N Option | Optional Joiner-Style Timing |
|---|---|---|
| Day 0 evening | Leave Cubao / Manila for Bontoc | Meet-up in Manila, overnight van or bus |
| Day 1 morning | Arrive in Bontoc, breakfast, buy last supplies | Continue land travel with organizer stops |
| 12:00 PM to 2:00 PM | Ride jeepney to Maligcong | Arrive Maligcong / settle homestay |
| 3:30 PM | Start Mt. Fato hike | Optional sunset hike |
| 4:30 PM to 5:00 PM | Summit Mt. Fato | Summit window |
| 7:00 PM | Back to homestay, dinner, prep for Kupapey | Dinner / briefing |
| 3:00 AM | Wake-up call | Wake-up call |
| 4:00 AM | Start Mt. Kupapey hike | Start hike |
| 5:00 AM to 5:30 AM | Summit / sunrise window | Summit / sunrise window |
| 7:00 AM onward | Descend through terraces | Descend through terraces |
| 8:00 AM to 9:00 AM | Breakfast, wash up, pack | Breakfast / checkout |
| 10:00 AM to 11:00 AM | Jeepney back to Bontoc | Depart Maligcong |
| Afternoon onward | Return to Manila or side trip to Sagada/Baguio | Continue organizer route |
Mt. Kupapey budget breakdown for DIY hikers
These are the planning figures I would use for a realistic Mt. Kupapey budget, not fixed guarantees. The most volatile line item is still the Manila-to-Bontoc bus fare, while the local Maligcong expenses are more stable once I arrive. If I want to save money on a Mt. Kupapey and Mt. Fato DIY guide, the biggest lever is still the shared guide fee, especially if I am traveling with a small group.
| Cost item | Planning figure to use | Notes |
|---|---|---|
| Manila to Bontoc bus fare | ₱1,232 to ₱1,377 | Current public route references for Coda bus classes; verify before booking |
| Bontoc to Maligcong jeepney | ₱20 to ₱40 | Public references conflict; use a range |
| Environmental / tourism fee | ₱30 to ₱50 | Per person |
| Guide fee | ₱500 to ₱600 per group | Best shared by up to 5 hikers |
| Extra guide charge if group is bigger | ₱100 to ₱150 per extra pax | Use only if applicable |
| Homestay | ₱300 to ₱400 per person | Basic village stay |
| Kitchen / cooking use | around ₱50 | If charged separately |
| Meals | ₱250 to ₱500 | Depends if I eat in Bontoc or at homestay |
| Water / snacks | ₱100 to ₱200 | Bring trail food |
| Tricycle in Bontoc | around ₱10 | Useful for terminal finding |
| Special trip risk fund | up to ₱700 | If I miss the last jeepney and charter transport |
| Estimated DIY total | around ₱2,400 to ₱3,600+ | Depends on bus class and sharing |
| Typical joiner reference | around ₱3,500 to ₱4,000+ | Depends on inclusions and organizer |
What to wear and bring for Mt. Kupapey and Mt. Fato
If I pack badly for this trip, I usually feel it before sunrise, when the temperature drops hard and the shaded trail starts feeling slick underfoot.
Clothing
- quick-dry shirt or quick-dry long-sleeve top
- fleece jacket or other warm layer for the cold Mt. Kupapey sunrise hike
- light rain shell, windbreaker, or compact poncho because mountain weather can flip fast
- hiking pants, leggings, or flexible trail pants instead of jeans
- extra shirt and socks for after the hike
Trail gear
- headlamp for the pre-dawn Kupapey climb and for possible late descent from Fato
- sturdy shoes with strong grip or proper muddy trail shoes
- trekking poles if I want better balance on muddy forest sections and terrace paths
- drinking water for the whole hike
- trail snacks like bread, chocolate, nuts, or energy bars
- small daypack with a waterproof liner or dry bag
Overnight essentials
- basic toiletries and towel for wash-up after the hike
- cash for fees, meals, jeepney fare, and small village expenses
- power bank since I do not want to rely on charging access too much
- sleepwear that can handle the cool mountain night
- personal medicine, especially if I am sensitive to cold or long bus rides
Camera / phone notes
- keep my phone and camera in a waterproof pouch or dry bag
- bring extra battery or power bank because the cold can drain devices faster
- do not rely on signal for everything; patchy service is normal
- if I plan to shoot sunrise, I would prep my gear the night before so I am not fumbling in the dark

Safety reminders and mistakes to avoid in Maligcong
- The biggest DIY mistake is treating the Bontoc-to-Maligcong ride like an easy last-mile transfer. If I miss the Maligcong jeepney, the whole trip can get delayed, more expensive, or forced into an overnight stay in Bontoc.
- I would not rely on mobile data to carry the trip. Signal can be patchy, so a purely spontaneous setup is risky once I am already moving between Bontoc, the jeepney terminal, and the village.
- Bring enough cash before heading up. Maligcong is not the kind of place where I should expect ATMs, card terminals, or easy digital payment backup.
- Start Mt. Kupapey early if sunrise is the goal. A delayed wake-up means I either lose the best light or rush the climb more than I should.
- The trails are manageable, but the footing is not something I ignore. Kupapey’s shaded sections can get muddy and slick, and the slippery descent is where tired legs usually feel it most.
- Solo travelers can do this, but only if they plan ahead. I would arrange the homestay, ask about the next jeepney, and confirm guide setup instead of assuming everything will fall into place on arrival.
- Respect village quiet hours and local guidance. Maligcong works because it still feels like a real mountain community, not a noisy jump-off built around tourists.
Scenic highlights, photo spots, and why Mt. Kupapey photos stand out
If I only care about scenery, Mt. Kupapey photos usually give me the more iconic payoff because the sunrise view opens toward the terraces and the valley below. That said, Mt. kupapey and Mt. Fato work best together: Kupapey gives me soft morning cloud cover, layered rice terraces, and possible sea of clouds, while Fato gives me warm rock textures, pine silhouettes, and a more dramatic golden-hour summit feel. The best Maligcong shots do not always come from one single summit either. Some of the most photogenic frames happen on the terrace descent or even near the village edge during green or golden season.
- Mt. Kupapey summit: best at sunrise for the classic sunrise view, layered terraces, and possible sea of clouds
- Kupapey descent: one of the strongest photo sections because the trail drops into a terrace foreground instead of ending with a plain return walk
- Mt. Fato summit: best in late afternoon when the rocky summit and boulders catch warm golden hour light
- Pine sections near Fato: strong for moodier shots with tree lines and darker contrast
- Village-edge and homestay views: best during the green and golden terrace months, especially when I want wider landscape frames without hiking hard
- Best overall answer: Kupapey is better for iconic postcard-style photos, but Fato is still worth it if I want sunset texture and a second visual angle on Maligcong.

Mt. Kupapey and Mt. Fato FAQs
Is Mt. Kupapey beginner-friendly?
Yes, Mt. Kupapey is beginner-friendly for fit hikers, but the trip is more logistics-heavy than trail-heavy. The climb is commonly treated as a minor hike, yet the pre-dawn start, muddy shaded sections, and tight transport timing from Bontoc to Maligcong can still catch first-timers off guard.
How high is Mt. Kupapey?
Mt. Kupapey stands at 1,647 MASL. It is the higher of the two peaks in Maligcong and the one most hikers prioritize for sunrise and possible sea-of-clouds views.
How high is Mt. Fato?
Mt. Fato stands at 1,438 MASL. It is lower and usually quicker than Kupapey, which is why it works well as the sunset side hike in a 2D1N trip.
Do I need a guide in Maligcong?
Yes, I would treat a guide arrangement as the normal setup in Maligcong. Your knowledge base frames local guiding as mandatory in practice, both for trail navigation and for the community-based tourism system in the village.
Can I do Mt. Kupapey without staying overnight?
Yes, it is possible only if I am already in Bontoc or nearby, but for most travelers it works best as an overnight in Maligcong. Staying in the village makes the sunrise schedule much easier and also gives enough time to add Mt. Fato without rushing everything.
What is the best month to hike Mt. Kupapey?
The best all-around months are usually May to July if I want lush green terraces. If I want mirror-like paddies, January to early March is more interesting, while August is better for golden fields if harvest timing lines up.
How do I get to Mt. Kupapey from Manila?
The simplest DIY hike route is Manila to Bontoc by overnight bus, then Bontoc to Maligcong by jeepney. The hardest part is not the long bus ride but the timing of the Bontoc jeepney, which should always be checked with a buffer instead of assumed.
Is Mt. Fato worth adding to the trip?
Yes, Mt. Fato is worth adding if I have the extra half day. It balances the trip well because Kupapey is the cold sunrise climb, while Fato gives me a shorter sunset hike with rocky viewpoints and a different angle over Maligcong.
Final planning tips before you go
- Confirm my Manila-to-Bontoc bus seat early, especially if I am traveling on a weekend.
- Reconfirm jeepney timing in Bontoc instead of relying on one old schedule online.
- Book my homestay ahead if I am going during the green or golden terrace months, or if the trip falls on a busy weekend.
- Bring enough cash for transport, homestay, guide fee, environmental fee, and meals.
- Set my sunrise prep the night before, including guide coordination and wake-up time for Kupapey.
- Pack traction-friendly footwear because the trail can get muddy and slick, especially in shaded sections.
- Bring a headlamp for the pre-dawn Kupapey climb and for any late return from Fato.
- Keep my phone charged, but do not depend on signal for every step of the trip.
- Leave room for delays, because the reward here is not just the summit, but waking up in Maligcong and watching the terraces slowly come alive.
More Cordillera Hiking Guides You Can Read Next
If you enjoy quieter mountain villages, scenic ridgelines, and highland landscapes like Maligcong, these other Cordillera guides on Lakbay Pinas are worth checking next:
- Mt. Kotkot Hiking Guide in Benguet – A great follow-up if you want another scenic Cordillera hike with open views and a beginner-friendly feel.
- Northern Blossom Flower Farm in Atok, Benguet – Perfect if you want a lighter highland side trip after a mountain adventure.
- Guide to Lake Tabeo in Kabayan, Benguet – A good read for travelers who enjoy cool-weather mountain destinations and peaceful Cordillera scenery.
- Ultimate Guide to Mt. Ulap in Itogon, Benguet – One of the most popular beginner-friendly hikes in the Cordilleras and a useful comparison to Mt. Kupapey.
- Mt. Kabunian in Bakun, Benguet DIY Travel Guide – A solid next read if you want a more dramatic Cordillera climb after Mt. Kupapey and Mt. Fato.