Quick Facts: Nagpatong Rock
Before you commit to the drive, here is the technical snapshot of what you are getting into. While it sits near other popular hikes like Mt. Batolusong & Kay-Ibon Falls, Nagpatong is significantly more technical.
Location: Barangay Cuyambay, Tanay, Rizal
Jump-off Point: Sitio Tablon (accessible only after registering at Barangay Cuyambay Hall)
Elevation: ~660 Meters Above Sea Level (MASL)
Difficulty: 4/9 (Minor Climb, but with “Rock Precautions”)
Trail Class: 1-2 (Forest approach), 4 (Vertical Limestone Scramble)
Hiking Time: 1.5 – 2 Hours to Summit / 4-5 Hours Total (Back-and-forth)
Best Time to Hike: Weekdays during the Dry Season (November – April).
The “Sharp” Reality (My Warning): When they say “Rock Precautions,” they mean it. The limestone here is incredibly abrasive—imagine climbing a wall made of cheese grater blades.
During my hike, I saw people in basic running shorts get scraped up badly on the narrow fissures. The Barangay Cuyambay officials are strict about the 1:5 guide ratio for a reason: if you slip on the wet limestone (which becomes “greasy” in the rainy season), you need a spotter immediately.
Pro-Tip: Do not hike this during heavy rains. The Class 4 limestone sections become nearly zero-friction zones when wet, turning a fun scramble into a dangerous ordeal.
Introduction
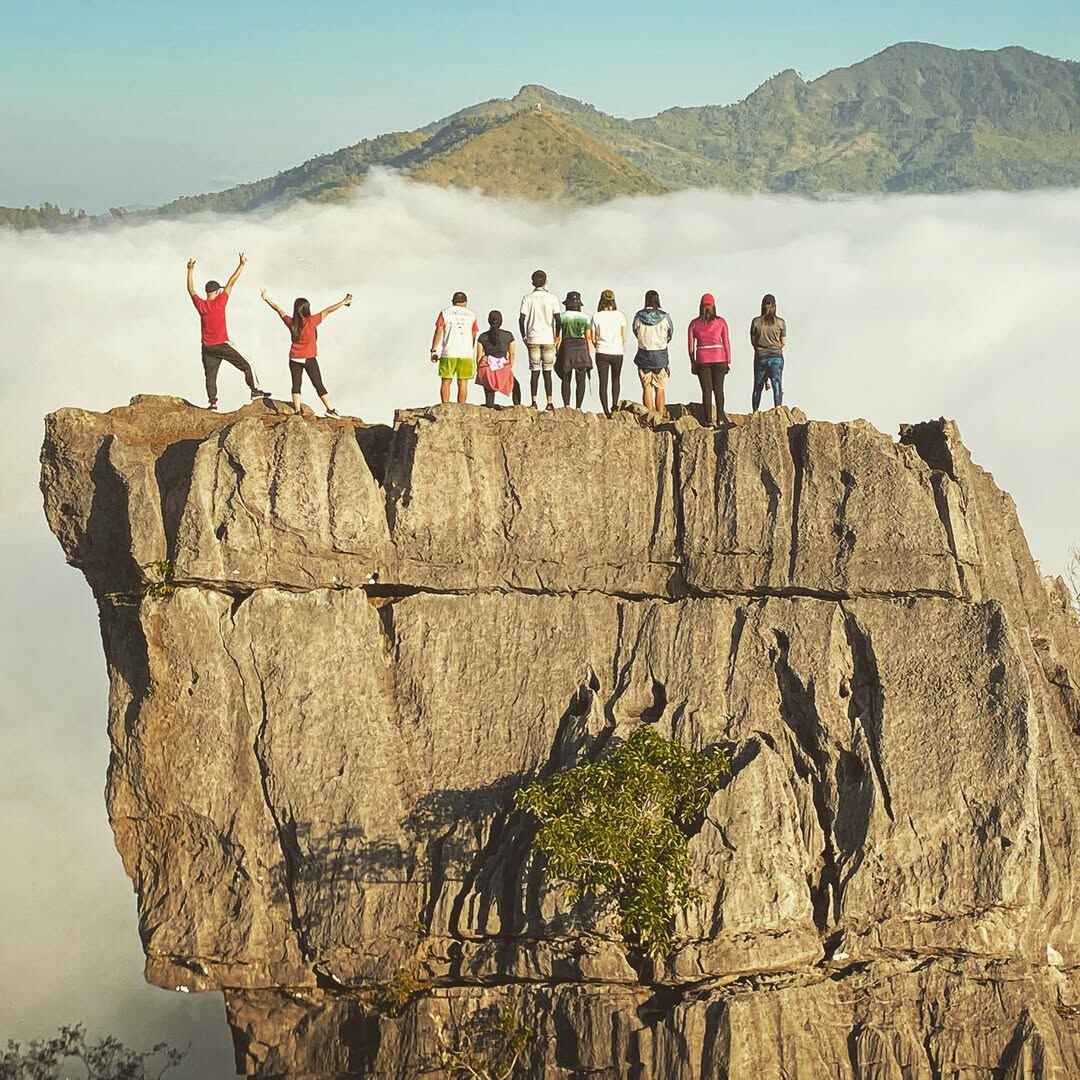
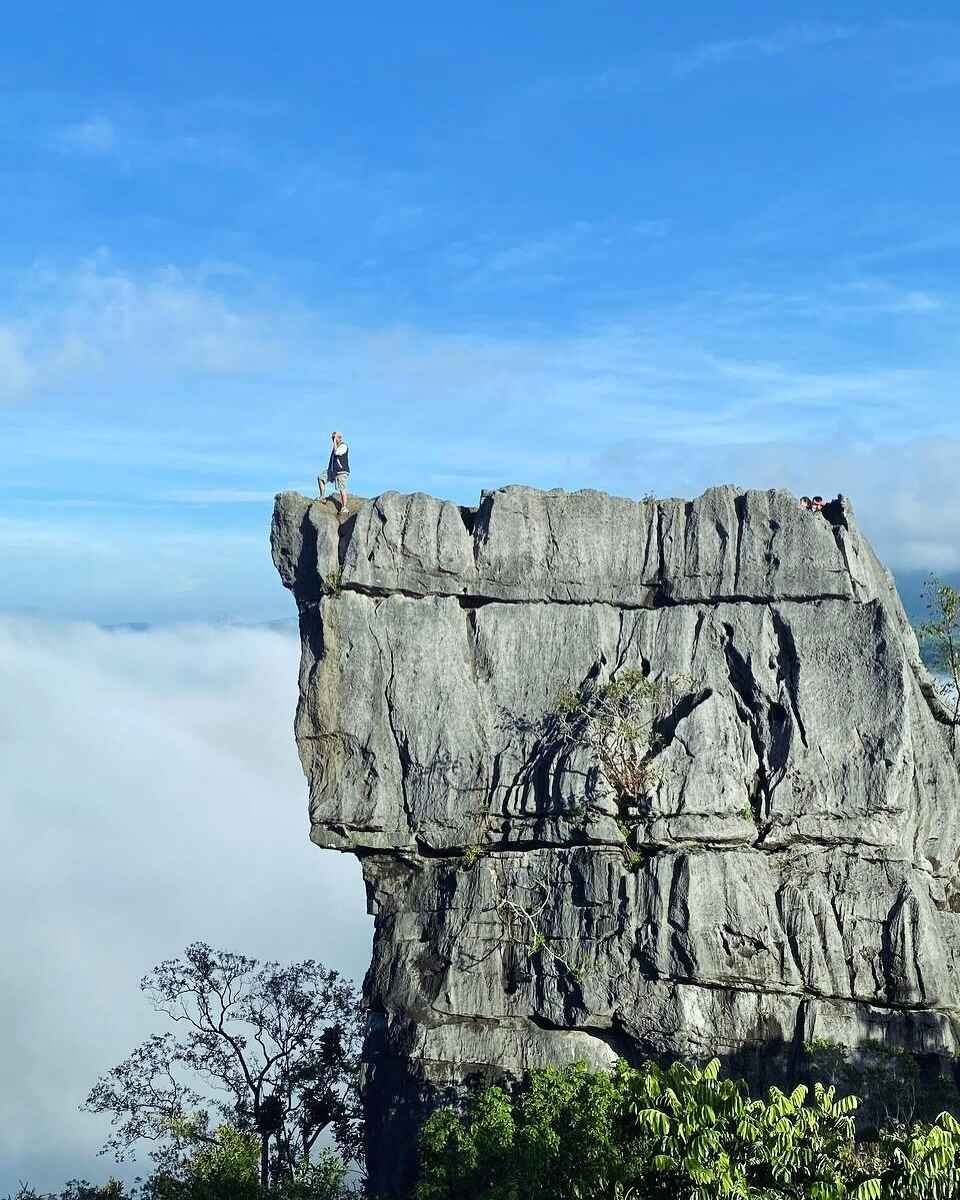
Nagpatong Rock Formation in Barangay Cuyambay, Tanay, Rizal isn’t your typical day hike—it is a vertical karst skyscraper rated 4/9 difficulty. Standing at 660 MASL, this limestone tower demands rock scrambling skills rather than just endurance. Best visited during the dry season (Nov–April) to avoid slippery rocks, the trek offers a “Sunrise Intercept” view of the Sierra Madre and can be combined with a cool-down dip at Tungtong Falls.
Most mountains in the Philippines welcome you with rolling slopes and grassy ridges; Nagpatong Rock Formation greets you with a vertical wall. Unlike the conical peaks of its neighbors, this geological oddity consists of two massive limestone towers standing in proximity, creating the illusion of rock layers “stacked”—or nagpatong in Tagalog—upon one another.
While many hikers flock to the usual 14 Must-Visit Tanay Rizal Tourist Spots, Nagpatong offers something different. It wasn’t until I was clinging to the bamboo ladder, staring at the gap between the Summit Block and the Viewing Block, that I realized this isn’t just a hike; it’s an obstacle course. The terrain is a sharp, jagged limestone playground that will shred your pants if you aren’t careful.
But the reward for navigating the “Bamboo Slide” and the vertical fissures is one of the most unique photos in Rizal. In this 2026 DIY Guide, I’m skipping the fluff to give you the exact operational details I used: from the critical turn at Pico de Pino Café, to the breakdown of the ₱750 Guide Fee, and why you absolutely need to bring gardening gloves for this climb.
We will also cover the “Sunrise Intercept” itinerary—my personal strategy to beat the 1-hour queues at the ladder—and how to add the Tungtong Falls module for a complete day of adrenaline and recovery.
Table of Contents
How to go to Nagpatong Rock (Manila to Tanay)
To reach Nagpatong Rock via public transport, take a UV Express or Jeep from Cubao (Aurora Blvd) or Starmall Mandaluyong to Cogeo Gate 2 (approx. ₱35). From the Cogeo terminal, board a jeep bound for Sampaloc/Tanay (₱50-60) and request a drop-off at the Cuyambay Junction. Finally, hire a tricycle (₱25-30/head) to the Barangay Cuyambay Hall for mandatory registration.
Public Transport (The Commuter’s Algorithm)
Navigating to Tanay is a “Hub-and-Spoke” mission. You cannot get a direct ride from Manila to the jump-off; you must transfer at Cogeo Gate 2.
Step 1: The Hub (Manila to Cogeo) From Cubao (under LRT-2) or Starmall Mandaluyong, board a Jeepney or UV Express bound for Cogeo Gate 2 or Padilla.
Travel Time: 45–60 minutes.
Fare: Approximately ₱26–35.
Tip: If coming from Robinsons Galleria, UV Express vans are also available at the transport terminal.
Step 2: The Mountain Road (Cogeo to Cuyambay) Alight at Cogeo Gate 2 near the City Mall/Public Market and walk to the jeepney terminal. Look for jeeps with signage “Sampaloc” or “Tanay”.
First Trip: Typically 5:00 AM – 6:00 AM.
Fare: ₱50–60.
Stop: Tell the driver to drop you at “Barangay Cuyambay.”
Step 3: The Local Insert (Junction to Hall) The jeep drops you at the highway junction. From here, hire a local tricycle to take you down to the Barangay Cuyambay Hall.
Fare: ₱25–30 per person.
Requirement: You must stop here first. Going straight to the trailhead (Sitio Tablon) without a guide/permit is prohibited.
For Northern Hikers (Bulacan/Pampanga): If you are coming from the North (e.g., Marilao or Malolos), don’t force a commute all the way to Starmall.
Take the UV Express from SM Marilao to SM North/Trinoma (₱46–60, starts 6:00 AM) or the Precious Grace P2P from Malolos to Trinoma (₱80).
From Trinoma, take the MRT-3 or EDSA Carousel to Cubao, then follow Step 1.
Private Vehicle (Waze / Google Maps)
If you are driving, set your navigation pin to “Barangay Cuyambay Hall”. The drive involves the Marikina-Infanta Highway (Marilaque), which is a high-speed mountain road known for motorcycle riders—drive defensively.
Crucial Landmark: Keep an eye out for Pico de Pino Café/Restaurant. This marks the junction where you must turn right to descend into the barangay.
Parking: You can park at the Barangay Hall or proceed further to Sitio Tablon (the jump-off).
Parking Fee: ₱50 (Motorcycles) to ₱100 (Vans/Cars).
My Honest Warning: The road descending from the highway to the Barangay Hall is paved but steep. If you are driving a sedan with low clearance, drive slowly. I personally prefer parking at the Barangay Hall and taking a Habal-Habal (₱40-50) to the jump-off to save my car’s suspension from the rough road ahead.
Nagpatong Rock Hiking Trail & Experience
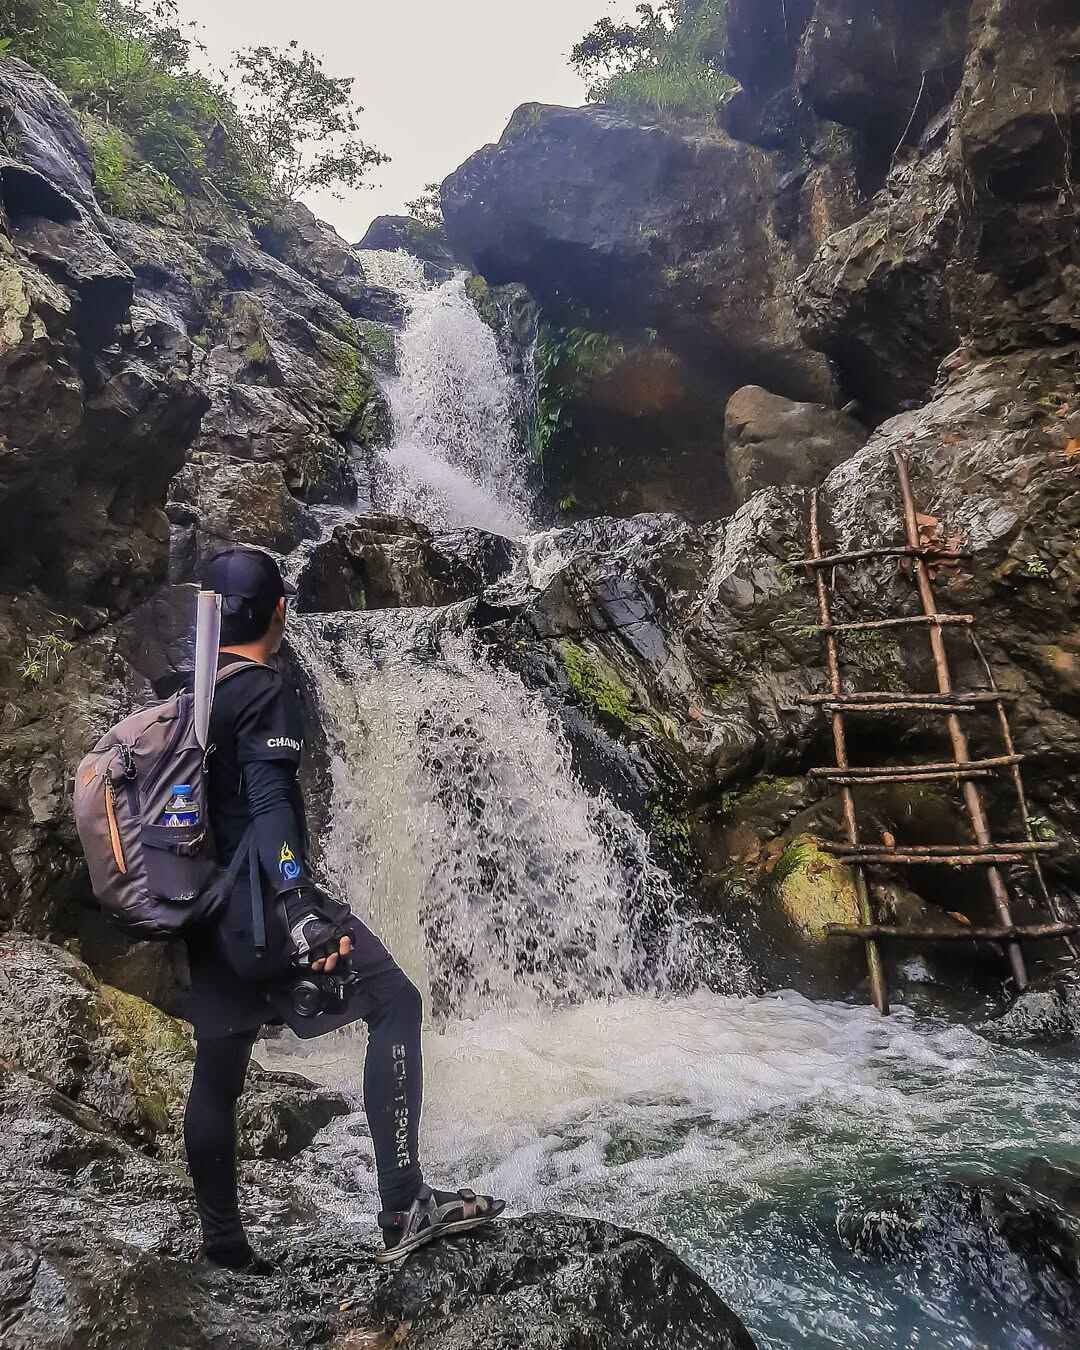
The trail to Nagpatong Rock begins with a rolling trek through bamboo thickets (“Buho”) and muddy dipterocarp forests. The difficulty spikes at the final assault, which involves vertical wooden ladders, squeezing through narrow limestone fissures, and scrambling on sharp ridges. Expect a mix of slippery dry leaves on the approach and high-friction abrasive rock at the summit.
Phase 1: The Bamboo & Mud
From the jump-off at Sitio Tablon, the first hour is deceptively easy but tricky for your footing. You will traverse extensive groves of Buho (Bamboo), where the shed leaves create a natural “carpet.”
My Honest Warning: This is the “Bamboo Slide.” Even on dry days, these leaves act like ball bearings over the hard-packed soil, causing more slips than the actual mud. I highly recommend using trekking poles here, but make sure to stow them away before the rock scramble.
As you gain elevation (past 500 MASL), the bamboo gives way to Mahogany and Binunga trees. This shaded section retains moisture, so expect deep, cohesive clay mud that clings to your shoes—heavy lugged footwear is non-negotiable here.
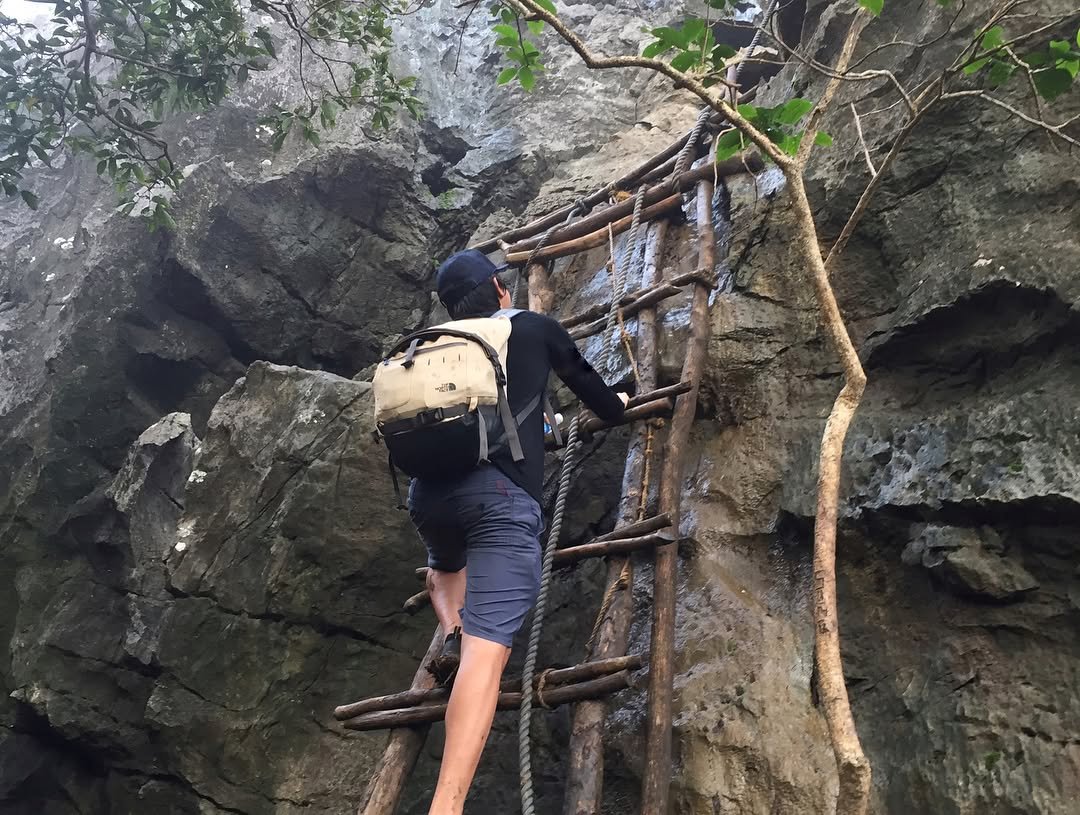
Phase 2: The Technical Ascent (The Crux)
Once you reach the base of the limestone towers, the hike turns into a climb. This is the bottleneck zone: a series of wooden and bamboo ladders bridge the vertical gaps between the rock faces.
Because the ladders only support one person at a time, queues here can last 30 to 60 minutes on weekends. While waiting on the exposed ledges, be prepared for the “wind tunnel” effect channeling through the gap between the Summit Block and the Viewing Block.
You will also need to squeeze through narrow fissures in the rock. If you brought a bulky 40L backpack, leave it at the base camp with a guide; it will only snag and tear on the sharp walls.
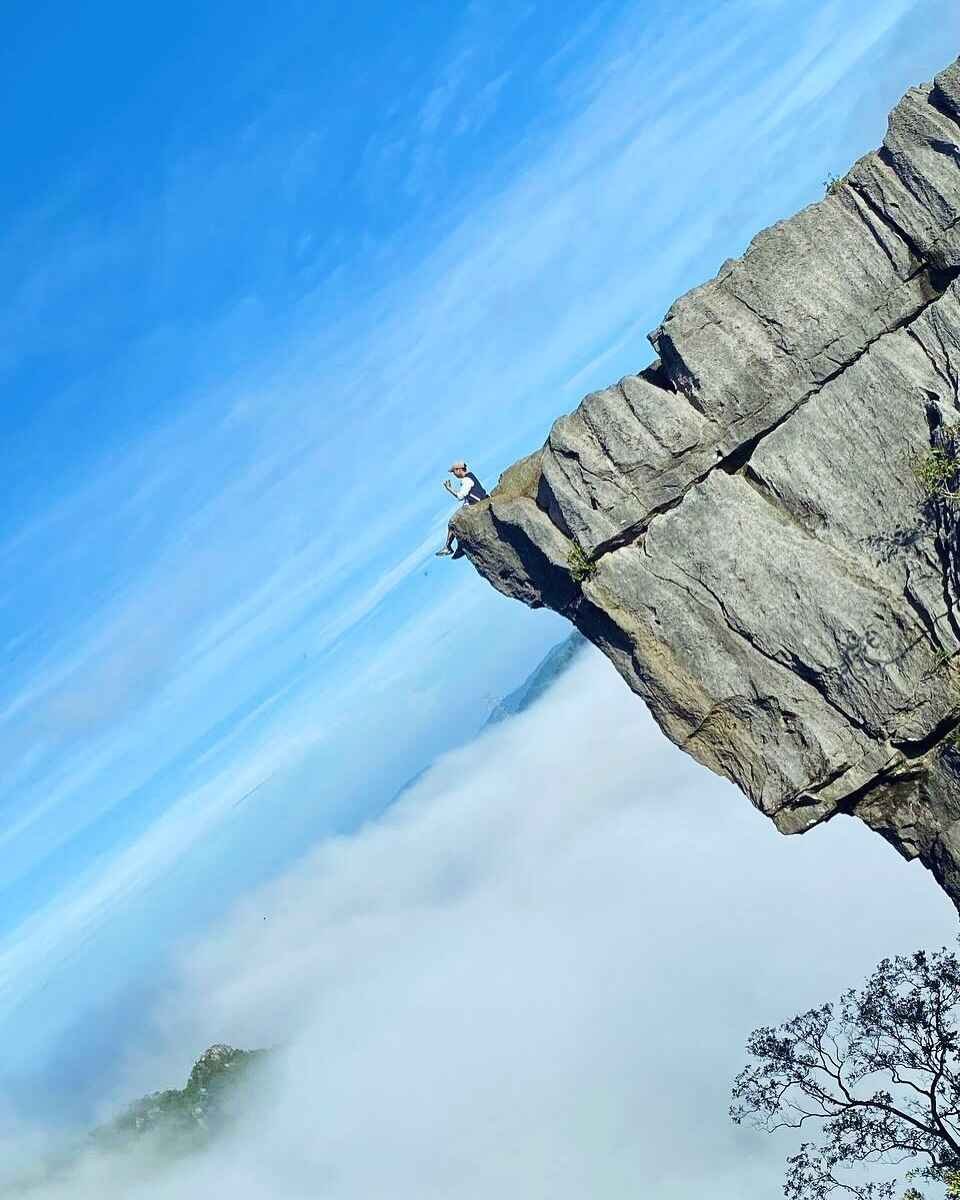
Phase 3: The Summit View & “The Shot”
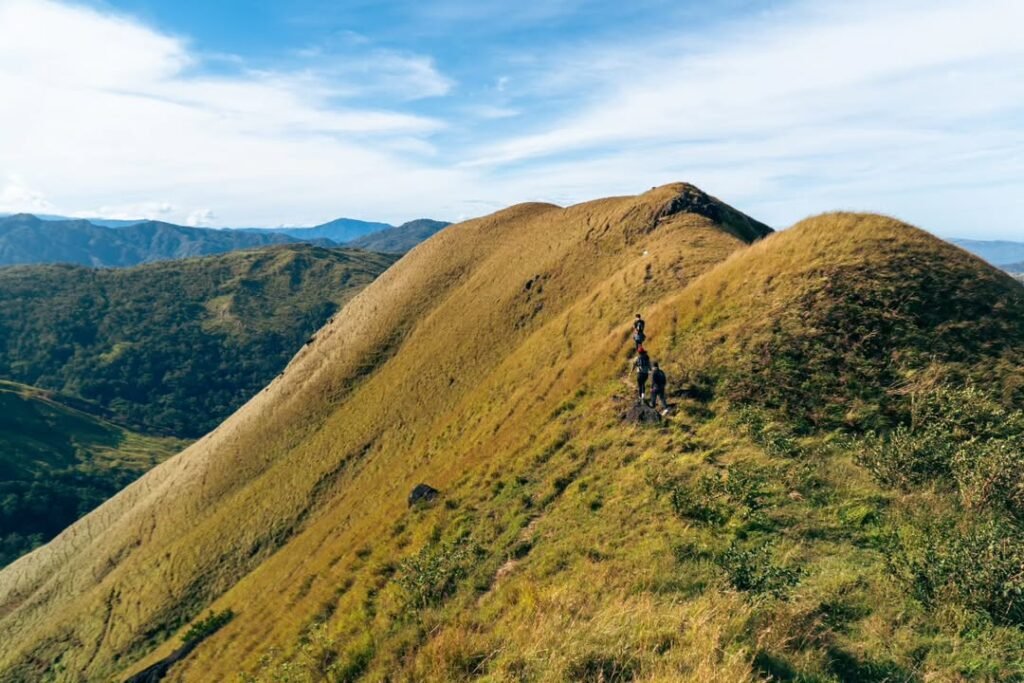
The summit isn’t a flat plateau; it’s a jagged spine of razor-sharp limestone. From here, you get a 360-degree view of the Southern Sierra Madre and the distant outline of Mt. Masungki. It is easily one of the 10 Must-Visit Sea of Clouds in Tanay, Rizal if you arrive early enough.
Getting the iconic “Nagpatong Shot” requires coordination. You will stand on the Summit Block while your guide positions themselves on the adjacent Viewing Block to take the photo.
Pro Tip: Trust your guide’s instructions on where to step. The rock here is extremely jagged, and a misstep could mean a nasty gash or a fatal fall—Selfies are great, but maintain three points of contact at all times.
Nagpatong Rock Sample Itinerary (Sunrise & Twin Hike)
For a Sunrise Hike, aim to start trekking from Sitio Tablon by 4:45 AM to reach the summit by 6:15 AM for the best sea of clouds probability. If attempting the Twin Hike (Masungki + Nagpatong), strictly follow a “Masungki First” strategy starting at 5:00 AM to clear the exposed limestone ridgelines before the midday heat becomes dangerous.
Timing is everything in Tanay. The difference between a peaceful summit coffee and a 1-hour queue at the ladder is often just 30 minutes. Below are the two operational profiles I use depending on the group’s fitness level.
Profile Alpha: The “Sunrise Intercept”
This itinerary is designed for photographers and leisure hikers who want to catch the sea of clouds and enjoy the Tungtong Falls side trip without rushing.
| Time | Activity | Operational Notes |
| 01:30 AM | Assembly (Cubao/Makati) | Buy supplies here; no 7-11 at the jump-off. |
| 02:00 AM | Depart for Tanay | Take Marilaque Highway. |
| 03:30 AM | Arrive Brgy. Cuyambay Hall | Secure Registration & Guides. |
| 04:00 AM | Orientation & Transfer | Ride Habal-Habal to Sitio Tablon (Jump-off). |
| 04:45 AM | Start Trek | Headlamps on. Silence in the bamboo forest. |
| 06:00 AM | Arrive Base Camp | Stage here. Wear gloves now. |
| 06:15 AM | Summit Push | Ladder ascent for Sunrise viewing. |
| 07:30 AM | Descent to Base | Breakfast at the local Carinderia. |
| 09:00 AM | Tungtong Falls | Optional river trek and cliff jump. |
| 11:00 AM | Wash Up | Shower at Sitio Tablon (₱25). |
| 12:00 PM | Lunch & Departure | Stop by Pico de Pino or Regina Rica on the way home. |
Profile Bravo: The “Endurance Loop” (Twin Hike)
This combines Mt. Masungki and Nagpatong Rock.
My Honest Warning: Do not do Nagpatong first. Summiting Masungki (the higher peak) early avoids the grueling heat. By the time you reach Nagpatong at noon, the rock radiates heat like an oven—bring at least 3 Liters of water.
| Time | Activity | Operational Notes |
| 03:00 AM | Arrive Brgy. Cuyambay Hall | Early registration is critical. |
| 05:00 AM | Start Trek (Masungki) | Begin at the Masungki specific jump-off. |
| 08:00 AM | Summit Mt. Masungki | 660 MASL. Rest and hydrate. |
| 09:00 AM | Traverse to Nagpatong | Forest trail connection. |
| 10:30 AM | Arrive Nagpatong Base | Prepare for the second ascent. |
| 11:30 AM | Summit Nagpatong | Expect high heat and exposure. |
| 01:00 PM | Descent to Jump-off | End of technical phase. |
| 02:00 PM | Late Lunch | Recovery meal at the jump-off stalls. |
Pro-Tip: If you choose Profile Bravo, ask your guide to radio ahead to the Nagpatong base camp to check the ladder queue. If the line is too long, extend your rest break in the shaded forest before the final assault.
Nagpatong Rock Budget Breakdown (2026 Estimates)
For a comfortable DIY trip to Nagpatong Rock, allocate a budget of approximately ₱900 – ₱1,200 per person. This covers the mandatory PHP 100 Ecotourism Fee, the PHP 30 Environmental Fee, and your share of the PHP 750 Guide Fee (strictly good for up to 5 pax). Bring extra cash for the habal-habal transfer (₱40-50/way) and meals, as there are no ATMs onsite.
The “Share-It” Economy
The golden rule for keeping costs low in Tanay is the “Group of 5.” Because the guide fee is fixed per group, going solo means shouldering the full ₱750 cost alone. A full squad splits that down to ₱150 per head.
Here is the actual expense log from my last trip (based on a group of 5):
| Item | Cost (PHP) | Notes |
| Ecotourism Fee | ₱100.00 | Paid at Brgy. Hall (Per Head) |
| Environmental Fee | ₱30.00 | LGU Levy (Per Head) |
| Guide Fee (Nagpatong) | ₱750.00 | Per Group (1-5 Pax) |
| Guide Fee (Twin Hike) | ₱1,000 – 1,250 | For Masungki + Nagpatong |
| Tricycle Fare | ₱30.00 | Junction to Hall (Per Head) |
| Habal-Habal | ₱40.00 | Hall to Jump-off (Per Head) |
| Shower Fee | ₱20.00 – 25.00 | At Sitio Tablon |
| Safe Budget | ~₱900.00 | Per Person (Group of 5) |
Important: The “Guide Math” Warning
The 1:5 Guide Ratio is non-negotiable. This is a safety protocol, not a suggestion.
Scenario A: You are a group of 5. You hire 1 Guide (Total: ₱750).
Scenario B: You are a group of 6. You must hire 2 Guides (Total: ₱1,500).
My Honest Warning: I’ve seen hikers try to negotiate this at the registration desk, arguing that the 6th person is “small” or “experienced.” Don’t be that person. The second guide is critical for spotting you on the ladders. Just pay the fee—it supports the local livelihood of the Dumagat community.
Hidden Costs & Cash Tips
Parking Fees: If you brought a car, expect to pay ₱100 at the designated areas near the hall.
No ATM: The nearest ATM is back at Cogeo or the town proper of Tanay. The carinderias selling ₱50 Tofu Squares and ₱25 Buko Juice only accept cash (GCash is unreliable due to spotty signal).
Important Requirements & Gear
No prior online reservation is required, but every hiker must register in person at Barangay Cuyambay Hall before proceeding to the jump-off point. For gear, industrial gardening gloves are mandatory to prevent lacerations on the sharp limestone. Wear shoes with deep lugs for the clay mud and bring at least 1.5 Liters of water.
The Administrative Checkpoint
Do not drive straight to the trailhead at Sitio Tablon. You will be turned back. The local ordinance requires all expeditions to originate at the Barangay Cuyambay Hall for insurance logging and guide assignment.
Permit Status: Walk-ins are accepted daily.
Waiver: You will sign a risk waiver upon paying the ₱100 Ecotourism Fee.
Medical Cert: Not required for day hikes as of late 2025, but highly recommended if you have pre-existing conditions.
The “Karst Loadout” (Gear Strategy)
Nagpatong isn’t a fashion show; it’s a friction battle. Standard gym gear often fails here because the environment shifts rapidly from slick mud to razor-sharp rock.
1. Hand Protection (Critical) This is the single most important item. The limestone is weathered into knife-edges.
The Fix: Buy Nitrile-dipped or Rubber-coated Gardening Gloves. You can find these at any Ace Hardware or Mr. DIY for ₱50–100.
Avoid: Fleece or wool gloves. They provide zero grip on smooth rock and will snag/tear instantly on the jagged edges.
2. Footwear Dynamics You are fighting two enemies: the “Bamboo Slide” (dry leaves) and wet clay.
The Fix: Trail running shoes with Vibram or Contagrip soles, or aggressive hiking sandals (e.g., Sandugo/Lamina).
The Warning: Avoid flat-soled lifestyle sneakers (like Vans or Chucks). They turn into ice skates on the muddy slopes leading to the rock base.
3. Clothing & Hydration
Bottoms: Wear leggings or long trekking pants. I wore shorts on my first attempt and came home with scraped shins from squeezing through the narrow rock fissures.
Water Budget: Bring a minimum of 1.5 Liters (or 3 Liters if doing the Masungki Twin Hike). The humidity in the bamboo forest is stifling, and there are no water sources on the trail.
My Honest Warning: Don’t underestimate the abrasion risk. I watched a fellow hiker try to “tough it out” without gloves. He spent the summit lunch break nursing cuts on his palms with betadine. Spend the ₱50 on gloves—it’s cheaper than a tetanus shot.
What I Wish I Knew Before Hiking Nagpatong Rock Formation
The limestone rocks are razor-sharp; a single slip can cause deep lacerations, so gloves are non-negotiable. Expect a 30-60 minute queue for the ladder and “picture spot” on weekends due to the single-file constraint. Additionally, there are no stores at the summit—purchase all food and water at the carinderia near the jump-off before ascending.
Honest Warning 1: The “Ladder Traffic” is Real
The photos on Instagram look solitary and peaceful, but the reality on a Saturday morning is very different. Because there is only one ladder system connecting the Summit Block to the Viewing Block, a bottleneck forms immediately.
On my last weekend trip, we waited nearly 45 minutes just to get our turn on the viewing deck. The guides manage this by batching groups, but standing on an exposed ledge under the sun gets exhausting fast.
My Fix: If you can, book a Tuesday or Wednesday hike. If you must go on a weekend, use the “Sunrise Intercept” itinerary and start trekking by 4:30 AM to beat the crowd.
Honest Warning 2: The “Bamboo Slide” Phenomenon
Most hikers worry about mud, but the real enemy is dry bamboo. The first hour of the trail through the Buho (bamboo) forest is covered in shed leaves that act like ball bearings on the hard-packed soil.
I actually slipped twice here—not because it was wet, but because the leaves provided zero traction. It’s slippery even on a bone-dry day in March.
My Fix: Shorten your stride and keep your weight centered. Trekking poles are great here, but you must collapse and stow them before you hit the rock scrambling phase.
Honest Warning 3: The Danger at Tungtong Falls
If you add the Tungtong Falls side trip (an extra ₱500 for the guide fee), you will likely be tempted to cliff jump. If Tungtong is crowded or dry, you might want to consider Daranak Falls instead, though it requires a separate drive.
If you stay at Tungtong, know that the drop is roughly 9 to 12 feet, but the pool depth is deceivingly variable. The water level shifts based on sediment movement and recent rainfall. Never jump blindly. I always ask my guide explicitly: “Kuya, pwede ba tumalon dito ngayon?” (Brother, is it safe to jump here right now?).
Crucial Safety Rule: If the water looks chocolate-brown (turbid), it means it rained upstream in the Sierra Madre. Get out of the river channel immediately to avoid flash floods.
Conclusion: Is Nagpatong Rock Worth It?
Nagpatong Rock is absolutely worth the effort, offering a rare “high value, low altitude” mountaineering experience. It packs the visual drama of a major expedition—vertical limestone towers and sea of clouds—into a manageable 1.5 to 2-hour trek. It is the perfect training ground for aspiring technical climbers who want the thrill of a scramble without the exhaustion of a multi-day hike.
In my opinion, this is one of the most efficient hikes in Rizal. You get the adrenaline rush of clinging to a cliffside ladder and the reward of a 360-degree view of the Sierra Madre and Laguna de Bay, all before lunch.
Unlike traditional hiking destinations that require 8 hours of trudging up a slope, Nagpatong keeps you engaged every minute with its technical terrain. It forces you to focus on your footing, your grip, and your surroundings, making it a much more immersive experience than a standard trail walk.
Final Travel Tip: The “February Window”
If you want that postcard-perfect shot without the hassle, schedule your hike for a weekday in February.
Why? This aligns with the tail end of the Amihan (Northeast Monsoon).
The Result: You get the cool, stable air necessary for the Sea of Clouds to form, but the limestone rocks are dry and grippy, unlike the dangerous “grease” of the wet season.
If you have extra time after your hike, don’t forget to check out our Ultimate Guide to Rizal Tourist Spots or perhaps swing by the Pililla Wind Farm for a relaxing sunset view before heading back to Manila.
Ready to brave the limestone towers? Share this guide with your hike squad and start planning your convoy to Tanay!
Frequently Asked Questions (FAQ)
Nagpatong Rock is generally beginner-friendly for adults comfortable with heights but is not recommended for young children due to the vertical ladders and sharp limestone. Walk-ins are accepted daily at the Barangay Cuyambay Hall registration desk. Mobile signal (Smart/Globe) is strong at the summit, and basic shower facilities are available at Sitio Tablon for roughly ₱25.
Is Nagpatong Rock suitable for beginners?
Yes, but with a mental caveat. Physically, the hike is short (only 1.5 to 2 hours), making it manageable for those with average fitness. However, the 4/9 Difficulty Rating comes from the technical aspect—if you have a fear of heights or vertigo, the vertical ladder climb and the bridge between the rock towers will be challenging.
Can we bring children?
I honestly do not recommend it for children under 12. The limestone is unforgivingly sharp, and the gaps between the rocks require a stride length that most kids don’t have.
Risk Factor: One slip on the ladder or a stumble on the “Summit Block” can result in serious injury.
Better Alternative: If you have kids or absolute beginners, consider Treasure Mountain which is far more accessible and requires no technical hiking.
Are there shower facilities?
Yes. Upon returning to the jump-off point at Sitio Tablon, there are several houses offering bathroom use.
Cost: ₱20 – ₱25 per head.
Condition: These are basic “tabo-timba” (bucket and dipper) setups. Don’t expect heaters or tiled showers.
Is there mobile signal?
Connectivity is a mixed bag. You will likely lose signal while trekking through the Dipterocarp forest and bamboo groves.
The Sweet Spot: Once you reach the summit (660 MASL), both Smart and Globe usually have decent 4G/LTE coverage, allowing you to upload that summit selfie immediately.
Can we do a walk-in hike?
Yes, walk-ins are the standard procedure. You do not need to book online.
The Rule: You must stop at Barangay Cuyambay Hall first. Security personnel at the Pico de Pino junction and the jump-off will ask for your registration receipt. Do not attempt to bypass the hall to “save time”—you will be sent back.