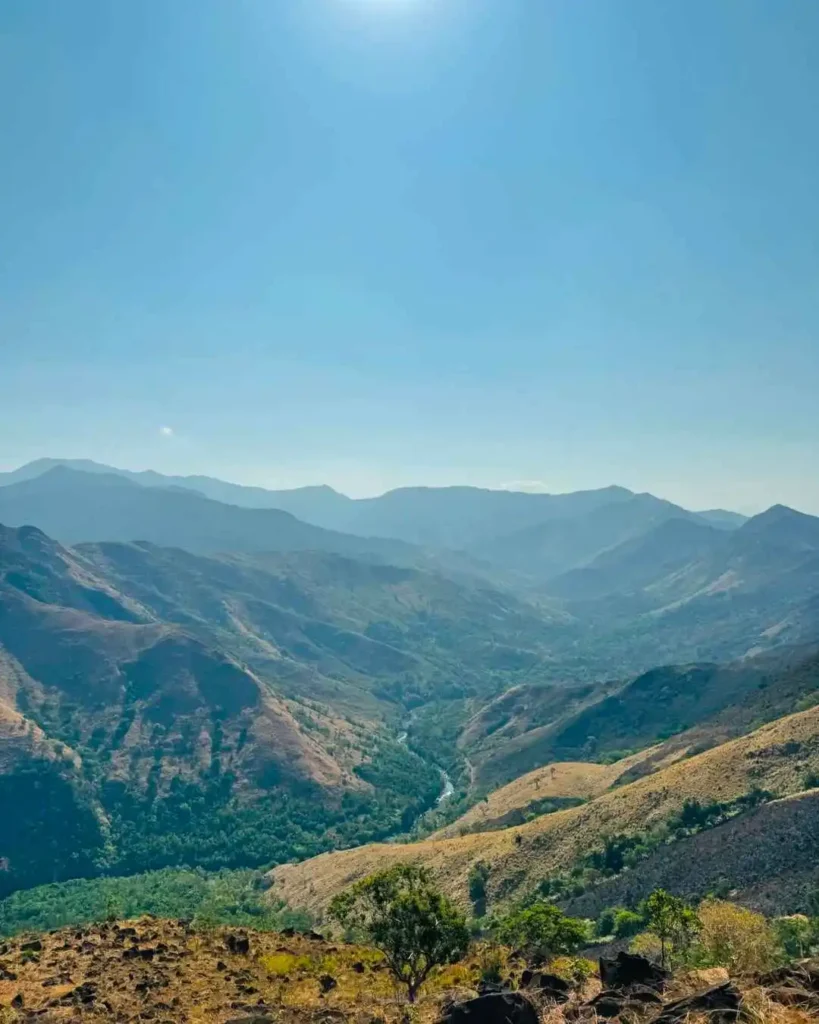
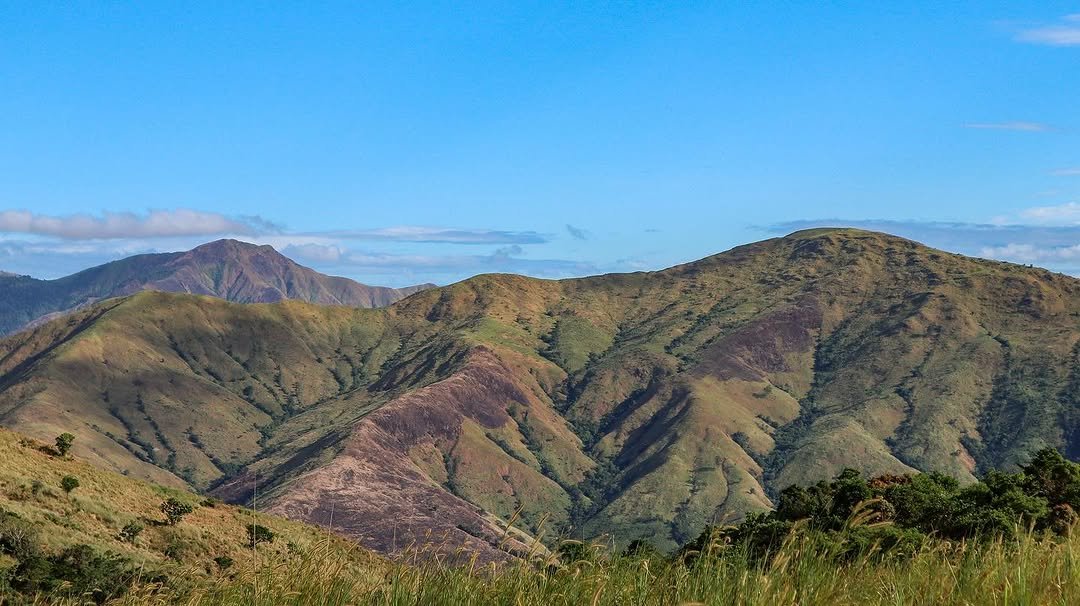
Mt. Kapigpiglatan is a 678 MASL minor climb in San Narciso, Zambales, rated 3/9 difficulty — genuinely manageable for first-timers with decent fitness. The summit delivers a wide, open view of the Cawag Hexa range and the West Philippine Sea, and a side trip to Veto Falls on the descent makes the full day feel more than worth the early wakeup.
Mt. Kapigpiglatan Quick Guide
| Detail | Information |
|---|---|
| Mountain | Mt. Kapigpiglatan |
| Location | Barangay Omaya, San Narciso, Zambales |
| Province | Zambales |
| Elevation | 678 MASL (2,224 ft) |
| Difficulty | 3/9 — Minor Climb, Trail Class 1–3 |
| Jump-off | Brgy. Omaya Hall, San Narciso, Zambales |
| Best Season | November to February (Amihan) |
| Trek Time | 2–3.5 hrs to summit; 7–8 hrs full day with Veto Falls |
| Registration | Brgy. Omaya Hall — opens 4:00 AM |
| Campsite | Day hike only; no designated overnight campsite |
Table of Contents
Where Is Mt. Kapigpiglatan Located?
Mt. Kapigpiglatan is a beginner-friendly mountain located in Barangay Omaya in the municipality of San Narciso in the province of Zambales. It sits roughly 180 kilometers northwest of Manila, making it accessible as a one-day round trip from the metro.
Mt. Kapigpiglatan got its name from the Ilocano word “piglat,” which means “scar.” According to locals, the mountain was named as such because it was once a common pasture area for farm animals such as carabaos, cows, and horses, as well as a hunting ground for deer and wild boars. The heavy rains in the region created mud puddles where animals washed, and the digging marks left by wild boars resembled scars from a distance.
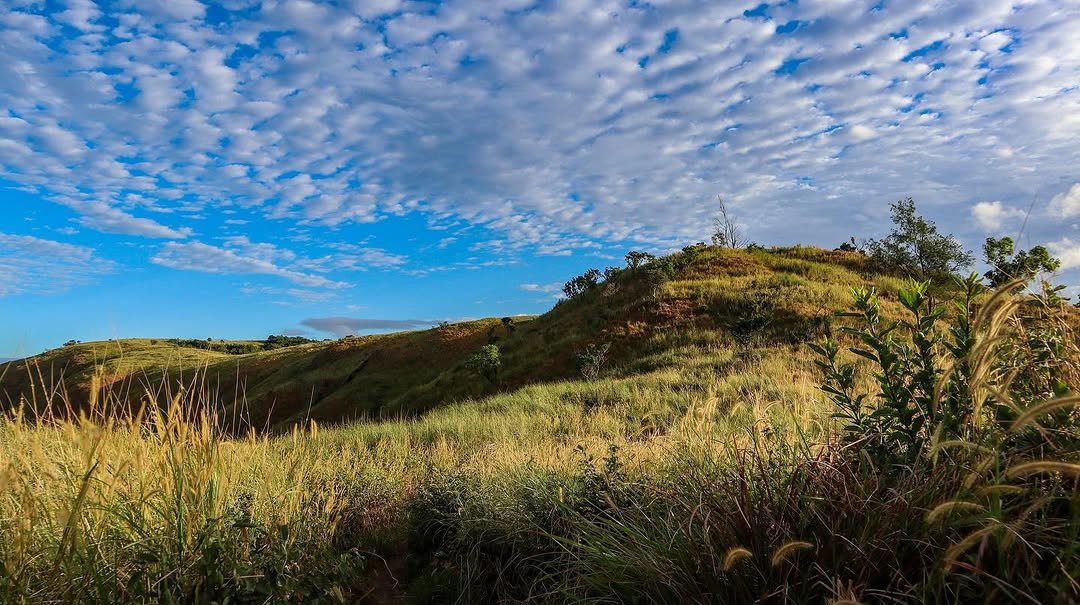
It was opened to the public in July 2023. For a province more associated with lahar fields and volcanic peaks, this mountain offers something entirely different. Instead of volcanic lahar and jagged peaks, it greets hikers with endless waves of verdant cogon grass and rolling hills that look more like the pastoral landscapes of Bukidnon or even a tropical New Zealand than Central Luzon.
For a broader overview of the mountains you can combine this climb with, check out our guide to mountains in the Philippines and our list of Zambales tourist spots.
How to Get to the Mt. Kapigpiglatan Jump-off Point
The jump-off at Brgy. Omaya Hall is reachable by public bus or private vehicle from Manila.
By Public Bus (DIY):
Board a Victory Liner bus bound for Iba or Santa Cruz, Zambales (fare: ₱375–₱450). Ask to be dropped off at the San Narciso Municipal Hall. From the town proper, hire a tricycle directly to the Brgy. Omaya jump-off point (₱100–₱300 per way).
The total travel time is approximately 4–5 hours. Most hikers depart from the Cubao or Pasay terminals between 11:00 PM and 1:00 AM to arrive in Zambales before sunrise.
By Private Vehicle:
Set your Waze or Google Maps to “Brgy. Omaya Hall” or “Mt. Kapigpiglatan Jump-off.” Drive via NLEX and exit at SCTEX bound for Subic/Tipo. Enter the Subic Bay Freeport Zone and exit at the Kalaklan Gate, then follow the National Highway passing through Castillejos and San Marcelino before reaching San Narciso.
Secure parking is available near the Barangay Hall for a fee of ₱50 to ₱100, depending on the caretaker.
I took the overnight bus route in June 2026 and found the tricycle drivers at San Narciso very familiar with the jump-off — just say “Omaya” and they’ll know exactly where to bring you.
Permits, Fees, and Guide Requirements at Mt. Kapigpiglatan
Registration at Brgy. Omaya is mandatory — no permit, no trail access.
Requirements include a valid ID presented at the registration desk and a ₱100 registration fee. You will also be required to sign a liability waiver before the briefing.
Registration opens at 4:00 AM. This is a genuine insider tip — arrive at or before 4:00 AM if you want to register early and beat the group queues. On weekends, multiple organized tours arrive at the same time, and the briefing process can take 30–45 minutes.
The guide fee is a flat rate of ₱1,500 per group, regardless of whether you are one person or a group of five. If you are a solo backpacker, wait at the Brgy. Omaya registration area to see if other small groups are willing to let you join under their guide permit to split the cost.
The local guides assigned at Brgy. Omaya are community-based — many are Ilocano residents of San Narciso who know every section of the cogon ridge by heart. Hiring them directly at the barangay hall keeps income local. Ask for a guide who speaks basic English or Tagalog if you’re coming from Manila; most do. San Narciso, Zambales municipal tourism office page.
No separate DENR permit is required for this minor climb beyond the barangay-level registration. DENR official website
What Is the Mt. Kapigpiglatan Trail Like?
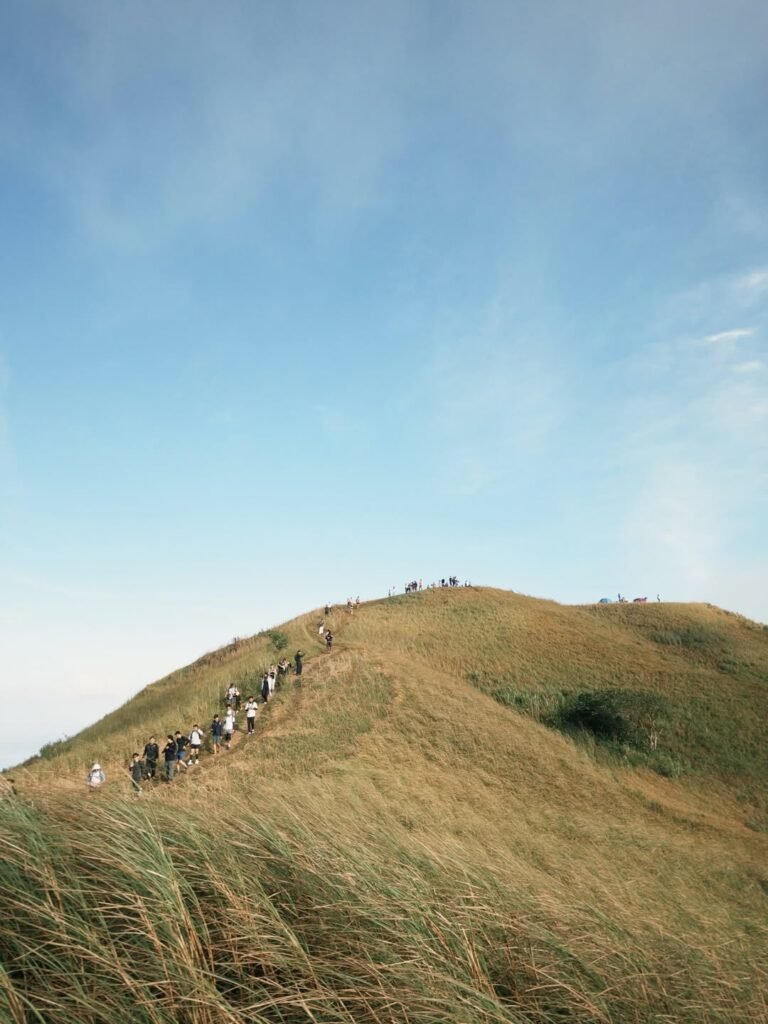
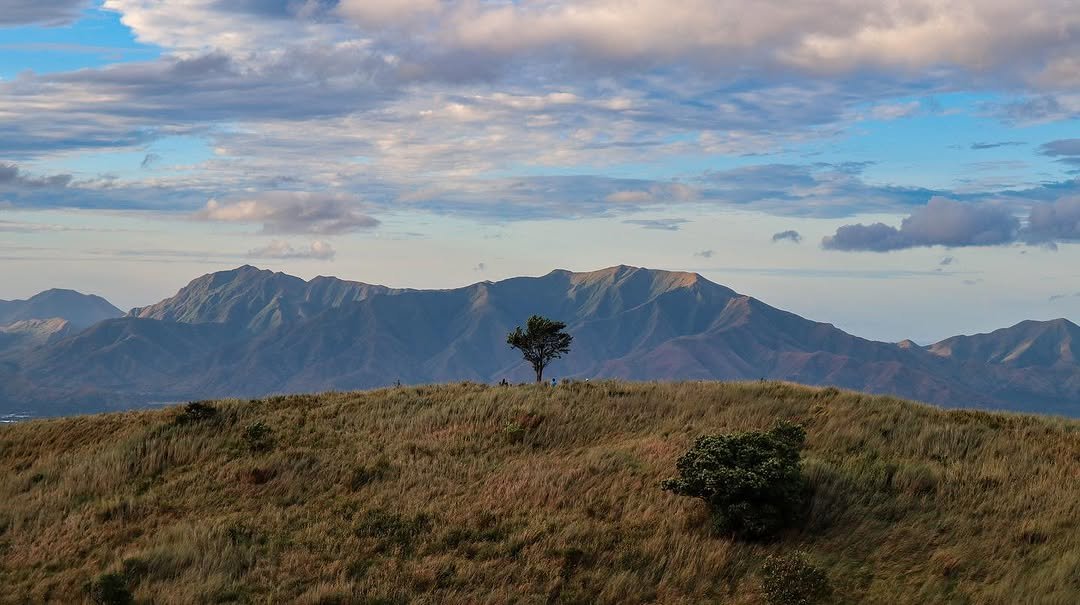
The Mt. Kapigpiglatan trail is defined by vast, open cogon grasslands and rolling terrain with zero canopy cover, making solar exposure the biggest challenge. This is the single most important thing to understand before you pack your bag.
The 12.6 km full trek begins with a riverine section requiring stream crossings, followed by a gradual ascent to 678 MASL.
Stage-by-Stage Trail Breakdown (with Difficulty Scores)
- Stage 1 — Brgy. Omaya Hall to River Section (0–30 min)
Difficulty: 2/5 — Flat agricultural land, easy walking; the terrain lulls you into comfort before the stream crossings begin.
Multiple stream crossings begin within the first 30 minutes. Water levels can range from ankle-deep to knee-deep depending on recent rainfall.
- Stage 2 — River Crossings to Base of Grassland Zone (30–60 min)
Difficulty: 2/5 — Short, repetitive crossings on uneven riverbed rocks; no technical skill required, but wet feet are almost guaranteed.
Hiking sandals like Sandugo or Tribu are highly recommended instead of shoes, as keeping feet dry at this stage is nearly impossible.
- Stage 3 — Grassland Zone Ascent (60–180 min)
Difficulty: 3/5 — After the river, the trail ascends into the “Grassland Zone,” which makes up about 80% of the hike — endless waves of green cogon grass covering rolling hills. There are no steep technical pitches, but the relentless sun and rolling gradient grind you down.
- Stage 4 — Final Push to Summit (180–210 min)
Difficulty: 3/5 — The last section tightens into a more direct climb. Footing is firm and dry in good weather; there are no ropes or scrambles needed.
- Stage 5 — Summit to Veto Falls (Descent)
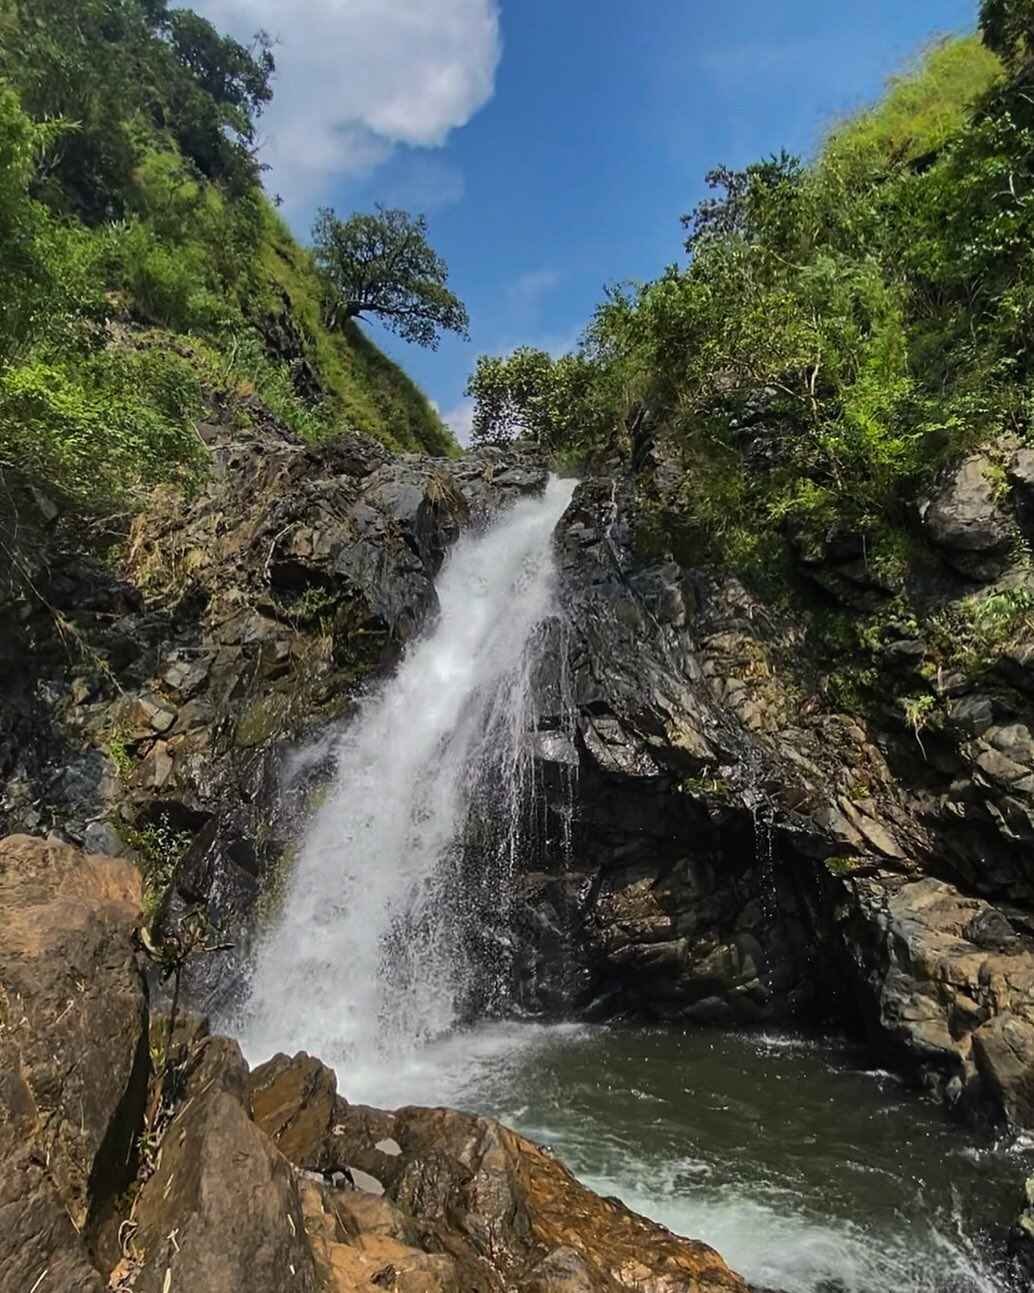
Difficulty: 2/5 — Mostly downhill. Veto Falls is a small, three-tiered cascade that feeds into a rocky basin. The water is refreshingly cold — a necessary recovery after baking on the exposed ridges. The basin is shallow enough to sit in, but be careful on the slippery rocks.
What I’d Do Differently Next Time
I climbed in June 2026 during the start of the rainy season. It was sunny the day of the hike, which was fortunate — but the stream crossings were already running higher than descriptions suggested. Here’s what I’d change:
Start even earlier. Registration opens at 4:00 AM. I was in line by 4:10 AM and on trail by 4:50 AM. Even so, by the time I hit the summit at around 8:00 AM, the sun was already fierce. I’d aim to be on trail by 4:30 AM sharp — especially in summer and early wet season.
Bring hiking sandals, not trail runners. I wore waterproof trail runners and my feet were soaked by the second stream crossing anyway. The sandal recommendation is real. Wet shoes on this dry, open terrain make the rest of the hike uncomfortable.
Add an electrolyte strategy. I brought two liters of water and ran out before Veto Falls. There are no potable water sources on the ridge, so you must carry at least 2–3 liters. On a June day, I’d bring 3 liters plus electrolyte powder packs.
Pair it with a Liwliwa Beach overnight. If you’re looking for a hike that combines an intense sweat session with a relaxing dip at Veto Falls — and maybe a post-hike surf at Liwliwa Beach — this is the mountain for it. Liwliwa Beach is known for surf waves and seaside cafés.
After the hike, take a tricycle from Brgy. Omaya back to San Narciso, then catch a ride to Liwliwa. Book a beachfront room the night before via any major booking platform to lock in accommodation. It turns a one-day trip into a full weekend itinerary that feels earned. Check out the full rundown of Zambales beaches to plan your add-on stay.
Is Mt. Kapigpiglatan Good for Beginners?
Yes — Mt. Kapigpiglatan is one of the most beginner-accessible mountains in Central Luzon. It has a moderate beginner trail with a 3/9 difficulty level. The trail is easy to follow and does not require technical gear to reach the summit.
The main challenge is not the elevation or the steepness — it is the heat. The trail has zero canopy cover, making solar exposure the single biggest obstacle. Hikers with low heat tolerance should plan their summit push entirely before 9:00 AM.
The tocilog at the small eatery near the jump-off area is a solid pre-hike breakfast. I had mine at around 4:00 AM while waiting to register, and the combination of rice, marinated pork, and fried egg is exactly the right fuel for a three-hour ascent. Budget ₱80–₱120 for the meal.
If you’re looking for other beginner-friendly options in Zambales to build up to bigger climbs, check out our beginner hike guide and our review of Mt. Mariglem, a similarly approachable Zambales peak.
Best Time to Climb Mt. Kapigpiglatan
November to February (Amihan Season) is the best window. The grass is vibrant green, and the cool Northeast Monsoon winds help manage the heat.
March to May (Summer): The grass turns golden brown, but the heat is extreme. Hiking is only recommended if you start walking by 5:00 AM or earlier.
June to October (Habagat): The trail becomes muddy, and the river crossings at Brgy. Omaya can become dangerous flash flood zones. I climbed in early June and the water was manageable — but I checked the weather report the night before and confirmed there had been no heavy rainfall in the preceding 48 hours. That is a non-negotiable check during Habagat months. If there has been rain in the past 24 hours, the stream crossings can turn from a casual wade into a genuine flood risk. Skip the hike and reschedule.
Heat management on the open ridge is the year-round challenge no guide discusses at length. The summit sits fully exposed with almost no natural shade — one hiker noted upon reaching the summit that there was only one tree that could protect from the sun. Apply sunscreen before registration, reapply at the river crossing checkpoint, and wear a neck gaiter or lightweight long-sleeve shirt rather than relying solely on sunscreen.
Budget Breakdown for Climbing Mt. Kapigpiglatan
The total Mt. Kapigpiglatan hike ranges from ₱1,750 to ₱2,400 per person for a DIY setup with a group of five. Solo hikers pay more.
| Expense | Cost (PHP) |
|---|---|
| Victory Liner Bus (roundtrip) | ₱750–₱900 |
| Tricycle to Brgy. Omaya (one way) | ₱100–₱300 |
| Registration Fee | ₱100 |
| Guide Fee (shared per group of 5) | ₱300/pax (₱1,500 flat fee) |
| Parking (private vehicle) | ₱50–₱100 |
| Breakfast at jump-off (tocilog) | ₱80–₱120 |
| Water & Snacks | ₱150–₱250 |
| Tricycle back to San Narciso | ₱100–₱300 |
| TOTAL (estimated per person, group) | ₱1,580–₱2,270 |
Solo hikers can expect costs to push toward ₱2,800 or more, so finding a group or joining an organized tour (priced at roughly ₱1,499–₱1,600 per person) is significantly cheaper.
What to Pack for Mt. Kapigpiglatan
| Item | Essential? |
|---|---|
| Hiking sandals or waterproof footwear | Yes — for river crossings |
| 2–3 liters of water | Yes — no water source on ridge |
| Electrolyte powder or sports drink | Yes — heat is intense |
| Sunscreen (SPF 50+) | Yes |
| Lightweight long-sleeve shirt or sun hoodie | Yes |
| Wide-brim hat or cap | Yes |
| Packed lunch or energy snacks | Yes |
| Trekking poles | Optional — helps on descent |
| Rain jacket or poncho (June–October) | Yes in wet season |
| Valid ID (for registration) | Yes — required |
| Cash (no ATMs in Brgy. Omaya) | Yes |
| First aid kit / blister pads | Recommended |
| Power bank | Recommended |
Safety Tips for Climbing Mt. Kapigpiglatan
Start before sunrise. The trail is manageable in the dark with a headlamp for the first flat section. Being on the ridge by 6:30 AM means you summit before 9:00 AM and descend before the heat peaks.
Never skip registration. The waiver and orientation at Brgy. Omaya Hall give your guide group your contact details. If someone falls or gets lost on the trail, this is how help finds you.
Watch the river crossings closely. Water levels at the early river crossings can range from ankle-deep to knee-deep depending on recent rainfall. If the water is moving fast and is above knee height, do not cross. Turn back.
Do not drink from Veto Falls. The water looks clear but is not safe to drink. Carabaos graze upstream in the watershed, which means the water likely contains biological contaminants.
Mobile signal is intermittent along the trail but generally strong at the summit for both Smart and Globe users. Save your guide’s number before you lose signal on the ascent.
Respect the community. The locals at Brgy. Omaya maintain and manage this trail. Stay on the trail and do not damage any flora or fauna. Respect the local culture and do not disturb the environment by shouting or playing loud music. Littering, vandalism, and kindling of wood are strictly prohibited.
For a longer and more technical Zambales challenge after you’ve done Kapigpiglatan, see our guide to Mt. Tapulao or the Cawag Hexa dayhike.
Frequently Asked Questions About Mt. Kapigpiglatan
How difficult is the hike to Mt. Kapigpiglatan for first-time hikers?
Mt. Kapigpiglatan has a difficulty rating of 3/9 and a trail class of 1 to 3. For first-time hikers with average fitness, the ascent is fully doable. The terrain does not require technical climbing or ropes. The primary difficulty is the open sun exposure, not the gradient. Anyone who can walk uphill for two to three hours with breaks will reach the summit.
How long does it take to reach the summit of Mt. Kapigpiglatan?
Standing at 678 MASL, the hike requires 2 to 3.5 hours to the summit at an average pace. A complete day hike including ascent and descent finishes in approximately 7.5 hours total — enough for Veto Falls and a comfortable return. Faster hikers summit in under 2 hours; beginners taking rest breaks will average 3–3.5 hours.
How do you get to Mt. Kapigpiglatan from Manila?
Board a Victory Liner bus bound for Iba or Santa Cruz, Zambales, and ask to be dropped off at the San Narciso Municipal Hall. From the town proper, hire a tricycle directly to the Brgy. Omaya jump-off point for ₱100–₱300 per way. Total travel time from Manila is roughly 4–5 hours, so an overnight bus is the standard approach for a sunrise start.
Can you visit Veto Falls on the same day as the Mt. Kapigpiglatan hike?
Yes — and most hikers do. After the summit, guides lead groups on a descent toward Veto Falls, a three-tier horsetail waterfall. The water is refreshingly cold — ideal after baking on exposed ridges — and the basin is shallow enough to sit in comfortably, though the rocks are slippery. Most hikers complete the full 12.6 km loop, including the Veto Falls side trip, by 2:00 PM.
What should you pack and prepare for hiking Mt. Kapigpiglatan?
The two non-negotiables are water and sun protection. There are no potable water sources on the ridge, so carry at least 2–3 liters. Bring a valid ID and ₱100 in cash for the registration fee. Wear hiking sandals for the river crossings, apply SPF 50 sunscreen before you start, and pack electrolytes. A rain jacket is essential from June through October.
Final Verdict: Should You Climb Mt. Kapigpiglatan?
Mt. Kapigpiglatan earns a 4.5 out of 5 for beginner and casual hikers. The trail is genuinely accessible, the summit view — the full 360-degree sweep from the Cawag Hexa range all the way out to the West Philippine Sea coastline — pays off every sweaty step, and the Veto Falls cool-down makes the full day feel complete rather than one-note.
The only reason it doesn’t score a perfect five is the unforgiving heat exposure, which demands real preparation — not just a water bottle and good intentions. Go with a group, start at 4:00 AM, and bring more water than you think you need. You’ll leave wanting to come back.