What to Expect When Hiking Mt. Kotkot (2026 Overview)
Mt. Kotkot is a point-to-point ridge traverse in Itogon, Benguet with long exposed sections, unreliable water, and a steep Sigsiglay descent that punishes tired legs. Expect 7–10 hours on trail for most groups, with the safest experience during January to early March. Registration is typically at Ampucao Barangay Hall and a local guide is required.
At a glance
Location: Benguet / Itogon / Barangay Ampucao (CAR, Philippines)
Difficulty: 6/9 (exposed ridges + heat risk + steep descent)
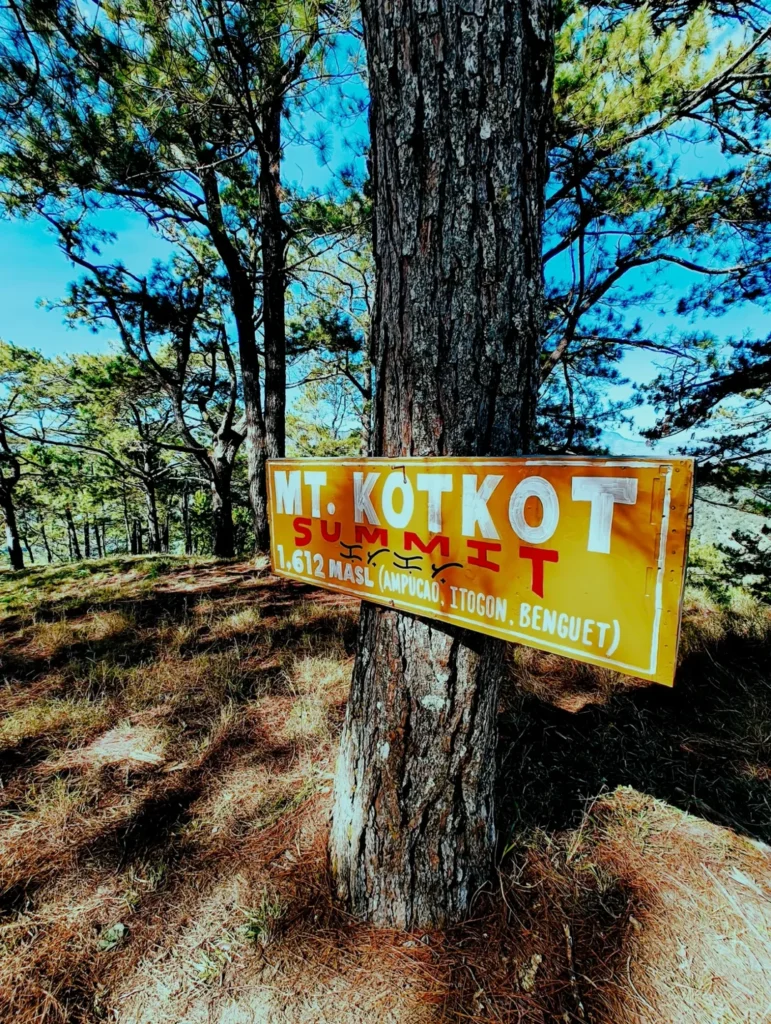
Elevation: ~1,600+ MASL (verify locally with Itogon Tourism / Brgy Ampucao)
Distance & elevation gain: Not specified (varies by route; verify locally or via your GPX)
Typical hike time: 8–12 hours (dayhike)
Trail type: Point-to-point (Traverse)
Best months: January to early March (cooler, drier)
Water sources: None/unreliable on ridge (carry 2–3L + electrolytes)
Cell signal: Partial/intermittent (usually better on open ridges; verify on-ground)
Permit/fees/guide: Register at Ampucao Barangay Hall; ~₱150/pax env/registration (verify latest); guide required
Mt. Kotkot is one of those Benguet ridge hikes that looks “easy” on photos—until you’re under full sun with zero water sources and a long descent ahead. When I hiked it, what surprised me most wasn’t the climb—it was how exposed the ridge feels once the day heats up.
Plan for a full day: around 7–10 hours for the MarMax Farm to Sigsiglay traverse, plus registration time at Barangay Ampucao. This is best for fit beginners leveling up and intermediates who can manage sun exposure, pacing, and a steep exit descent.
Table of Contents
Best Time to Hike Mt. Kotkot (Weather + Go/No-Go Rules)
The best time to hike Mt. Kotkot is January to early March when mornings are cool and trails are usually drier, reducing slip risk and heat stress. Avoid June to October because Habagat rains turn slopes muddy and raise lightning danger on exposed ridges. Start before sunrise so you finish the ridgeline before peak heat and afternoon storm windows.
Best months (and why)
January–early March (Amihan): cooler air, lower rain chance, safer footing
Late March–May (hot season): doable, but heat is brutal—start earlier and carry more water
Worst months (specific risks)
June–October (Habagat): mud, slips, low visibility, lightning risk on open ridges
Typhoon windows (varies): high wind + exposure = unsafe ridge travel
Sunrise start timing
Recommended start window: 04:30–05:10 AM
Why: you clear the steep effort in cooler hours and reduce lightning/heat exposure later
Go/No-Go checklist
GO if: clear forecast, low thunderstorm probability, no LGU trail closure, group is hydrated and paced
NO-GO if: thunder forecast, active rain at jump-off, ridge winds feel unsafe, visibility is poor, or someone is already unwell at registration
Verify: morning forecast + barangay advisories before committing
Best Time to Hike
| Season/Months | Trail Condition | Main Risks | Best For | Notes |
|---|---|---|---|---|
| Dry / Amihan (Jan–early Mar) | Mostly dry, better traction, cooler mornings | Sun exposure mid-day, wind chill early | First-time traverse, photography, steady pacing | Best overall window; verify forecast/LGU advisories |
| Shoulder (late Mar–May) | Dry but hotter; dustier descent | Heat exhaustion, dehydration | Strong, heat-adapted hikers | Start earlier; carry 3L if slow mover; verify forecast |
| Rainy / Habagat (Jun–Oct) | Muddy clay, slippery laterite, low visibility | Slips, lightning on ridge, hypothermia when wet | Not recommended | Avoid; only attempt with strict forecast checks + LGU approval |
| Typhoon-prone (varies, often Aug–Oct) | Unpredictable; trail may close | Strong winds, flash rain, landslide risk | None | Treat as automatic no-go; verify forecast/LGU advisories |
Is Mt. Kotkot Beginner-Friendly? Who Should Hike It?
Mt. Kotkot can be beginner-friendly only for fit beginners who already handle long day hikes, sustained sun exposure, and careful descents. If you’re sedentary or new to hiking, the ridge heat plus the steep Sigsiglay exit can feel overwhelming. I’d treat this as a “level-up” hike, not a first mountain.
Suitability (quick filter)
Beginner (fit, with prior hikes): Yes, if you can do 6–8 hours moving and manage heat
Intermediate: Yes, ideal sweet spot for the traverse experience
Advanced: Still fun for pacing and ridge photography, but not a technical climb
If you only have one day…
Start early and keep your pace conservative on the first half. The exit descent is where accidents happen, especially when legs are already cooked and the trail turns dusty or slick.
Common beginner mistakes
Underestimating sun exposure (no shade = heat fatigue fast)
Bringing too little water (2L is often not enough for slow movers)
Wearing poor footwear for loose gravel/pine needles on descent
Skipping electrolytes and relying on “just water”
Preparation baseline
Comfortable with 10–15 km walks or a full day on your feet
Practice hikes that help: any long ridge day hike + steep descent training
Weekly basics: brisk walk/jog 30–45 min, stairs/step-ups, leg strengthening
Permits, Registration, Guide, and Fees (Updated 2026)
For Mt. Kotkot, plan to register at Barangay Ampucao and secure a mandatory local guide, especially on weekends when guide availability can run out. Fees typically include an environmental/registration payment (often around ₱150 per person, but this can change) plus guide costs and possible parking or jump-off charges. If the process shifts to QR or eGov-style systems, confirm the latest steps with the barangay or Itogon Tourism.
Where to register
Primary: Ampucao Barangay Hall (even if jump-off is MarMax Farm)
On-ground coordination: jump-off staff or assigned guide (process can vary by day)
Note: Procedures may change (QR/eGov/eBOSS-style updates), so verify locally
What to prepare
Valid ID
Hiker manifest/list (names + emergency contact)
Signed waivers (per barangay requirement)
Basic emergency details: allergies, meds, contact person
Typical fee types (ranges if unknown)
Registration/environmental: ~₱150/pax (verify latest)
Guide fee: varies by group size/route (ask for the current rate on registration day)
Parking/jump-off fees: may apply depending on vehicle and jump-off arrangement
Guide rules + group etiquette
Guide required (mandatory assignment)
Keep group tight on ridges; avoid splitting without guide consent
Respect farms and private areas near jump-off and exit
Peak weekend/holiday notes
Expect queues at registration and limited guides
Start earlier and pre-coordinate when possible
Be ready for stricter cut-offs if weather changes

How to Get to the Jump-Off (DIY Commute + Private Car)
The cleanest DIY plan for Mt. Kotkot is to arrive in Baguio around 3:00 AM, then transfer straight to Ampucao and onward to MarMax Farm for a pre-dawn start. For groups, a chartered jeepney or arranged vehicle is usually faster (and less stressful) than piecing together rides. Private car works too, but the last-mile road can be rough—low-clearance vehicles risk undercarriage hits.
From Manila (DIY commute)
Step-by-step
Manila → Baguio (bus): take a late-night trip so you arrive ~2:30–3:30 AM
Recommended bus companies (choose what’s available on your date):
Victory Liner (most frequent schedules)
Genesis / JoyBus (often more comfortable options depending on route)
Solid North (check schedule availability)
PITX luxury option: some trips depart/arrive via PITX depending on operator and season
Baguio → Ampucao: charter a jeep/taxi/Grab depending on group size
Ampucao → MarMax Farm: short transfer; expect rough road near the end
Registration: coordinate at Ampucao Barangay Hall before/around jump-off logistics
Fare + time ranges
Bus Manila → Baguio: varies by operator/seat class and terminal (verify current fare when booking)
Baguio → Ampucao (group charter): ₱1,500–₱2,000 one-way (split)
Baguio → Ampucao (taxi/Grab): ~₱350–₱800 depending on demand/negotiation
Travel time Baguio → Ampucao: ~40–60 mins, around 18–20 km (traffic affects)
Early arrival strategy
Leave Manila late evening so you land in Baguio before dawn. That ~3:00 AM buffer matters because registration and transfers can eat time, and the ridge is safest when you’re already moving in cool air.
From Baguio City
Step-by-step (practical)
Go to the jeep terminal area around Lakandula Street near Petron + Orion Drug / Baguio Center Mall–Magsaysay area (verify exact point on arrival)
Option A (groups): charter a special trip jeepney to Ampucao
Option B (small group): taxi/Grab direct to Ampucao
Continue to MarMax Farm via your arranged last-mile ride
By Private Car
Route notes + arrival target
Aim to be in Ampucao by ~04:00 AM to protect your start window
Expect typical Baguio approach traffic; add extra buffer on weekends/holidays
Last-mile considerations
Road can be rough near MarMax Farm; high-clearance is safer
Vans are often okay, but conditions change—ask locals/guide on hike day
Confirm parking arrangement at/near jump-off in advance if possible

Trail Routes and Difficulty Breakdown (Segment-by-Segment)
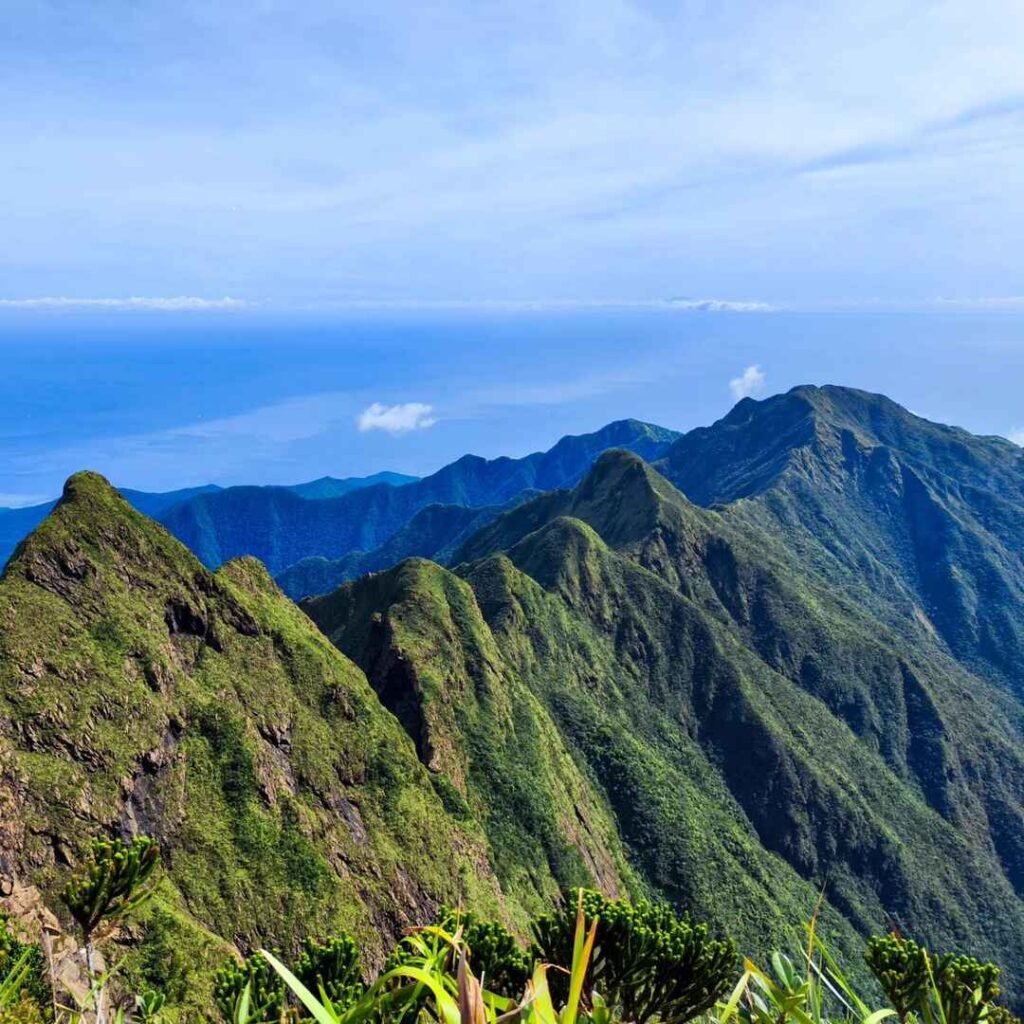
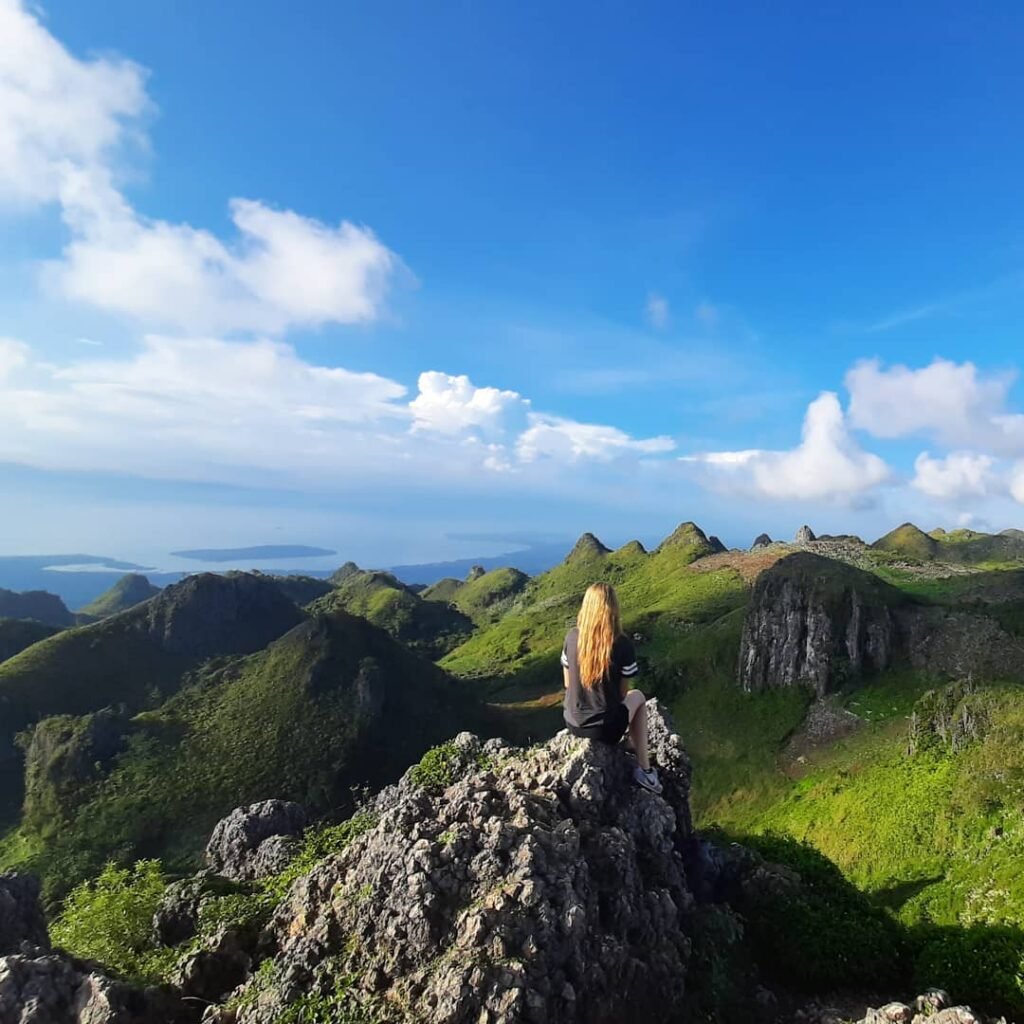
Mt. Kotkot’s difficulty comes less from technical climbing and more from exposure: long ridge walking under sun and wind, plus a steep, loose descent to Sigsiglay that demands focus when you’re tired. Since exact distance and elevation gain vary by GPX and route choice, treat time estimates as ranges and adjust based on your group’s pace. My best strategy here was simple: start early, sip water steadily, and save knees for the exit.
Route summary: MarMax Farm (Ampucao) → Mt. Kotkot summit → ridge traverse toward Mt. Bukaw → Sigsiglay exit
Segment-by-segment breakdown
Jump-off (MarMax Farm) to early trail landmarks
Time: ~1.0–2.0 hours (varies by pace)
Terrain: mixed path, gradual to moderate climb
Exposure/hazards: cool early, but you’ll start feeling wind on open parts
Pacing tip: I kept it deliberately slow here—if you burn out early, the ridge punishes you later.
Landmarks to main ridge
Time: ~1.0–2.0 hours
Terrain: sustained climb sections; possible loose soil depending on season
Exposure/hazards: increasing sun exposure; slippery if damp
Pacing tip: eat small snacks early (every 45–60 minutes) so you’re not “catching up” later.
Ridge traverse to Mt. Kotkot summit
Time: ~1.0–2.0 hours
Terrain: rolling ridge, open viewpoints
Exposure/hazards: full sun, strong ridge winds, dehydration risk
Pacing tip: I used a “walk 10 minutes, sip” rhythm—waiting for thirst is too late.
Summit to Sigsiglay exit (descent)
Time: ~2.0–4.0 hours
Terrain: steep sections; loose gravel + pine needles; can be muddy clay in wet months
Exposure/hazards: ankle sprains, slips, knee strain, fatigue mistakes
Pacing tip: shorten your stride and keep weight centered—this is where trekking poles pay for themselves.
Water strategy
Refill: none reliable on ridge
Carry: 2–3L minimum + electrolytes
Why: ridge exposure + long descent = high sweat loss even on “cool” days
Practical viewpoints/photo spots
Open ridge panoramas (best in early morning light)
Summit area (quick photos—don’t overstay if winds are strong)
Traverse sections with layered Cordillera views (watch footing; don’t shoot while walking)

Recommended Itinerary (Day Hike + Overnight Options)
A Mt. Kotkot day hike works best with a pre-dawn start, tight registration timing, and conservative pacing so you’re off the ridge before peak heat or afternoon weather changes. Most groups finish within 7–10 hours, but delays happen when registration queues are long or someone bonks from dehydration. Overnight is only worth considering if local rules allow camping and your guide confirms safe, sheltered spots—this ridge can be windy and water is a serious limitation.
Day Hike Timeline (Conservative Example)
Time → Activity
03:00 AM → Arrive Baguio (target)
03:15–04:00 AM → Transfer to Ampucao (travel buffer)
04:00–04:30 AM → Registration at Ampucao Barangay Hall + final gear check
04:30–05:10 AM → Start trek from MarMax Farm (ideal window)
07:30–09:30 AM → Reach Mt. Kotkot summit (pace-dependent)
09:30–10:00 AM → Short summit break + photos (eat + electrolytes)
10:00 AM–02:30 PM → Traverse + descent to Sigsiglay exit (careful pacing)
02:30–03:30 PM → Regroup at exit + return transfer
Overnight Option (If Applicable)
Campsite options: Not confirmed in provided notes (verify with LGU/guide if camping is allowed and where)
Wind/cold notes: exposed ridges can be windy; early morning temps can feel cold even in dry season
Water realities: no reliable water source—overnight means carrying more or arranging support (confirm rules)
Leave No Trace reminders: pack out all trash, avoid trampling vegetation, keep noise low near communities

Budget and Sample Expenses (2026)
Mt. Kotkot costs are driven mainly by transport (Manila–Baguio–Ampucao chain), guide share, and whether you DIY or join an organized setup. DIY can be cheaper for groups who split charter costs, while joiner/organized trips trade money for convenience and smoother logistics. I usually “save” on fancy meals and “splurge” on safe transport timing and enough water/electrolytes.
Where to save vs splurge
Save: snacks bought in town, shared transport, simple packed lunch
Splurge: early and reliable transfers, trekking poles if you’re prone to knee pain, extra water/electrolytes
Budget and Sample Expenses (Plain Text Table)
| Line Item | Budget DIY | Mid-Range DIY | Organized Joiner/Private Tour |
|---|---|---|---|
| Transport (RT) | ₱900–₱1,600 | ₱1,400–₱2,500 | ₱2,500–₱4,500 |
| Registration/Environmental Fees | ₱150–₱250 | ₱150–₱250 | Included or ₱150–₱250 |
| Guide Share | ₱250–₱600 | ₱400–₱900 | Included or ₱300–₱800 |
| Food/Snacks | ₱250–₱450 | ₱350–₱650 | ₱400–₱800 |
| Water | ₱80–₱200 | ₱120–₱300 | ₱120–₱300 |
| Rentals (optional) | ₱0–₱200 | ₱150–₱400 | ₱0–₱400 |
| Contingency | ₱200–₱400 | ₱300–₱700 | ₱300–₱800 |
| Total | ₱1,830–₱3,700 | ₱2,870–₱5,700 | ₱3,620–₱7,850 |
Notes: Totals are realistic ranges and depend heavily on group size, charter splits, and current operator pricing. Verify current fees with Barangay Ampucao / guide.

Packing List (PH Mountain Essentials) + Gear Notes
For Mt. Kotkot, pack for sun, wind, and a long descent—hydration and leg protection matter more than “ultralight” bragging rights. I treat this as a water-and-electrolyte hike first, and a photo hike second, because there’s no reliable refill on the ridge. If you bring the basics and start early, the hike feels controlled instead of punishing.
Mandatory checklist
2–3L water (more if slow mover) + electrolytes
Trail food: sandwiches, rice meal, energy bars, nuts
Headlamp (pre-dawn start)
Cap/hat, sunglasses, sunscreen
Light windbreaker (ridge winds + cold early)
First aid basics: bandage, pain reliever, blister care
Emergency: whistle, lighter, emergency blanket
Fully charged phone + power bank
Nice-to-have
Trekking poles (huge help on Sigsiglay descent)
Gloves (for cold morning wind or grip)
Salt tabs / extra electrolyte sachets
Small sit pad for breaks
Seasonal add-ons
Dry season: extra sun protection, lip balm
If shoulder/rain risk: rain shell, waterproof bag/pack cover, extra socks
Water carry recommendation
2L minimum for fast hikers in cool months
3L if you’re a slow mover, it’s hotter, or you cramp easily
Add electrolytes because plain water won’t replace sweat salts
Footwear notes
Trail runners: great for dry ridges and speed, but be cautious on loose descent
Hiking shoes: more ankle support, helpful if you’re prone to rolling ankles
Either way: prioritize traction—dusty laterite and pine needles can be slick

Safety, Etiquette, and Responsible Hiking (Local Rules + LNT)
Mt. Kotkot is safest when you respect the ridge: start early, avoid storm windows, hydrate before you’re thirsty, and treat the descent as the crux of the day. The biggest real risks here are heat exhaustion, lightning exposure on open ridges, and slip injuries on the steep Sigsiglay exit—especially when fatigue sets in. Follow barangay rules, stay with your guide, and practice strict Leave No Trace.
Hazard-specific safety tips
Heat: wear a hat, sip every 10–15 minutes, electrolytes hourly, rest in any shade you find
Lightning: if thunder is present, don’t “push through” exposed ridges—turn back with guide decision
Ridge wind: secure hats and loose gear; wind can chill you early morning
Loose descent: short steps, poles, avoid rushing; keep spacing so falling rocks don’t hit others
Poor visibility: stay close; no hero shortcuts
Buddy system + pacing rules
Pair up; no one hikes out alone on the descent
Keep a steady “conversation pace” early; save legs for the exit
Regular micro-breaks beat long collapses (2–3 minutes every hour works)
Cut-off time discipline
Cut-offs exist because the ridge has limited evacuation options and weather flips fast. If you’re behind pace by late morning, your guide may enforce a turnaround to keep the group safe.
Waste management (pack in/pack out)
Bring a small trash bag; bring out all wrappers
Avoid leaving food scraps (it attracts animals and changes the environment)
Respect locals/farms/sacred areas
Stay on established trails and respect private farm boundaries
Keep noise down near communities; greet locals and follow barangay instructions
Don’t pick plants or disturb fences/markers
FAQs
1) How long is the hike to Mt. Kotkot?
Most groups take 7–10 hours for the Mt. Kotkot traverse, excluding travel and registration time. Actual duration depends on pace, weather, and group fitness. Plan a full day and start before sunrise.
2) What is the difficulty level and why?
Mt. Kotkot is around 6/9 because of long exposed ridges, heat risk, and a steep, loose descent to Sigsiglay. It’s not highly technical, but it’s physically demanding and punishes poor pacing.
3) What time should I start hiking?
A safe start window is 04:30–05:10 AM. Starting early helps you finish major ridge exposure before peak heat and reduces the chance of getting caught in afternoon storm conditions.
4) What are the fees and is a guide required?
Expect an environmental/registration fee around ₱150 per person (verify latest), plus guide-related costs. A local guide is required and typically assigned through barangay registration.
5) Is there a water source on the trail?
Water sources on the ridge are none/unreliable, so plan to be self-sufficient. Bring 2–3 liters plus electrolytes; increase if it’s hot or your pace is slower.
6) Is it safe to hike during rainy season?
Rainy season (often June–October) is not recommended because trails turn muddy and slippery and the ridge is exposed to lightning. Only hike with strong forecast confidence and LGU/guide approval—and be ready to cancel.
7) How do I commute to the jump-off from Manila?
Take an overnight bus Manila → Baguio, target arrival around ~3:00 AM, then transfer Baguio → Ampucao by charter jeep/taxi/Grab. From Ampucao, proceed to MarMax Farm and complete registration logistics at the barangay.
8) Is there cell signal on the trail?
Cell signal is partial/intermittent, usually better on open ridges. Don’t rely on it for safety; assume there will be dead spots and keep the group together.
9) Can beginners hike Mt. Kotkot?
Fit beginners can, but it’s best as a “level-up” hike after a few long day hikes. If you’re sedentary or new, the sun exposure and steep descent can be risky without conditioning.
10) What’s the best month to hike it?
January to early March is the best window for cooler mornings and generally drier trails. Shoulder months can work but may be hotter; always verify the forecast and barangay advisories.
Recommended Reads
If you’re already hiking Mt. Kotkot in Itogon, it’s smart to extend your Cordillera trip with nearby lakes, flower farms, and tougher climbs while your body is already acclimated to the cold mornings and highland pace. I use these guides to build a more complete Benguet–Cordillera itinerary—either as next-day side trips or as “next level” mountains once you’re confident on exposed ridges.