The Fast Facts: Mt. Kulis
Location: Brgy. Cuyambay/Laiban, Tanay, Rizal (Jump-off at Sitio Maysawa)
Elevation: ~620 Meters Above Sea Level (MASL)
Difficulty: 2/9 (Dry Season) | 4/9 (Wet Season)
Note: The difficulty doubles when the lateritic clay soil gets wet. It becomes like peanut butter—sticky and slippery.
Specs of Mt. Kulis: Minor Climb; 2-4 hours to complete the circuit (heavily dependent on photo queues).
Connectivity:
Smart: Strong / LTE (Reliable for posts and calls).
Globe: Dead spot / Intermittent (Do not rely on this for emergency comms).
Let’s be real: Mt. Kulis is the poster child for the “Instagram Mountaineering” era in the Philippines. It is easily the most accessible spot near Metro Manila to chase the elusive “Sea of Clouds,” but that accessibility comes with a steep price—crowds that can rival a mall sale on payday. This guide covers everything you need to know about the Mt. Kulis circuit in Tanay, moving past the filtered social media photos to the gritty logistics of queue lines, treacherous red clay mud, and strict local ordinances.
It is crucial to set your expectations straight before you drive up the Marilaque Highway. This isn’t a wilderness expedition into the unknown; it is a regulated loop inside the Fresno Agro-Forestry Eco-Tourist Campsite. You aren’t conquering a remote peak so much as navigating a highly managed eco-tourism zone.
If you are looking for a zero-effort view, you might be better off at Treasure Mountain, where you can drive partially to the campsite. But if you want a legitimate hike that balances physical activity with rewards, Mt. Kulis is the spot. However, do not let the “tourist trap” label lower your guard. If the Amihan winds bring rain, the trail on Mt. Kulis transforms from a “walk in the park” into a chaotic slip-and-slide that will punish your knees—unlike the rocky but stable terrain of Nagpatong Rock.
We are here to help you navigate the bureaucracy, time your ascent for the thermal inversion, and get you back to the jump-off without leaving your trash—or your dignity—on the mountain.
💡 The Local Beta (Pro Tip): The “Sea of Clouds” is a meteorological event, not a permanent fixture. To catch it, you need to be at the Mt. Kulis ridge (Camp A) before 05:30 AM. For a broader look at where to spot this phenomenon, check our list of 10 Must-Visit Sea of Clouds in Tanay. Also, please practice strictly Leave No Trace (LNT). This is private agro-forestry land; throwing your plastic wrappers on the trail threatens the access for everyone else.
Table of Contents
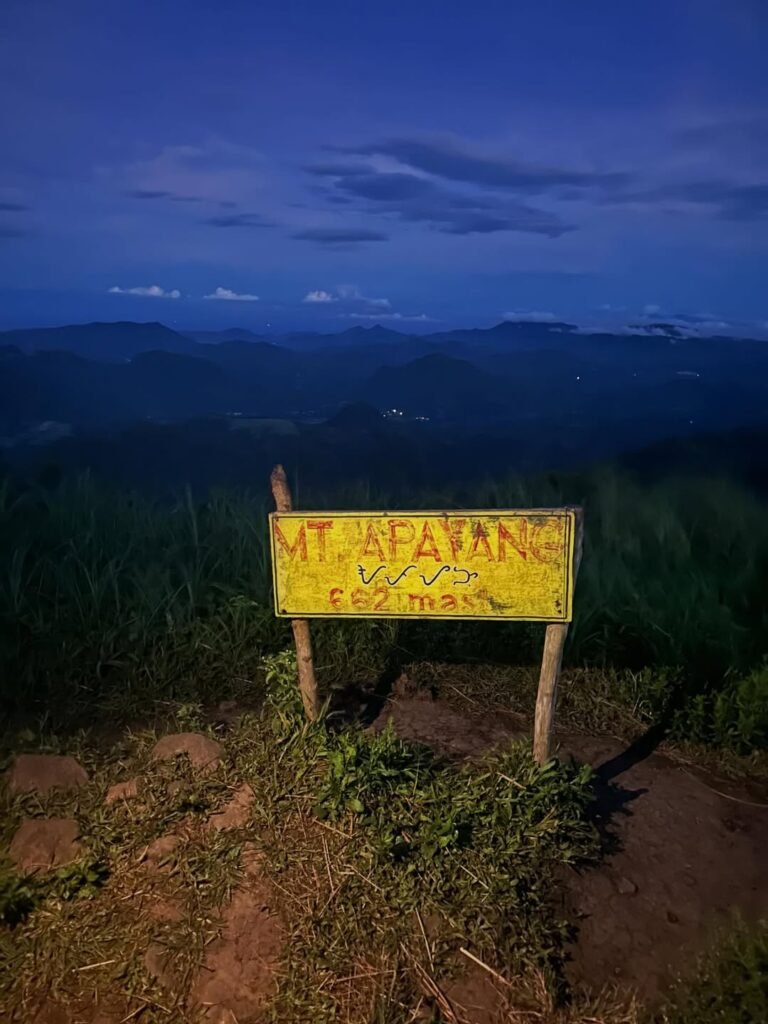
Pre-Climb Requirements (2026 Protocols)
To enter Mt. Kulis in 2025, the bureaucracy has simplified. You primarily need valid Identification (for the manifest), cash for the various fees, and a signed Liability Waiver.
Gone are the days of the strict pandemic health checkpoints. However, do not mistake “relaxed rules” for “no rules.” The process is now focused on waivers and fees rather than health docs.
The “Medical Certificate” Myth (2025 Update)
Let’s clear the air: You generally do not need a Medical Certificate to hike Mt. Kulis anymore. While you might see old blogs or outdated LGU ordinances mentioning it, the on-ground reality at Fresno Agro-Forestry is that they rely on the Liability Waiver. By signing this at the gate, you declare yourself fit to climb and release them from liability.
Caveat: If you have a known pre-existing heart condition or severe asthma, common sense (and veteran advice) dictates you should get clearance anyway. If you want a more physically demanding challenge where fitness is non-negotiable, consider the Mt. Daraitan and Tinipak River Trail.
The “Double Log-In” Process
Navigating to the trailhead still involves a two-step registration dance that you cannot skip:
Barangay Log-in: Your vehicle (or tricycle) must stop at the Tourism Desk in Sitio Maysawa. You will log your group for the manifesto and pay the Local Environmental Fee (approx. ₱20-50/head).
Fresno Agro-Forestry Log-in: After the bumpy ride down the dirt road, you reach the main campsite gate. Here is where you pay the Entrance Fee (₱200-300), secure your Mandatory Guide, and sign the Waiver.
Booking vs. Walk-ins
Day Hikes: Walk-ins are the standard. Just arrive between 4:00 AM and 5:00 AM to beat the queue.
Overnight / Kubos: If you want to rent a Kubo (native hut), reservations are still highly recommended. These units are limited and sell out weeks in advance during the dry season.
The Local Beta (Pro Tip): Bring a pen. Seriously. There is often only one ballpoint pen at the registration desk shared by 50 impatient hikers. Having your own pen lets you sign the waiver and logbook immediately, potentially saving you 15 minutes of standing in line while the sun starts to rise.
How to Get to Mt. Kulis (DIY Commute vs. Private)
To reach Mt. Kulis via public transport, follow this exact route. Expect a total travel time of 2.5 to 3 hours from Cubao.
Cubao to Cogeo: From Aurora Blvd (near Gateway/LRT), take a Jeepney or UV Express bound for Cogeo Gate 2 or Cogeo Market (Fare: ~₱35 – ₱40).
The Transfer: Alight at Cogeo Gate 2. Walk towards the City Mall of Antipolo. The jeepney terminal for the uplands is located alongside or near this mall. Look for the signage “Sampaloc” or “Tanay (via Marilaque)”.
The Drop-off: Board the jeep and tell the driver or conductor to drop you at Sitio Maysawa (Fare: ~₱60 – ₱70). First trip usually departs around 4:00 AM.
The Final Leg: At the Sitio Maysawa junction (landmark: large tarps and a waiting shed), hire a tricycle to the Mt. Kulis / Fresno Agro-Forestry registration area. (Fare: ₱150 per tricycle / “Special Trip”, good for up to 4 pax).
The Commuter’s Reality
Getting to Mt. Kulis is a tale of two roads: the smooth, winding asphalt of the Marilaque Highway and the jarring, suspension-wrecking dirt track of the final kilometer. If you are commuting, the “Crux” of the journey is often the transfer at Cogeo. It is a chaotic transport hub. Ask the barkers specifically for “Maysawa” to ensure you don’t end up on a jeep going to Paenaan.
For Private Vehicles: The Sedan Warning
If you are driving to Mt. Kulis, pin “Fresno Agro Forestry and Eco Tourist Campsite” on Waze. The drive along Marilaque is straightforward, but the final 1.5 kilometers from the highway turnoff to the campsite gate is unpaved.
Critical Warning: If you are bringing a sedan or hatchback:
In Dry Conditions: It is dusty and uneven, but passable if you drive slowly.
In Wet Conditions: If it rained recently, DO NOT force a 4×2 sedan down this road. The red clay turns into a viscous, slippery trap. It is smarter to park your car at the guarded spaces in the Sitio Maysawa junction and pay for a tricycle to bring you inside.
💡 The Local Beta (Pro Tip): The return trip is the hardest part of a DIY hike here. Jeepneys coming from Sampaloc are often full by the time they pass Sitio Maysawa in the afternoon. Instead of waiting hopelessly by the highway, try to coordinate with a tricycle driver to bring you further up to the Sampaloc Terminal to secure a seat. While you are in town, you can explore other Tanay Rizal Tourist Spots.
The Trail Description: What to Expect on Mt. Kulis
Trail Specs (Full Circuit):
Total Duration: 3–5 Hours (Heavily dependent on photo queues).
Terrain: Open Grassland (Ridge) > Slippery Clay (Descent) > Riverbed > Steep Dirt Road (Ascent).
Elevation: ~620 MASL (Summit) dropping to ~400 MASL (River).
The trail conditions on Mt. Kulis vary drastically depending on the rainfall. In the height of summer (March-May), it is a dusty, sun-baked walk similar to the open trails of Mt. Batolusong. In the wet season, however, the lateritic clay transforms the path into a friction-less mud slide that effectively doubles the difficulty rating.
Phase 1: The Ridge & The Photo Ops (Camp A)
Stats: ~30-45 mins to Summit from Jump-off. Easy/Rolling.
The hike begins on a wide, established dirt path that cuts through rolling hills of sharp Cogon grass. There is zero tree cover here. You will quickly reach Bahay ni Cardo, the summit hut popularized by Ang Probinsyano. It offers a legitimate 360-degree view of the Sierra Madre.
However, the reality of Mt. Kulis hits hard at “Noah’s Ark.” This limestone formation with a wooden boat structure is the most photographed spot on the mountain. On weekends, the bottleneck here is severe. You might hike for 30 minutes and then stand in a queue for 90 minutes just for a 2-minute photo window.
Phase 2: The Descent to the River (Camp B)
Stats: ~45 mins Descent. Moderate to Steep.
After the ridge, the trail drops sharply into the valley toward Lion House Falls and Twin Rock. This is the technical crux of the circuit. The trail is carved directly into red clay. If it has rained recently, this section becomes a dangerous “mud chute.” While there are intermittent rope segments, they are often caked in mud.
Once you reach the bottom, the vibe shifts. The air is cooler, damp, and shaded by canopy. You can swim in the natural pools to wash off the grime—a refreshing break, though perhaps less spectacular than the 8 waterfalls of Mt. Maynuba & Mt. Cayabu. Remember strict LNT protocols: No shampoo, soap, or detergents allowed.
Phase 3: The Ascent (The Monster Jeep Option)
Stats: ~1 Hour Hike (Ascent) OR 20 Mins (Jeep). Strenuous.
What goes down must come up. The hike back to the trailhead from the river is a straight-up “heartbreak assault” on a steep fire road. It is a monotonous, lung-busting climb with little shade.
If your legs are shot, there is a bailout option: The Monster Jeep. These modified, lifted jeepneys ply the route between the river and the campsite. For a standard fee (usually around ₱50 per head), you can skip the exhaustion and experience a thrill ride as the massive tires chew through the mud.
💡 The Local Beta (Pro Tip): If the queue at Noah’s Ark is demoralizing (100+ people), peel off and head to Sambong Peak nearby. It offers a nearly identical vantage point of the Sea of Clouds but with a fraction of the crowd.
Suggested Mt. Kulis Itineraries
Timing is everything on this mountain. To catch the thermal inversion, you must be walking before dawn.
The window for the “Sea of Clouds” on Mt. Kulis is notoriously short. It typically forms around 5:00 AM and burns off completely by 7:30 AM. If you arrive late, you aren’t chasing clouds; you are just hiking in the heat.
Option A: The “Sea of Clouds” Chaser (Day Hike)
This is the standard tactical approach for DIY hikers.
03:00 AM: Depart Metro Manila (Cubao/Marikina area).
05:00 AM: Arrival at Sitio Maysawa. Complete the double registration.
05:30 AM: Start Trek. Head straight to the ridge.
06:00 AM: Summit Area / Noah’s Ark / Sambong Peak.
08:00 AM: Descent to Falls/River.
09:30 AM: Swimming / Rest at the river.
10:30 AM: Take the Monster Jeep or hike back up to the jump-off.
11:00 AM: Wash up. Head to Sampaloc for a hot bowl of Lomi.
Option B: The “Stargazer” (Overnight)
The real “hack” for Mt. Kulis is staying overnight. By camping, you bypass the morning rush entirely and get access to the photo spots like Noah’s Ark during the “Golden Hour” (sunset).
Day 1: Arrive at 3:00 PM. Set up camp. Watch the sunset. Quiet hours start at 10:00 PM.
Day 2: Wake up at 4:30 AM. Walk 5 minutes to the viewing deck. Enjoy the view without the stress.
Mt. Kulis Budget Breakdown (2026 Estimates)
The safe budget for a DIY Mt. Kulis day hike is roughly ₱1,200 per person (assuming a group of 4-5 sharing costs).
Prepare small bills (₱20, ₱50, ₱100). The local transaction culture is strictly cash-based.
| Expense Item | Cost (PHP) | Notes |
| Mt. Kulis Entrance (Day Tour) | ₱200 – ₱300 | Per head. Paid at main gate. |
| Guide Fee (Mandatory) | ₱500 – ₱800 | Good for 5 pax. Tip not included. |
| Tricycle (Maysawa to Jump-off) | ₱150 | Per way. Good for up to 4 pax. |
| Environmental / Brgy Fee | ₱30 – ₱50 | Collected at the Brgy. Hall outpost. |
| Camping Fee (Own Tent) | ₱200 | Per tent. Tent rentals cost extra (~₱500). |
| Monster Jeep (Internal) | ₱50 | One-way fare (River to Camp). |
| Estimated Total (DIY) | ~₱1,200 | Includes food and transport allowance. |
The Hidden Costs:
Don’t get budol-ed (scammed) by your own lack of planning. Factor in the bathroom fees (₱20 per shower) and the overpriced bottled water at the campsite.
The Local Beta (Pro Tip):
Post-hike, skip the fast food on the highway. Stop at Ate Gendel’s Lomi House or any roadside carinderia in Sampaloc. Order the “Special Lomi”—it costs less than ₱100 and is the perfect recovery meal.
The “Gear Watch”: What to Wear & Bring
If you bring white sneakers to Mt. Kulis, you are effectively throwing them away. The red lateritic clay in Tanay stains permanently.
Your gear for Mt. Kulis needs to handle two extremes: scorching heat on the ridge and sticky, viscous mud in the valley.
-
Footwear (The “Anti-Slide” Protocol): Hiking sandals with aggressive lugs (at least 4mm deep) are the superior choice here. Brands like Sandugo, Lamibato, or Tribu are ideal. If you wear closed shoes, use trail runners. Do not wear canvas sneakers; they will turn into “slicks” on the clay, and you will slide down the trail—a hazard you’d also face on the slopes of Mt. Maynuba.
-
Hygiene Kit (The “Tabo” Reality): Let’s manage expectations: the comfort rooms (CRs) are “tabo-style” (bucket flush) and generally do not have bidets or tissue stock.
-
Must-bring: Wet wipes, a portable bidet, and alcohol.
-
-
Sun Protection: The ridge near Noah’s Ark is 90% exposed. An umbrella (payong) is actually very common and effective here, or wear a wide-brim hat.
-
Power & Tech: There are no electrical outlets in the tents. Signal for Smart is strong enough to drain your battery if you keep uploading Stories. Bring a 10,000mAh power bank.
Frequently Asked Questions (FAQs)
1. Is Mt. Kulis beginner-friendly?
Yes, but with a major “weather asterisk.” Physically, Mt. Kulis is a 2/9 difficulty rating—it’s a minor climb that even children can complete. However, if it rains, the difficulty spikes to a 4/9 solely because of the terrain. If you want a beginner hike that remains relatively safe even with some rain, you might prefer Treasure Mountain.
2. Is the “Sea of Clouds” guaranteed at Mt. Kulis?
No. It is a weather phenomenon, not a scheduled show. The “Sea of Clouds” relies on thermal inversion. Your best chances are during the Amihan season (November to February).
3. Can we bring pets to Mt. Kulis? Yes,
the campsite is pet-friendly. However, you must keep them on a leash at all times. The ridge trails near Noah’s Ark and the Spider Web have steep drops into the karst ravines.
Conclusion
Mt. Kulis represents the new wave of Philippine outdoor travel: it is less about “mountaineering” in the traditional sense and more about the “eco-tourism lifestyle.” It doesn’t require the technical skills of the Masungi Georeserve rope courses, nor the endurance of Mt. Daraitan. It is accessible, photogenic, and relatively cheap.
However, its accessibility is its double-edged sword. It attracts crowds who may not be familiar with outdoor ethics. Your mission is to enjoy the view without adding to the degradation of the place. Whether you are there for the summit photo or just to escape the city smog, treat the mountain with the same respect you would a major peak.
Just remember: Respect the locals, practice strict Leave No Trace, and never, ever underestimate the mud on Mt. Kulis.


